CorsePerVita

Joined: 25 Jul 2008
Posts: 1992
Location: Redmond, Oregon
|
 Posted: Sun Sep 01, 2013 3:27 pm Post subject: How to: GTS Lights with Projectors Posted: Sun Sep 01, 2013 3:27 pm Post subject: How to: GTS Lights with Projectors |
 |
|
I've taken tons of inspiration from other how to guides on this. Namely these:
The "How to Make GT Headlights" Guide part 1
The "How to Make GT Headlights" Guide part 2
And finally, if you plan on using the actual buckets for this project, I recommend Claude's buckets as I found the quality to be good.
Here is a link to his thread on buying them
Could you make your own for a lot less? Well, yes, if you want, you can use the above guides. However, since the buckets are fairly thick, they are very rigid, don't really flex and overall it was nice to not have to bend metal. I got tired of trying to thicken my carbon fiber buckets I had made and finally said "Screw it" - if you want the ease, spend the money.
So what'll it be, is your time more valuable and you want to spend the money on buckets/lenses? Or is it worth it to just be done? Up to you! That's the idea of this tutorial is OPTIONS.
Step 1, what you will need:
- You will need buckets. Either creating them above in one of the tutorials, or by buying them.
- 2 headlight relays (if you're rewiring things, my car has nothing remaining of the original harness, so I needed them, if your car is stock, you might not!). I use part # 192D from Napa. This is a "Heavy Duty ISO base relay) 1 for high beam, 1 for lowbeam, unless you have one of those fancy pants projector sets that do it already, mine have separate bulbs.
- If you use a similar setup to mine you may need anywhere from 16 to 20 10mm head bolts with matching washers and nuts. If you find something you like more than that, go for it.
- Donor projectors or whichever projectors you desire - of course your tastes in projectors may vary. Mine was a donor set from a focus conversion kit, then I tore the kit to pieces and yanked the projectors out of them. But what you'll be looking for is a set of projectors that have a base you can bolt to a flat surface and adjust.
Some examples include these or these
- Ballasts and bulbs... here is a link to a kit although realistically I am not sure what is in my car because it was from a donor car. All I know is that mine are roughly 4500k. If you don't want to be obnoxious, 4500k to 6000k are close to white with a hint of blue. Anything above 6000k is that obnoxious blue and the really low stuff is also an odd color. I find 4500k and 6000k to be "what I like" but of course, you do whatever you want.
If you are unsure as to what kit will fit your car, it is probably best to go to a parts store, tell them what you're looking for, and order it all in one to make sure it works (and also so you can see them and make sure you are getting what you want)....
Another alternative is to find some kit on craigslist for sale that someone is selling, gut it out, and use it for what you want.
Step 2, determining how to place your projectors:
Jumping right into the nitty gritty here, if you've got all the above, then the first thing we need to do is determine exactly how deep your projectors are and then precisely how high up we can get them before they touch the lense. The reason for this is that GT lights largest suffering is that the 4x6 bulbs sit low, so all the light cannot get over the bucket angle.
However, on a projector setup, we have a bit more wiggle room if we can get them up higher.
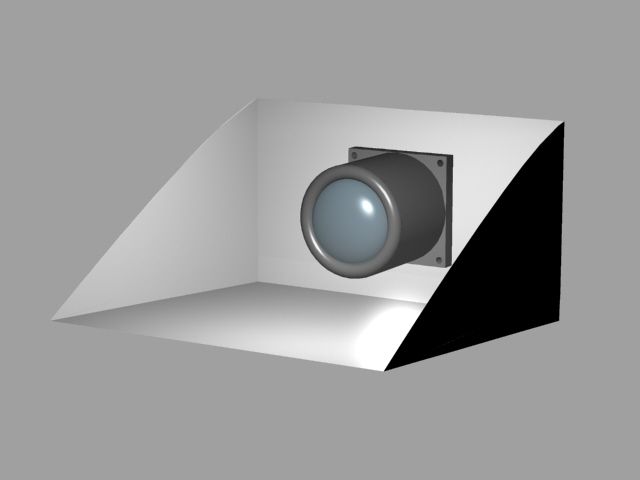
Here are some ways to do this. I'm not going to make exact measurements because realistically your projectors you choose may be different that mine. The principal will be the same, which is that on the back of projector setups there is a "bulbous" round area and then a flat area. You'll need to cut a hole just big enough for the bulbous area to clear your buckets, and then drill holes where they will sit.
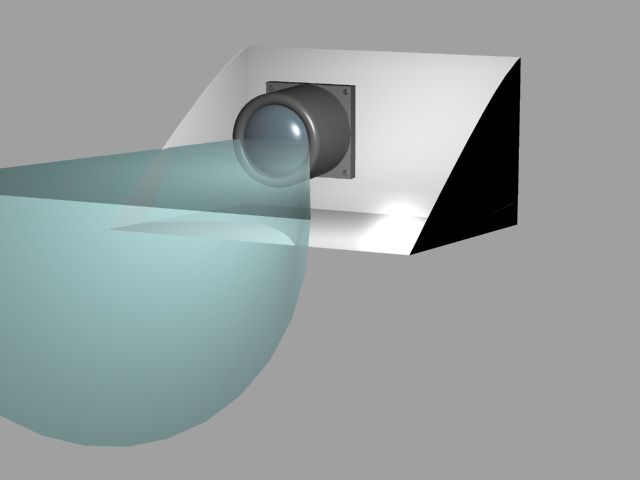
Here are some 3D renderings to show you exactly how this works.
Keep in mind, projectors generally have a "cut off" which keeps them from going up TOO far and basically blinding anyone in your path. If you've ever seen a terribly done HID system going down the road, it's generally a ricer, and the lights are generally so bright that it hurts to even look in the general direction. Likely because they removed the cut off, or installed a kit without one, or removed it.
Make sure yours have a cut off...
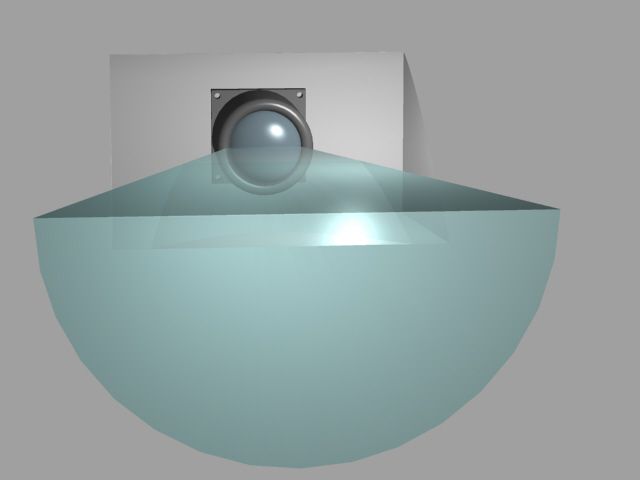
In other words, this means the projectors will project straight out in front and stop at a straight line, half cone shape. I've demonstrated this in the renderings, as well as an idea of what happens to the light based off of various configurations of being off to the side, or in the center, as well as why it's important to measure the length of your projector so it doesn't rub the lense.
This is essentially what it looks like
From the side, properly placed, not rubbing the lense and centered. (buckets are seethrough for your viewing pleasure)
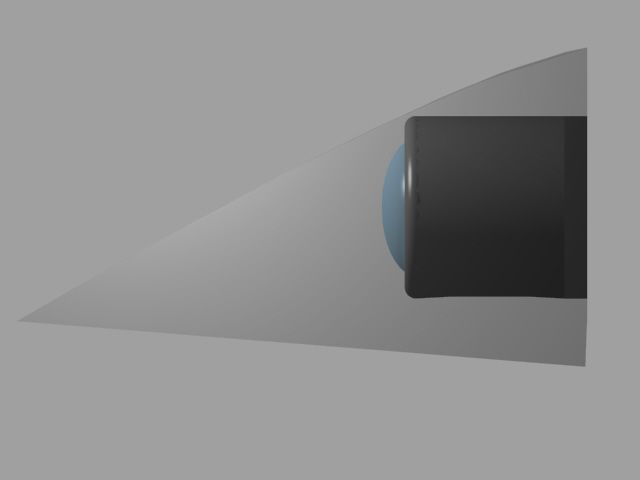
The importance of measuring your projectors
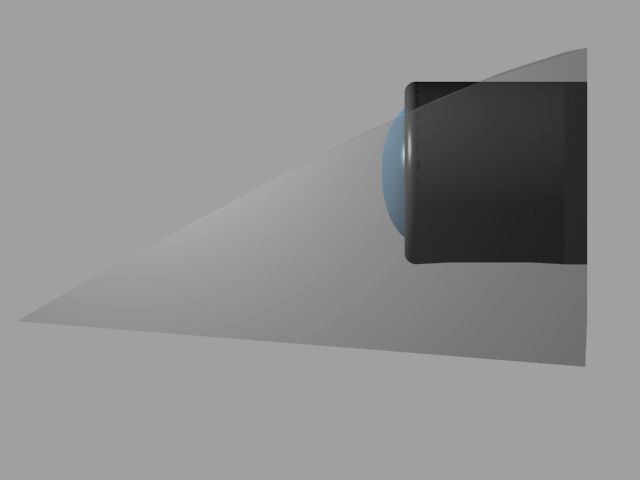
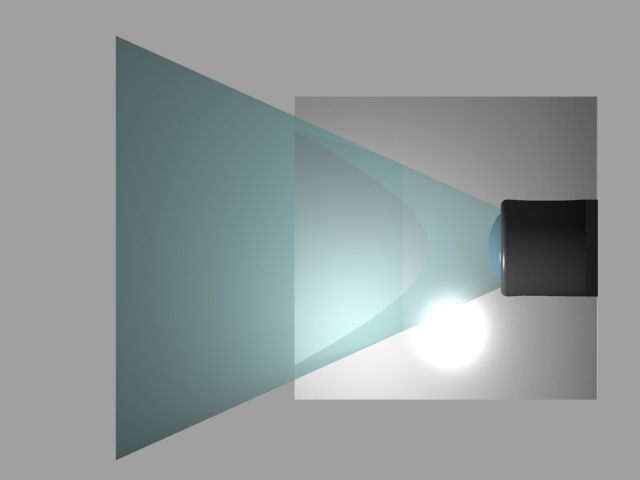
The idea of what buckets and projectors do with the cutoff effect
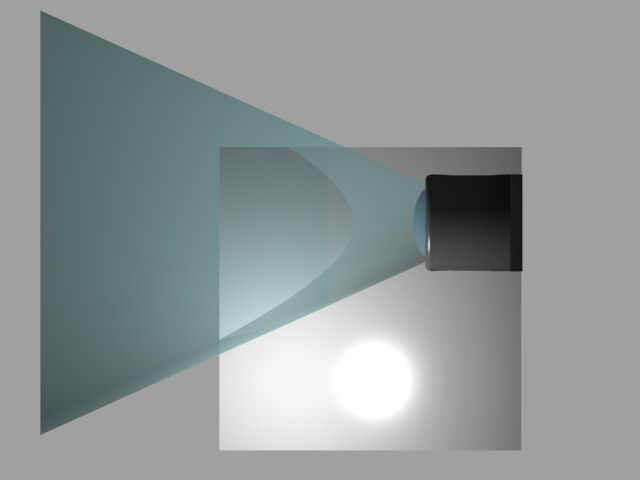
With the projector off to one side, the light can only make it so far. You still get decent light of course, but not the same as if it were strictly in the center.
Centered
To the side
The red ring would indicate the diameter of the cutting bit you need (I used a circular bit with teeth, circular saw bit), in the end, this will allow your projector to go through the bucket and sit flush against the back
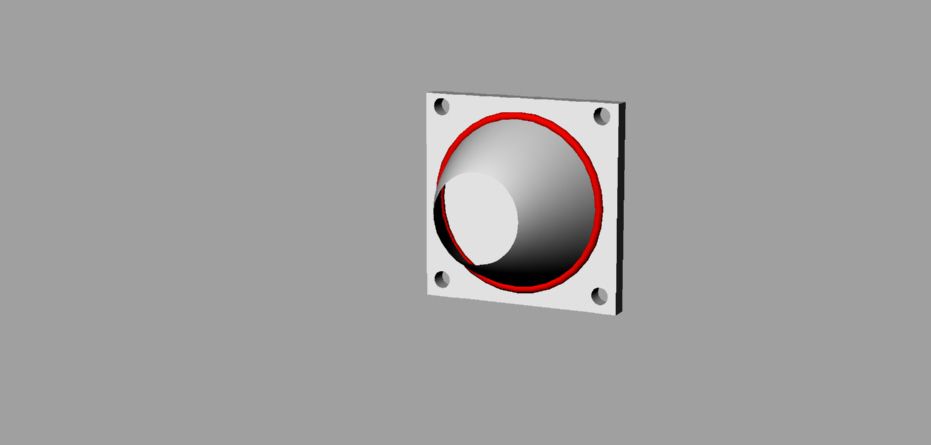
End result, back of the bucket

Step 3, installing them.
Once you've determined how you want to do your projectors, be it the side, or the middle, whatever, you need to make measurements. Once you've measured and ensured that you have marked the back of the bucket you'll want to likely use a drill press with a circular saw bit. Keep in mind, the diameter needs to resemble the red circle up above. If it is too big, your projectors might actually fall through and not fit the bucket. If it's too small, well, they won't go all the way through, and that will suck.
If you have made fiberglass buckets, it's highly advised to go with LIGHT pressure because drill bits with high pressure tend to tear the living crap out of fiberglass and carbon fiber. If you have carbon fiber buckets, put some masking tape over the area you plan on drilling and then drill into it, this helps the fraying a bit.
You'll want to drill the main hole(s) for the projector(s). Once this is done, line them up flush and drill the holes for the bolts you plan on using.
The way I adjust mine is by shimming them with washers of various sizes, this is the easiest for me, although probably not the prettiest way of shimming them to adjust the position of your projectors, but, if you are going function over form, this will work.
Alternatively, if you have a fancy pants kit that comes WITH adjustment hardware, USE IT, because it'll be far less primitive.
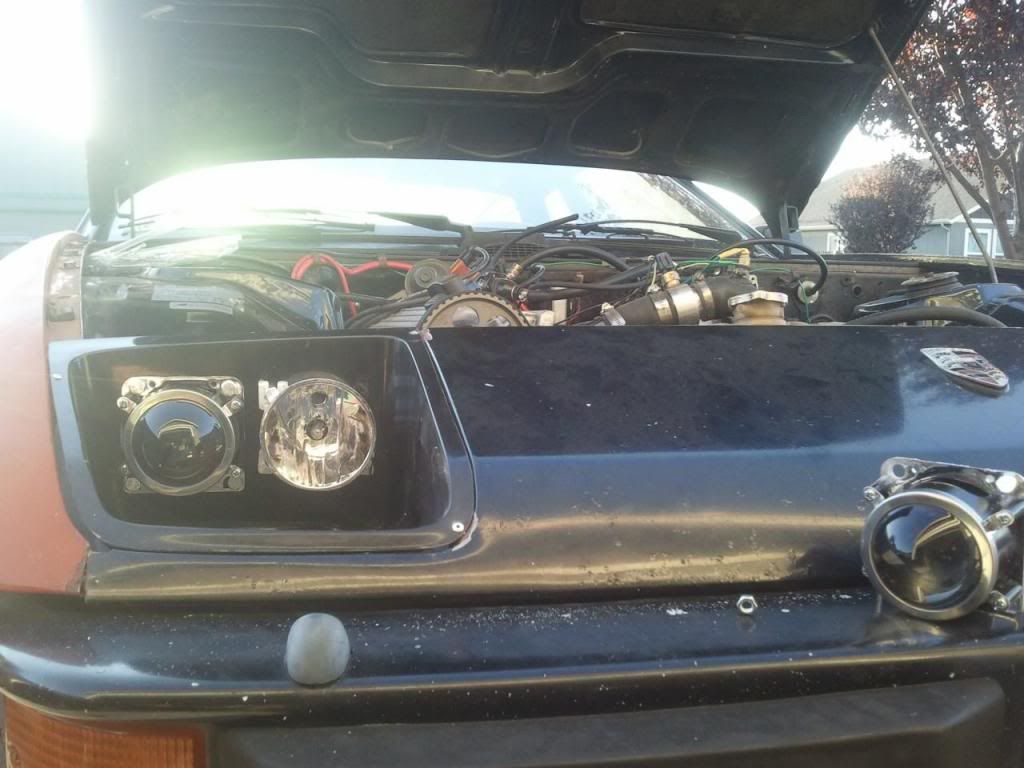
Once your projectors are mounted, you should have something like this:
Step 4, wiring those puppies in!
A lot of people get overwhelmed with wiring but it's really not all that hard. Thankfully, most projectors are 2 wires per bulb. In other words, you'll hook up the ballasts and everything and then connect 2 wires (positive/ground) and that's it!
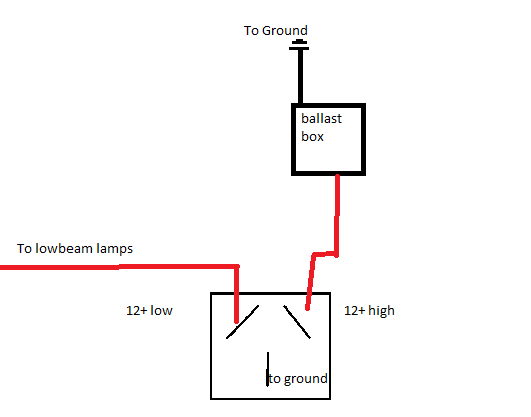
Here's the simple way to do this...
I cannot recall which 3 prong part of the headlight assembly is lowbeam and which is high beam. However, if you get out a multimeter, you can probe. So you'll want to figure out which part of the prong is the ground for the headlights. Then you'll want to probe and write down which part of the plug is high beam and which part is low beam.
If I recall, they will look something like this.
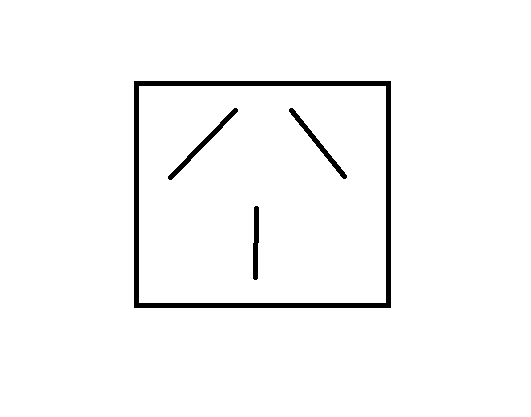
The lowbeam 12+ goes to a specific relay. The highbeam 12+ also goes to a specific relay, and of course the ground is ground.
What you will essentially want to do, is hook the highbeam up to your 12+ that turns on the ballast kit for your projector, and of course, you can hook up the ground as well.
You'll want to do the same for lowbeam and the lowbeam part of your projector.
Now... if you've got 2 projectors per side, instead of this going to "ballast box" you'd have 2 ballast boxes, and the lowbeam would simply go to the ballast box for the "lowbeam projector" instead of the "lowbeam lamp" - The reason I say lowbeam lamp is because so many of these kits have a lowbeam lamp and then the projector is considered the high beam.
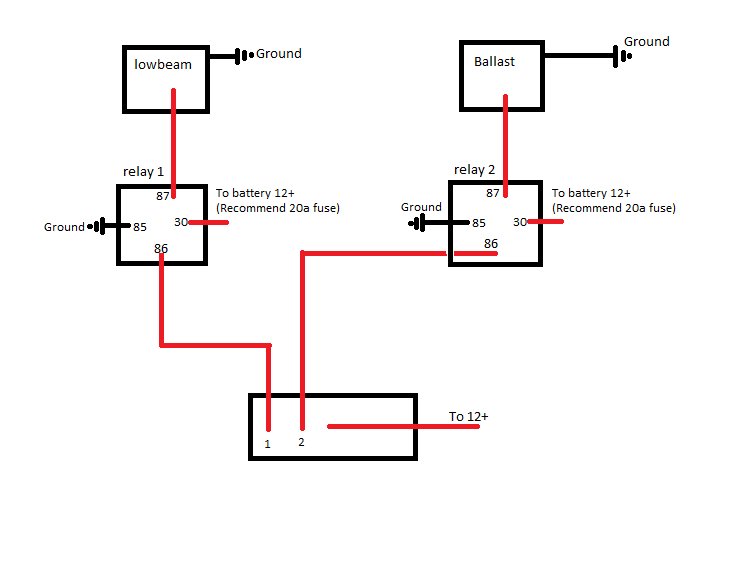
Alternatively, if you wanna be one of the kool kats and make your own wiring, here is a simple 2 relay setup to make a "high beam" and "low beam" setup. You will need a 2 way toggle, in other words, a switch that has an "off" and a "position 1" and "position 2" (some may call that a 3 way). This will allow you to toggle high and low beams. Although, the alternate method to wiring this if you don't want to run a switched 12v setup is to ground switch the relays. Although that's all up to you.
If someone could confirm the actual wiring and picture of one of the headlamp plugs on the 924 (I can do it to my own as well when time permits) I would happily cook up a wiring diagram for a "direct wire in"...
Hope this helps someone.
_________________
- 1977 Porsche 924 2.0 N/A (Trackday Project)
- 1979 Porsche 924 2.0 N/A (The other daily)
- 1980 Porsche 931 (Daily)
- 1987 Lamborghini Jalpa
- 1999 Ducati 900SS |
|

