 |
924Board.org
Discussion Forum of 924.org
|
| View previous topic :: View next topic |
| Author |
Message |
CorsePerVita

Joined: 25 Jul 2008
Posts: 1992
Location: Redmond, Oregon
|
 Posted: Tue Aug 28, 2012 9:03 pm Post subject: Posted: Tue Aug 28, 2012 9:03 pm Post subject: |
 |
|
Yep that was it. My battery is dead, charging. But proof that I had a signal. In fact, the engine rpms even showed up for a few moments.

I had my fuel pump turned OFF during the testing so there was no pressure in the system or fuel going anywhere. Once it charges up tomorrow I'll give it another try. SO CLOSE.
_________________
- 1977 Porsche 924 2.0 N/A (Trackday Project)
- 1979 Porsche 924 2.0 N/A (The other daily)
- 1980 Porsche 931 (Daily)
- 1987 Lamborghini Jalpa
- 1999 Ducati 900SS |
|
| Back to top |
|
 |
CorsePerVita
Joined: 25 Jul 2008
Posts: 1992
Location: Redmond, Oregon
|
|
| Back to top |
|
|
RC

Joined: 25 Mar 2007
Posts: 2637
Location: Australia
|
| Posted: Tue Aug 28, 2012 9:17 pm Post subject: |
|
|
Sweet as.
But as you intended to let MS control the ignition (dwell, advance & more) you need the IGBT coil output stage, or something similar. The coil needs to be replaced with a resistor at this input stage. Remember with the dizzy fixed there is no advance, so will run like crap. Although it should start & run with say 15* fixed BTDC to test.
Success feels good eh?
More to come. 
_________________
World`s quickest 924 2L slushbox
| Allan @ DTA wrote: | | I have no issue with superchargers, they are for guys who want to drive a car rather than talk about horsepower with their baseball cap on backwards |
|
|
| Back to top |
|
|
CorsePerVita
Joined: 25 Jul 2008
Posts: 1992
Location: Redmond, Oregon
|
| Posted: Wed Aug 29, 2012 4:48 pm Post subject: |
|
|
I have everything but spark. Pump primes properly. Pressure looks good. No leaks, injectors fire. Good to go. Need a coil driver mod (which I just ordered) and I should be set  Just waiting on parts (again). Just waiting on parts (again).
_________________
- 1977 Porsche 924 2.0 N/A (Trackday Project)
- 1979 Porsche 924 2.0 N/A (The other daily)
- 1980 Porsche 931 (Daily)
- 1987 Lamborghini Jalpa
- 1999 Ducati 900SS |
|
| Back to top |
|
|
CorsePerVita
Joined: 25 Jul 2008
Posts: 1992
Location: Redmond, Oregon
|
| Posted: Wed Aug 29, 2012 4:53 pm Post subject: |
|
|
I think I need a better resistor... I am using one designed for microcontrollers (5v circuits, weak resistance). My triggering is not missing any values, but it's a weak trigger on and off, not consistently strong. I ordered an entire $4 worth of resistors and electronics parts (which is realistically like 50 pieces thanks to digikey lol). So I will try a different one when it gets here.

_________________
- 1977 Porsche 924 2.0 N/A (Trackday Project)
- 1979 Porsche 924 2.0 N/A (The other daily)
- 1980 Porsche 931 (Daily)
- 1987 Lamborghini Jalpa
- 1999 Ducati 900SS |
|
| Back to top |
|
|
RC
Joined: 25 Mar 2007
Posts: 2637
Location: Australia
|
| Posted: Wed Aug 29, 2012 9:16 pm Post subject: |
|
|
Derek, a "better" resistor is like saying... WTF? Resistors have various properties, resistance obviously, measured in ohms. Different value possibly, higher wattage maybe, different type umm.. better is metal film, wire wound for higher power (wattage). It all depends on the application. Guess you are using 1/4 watt carbon or possibly 1/8W? They would probably have a max Voltage rating of a few hundred V, but at least 100V so thats not an issue. just google for more info or read a bit of the basics here on wiki:
http://en.wikipedia.org/wiki/Resistors
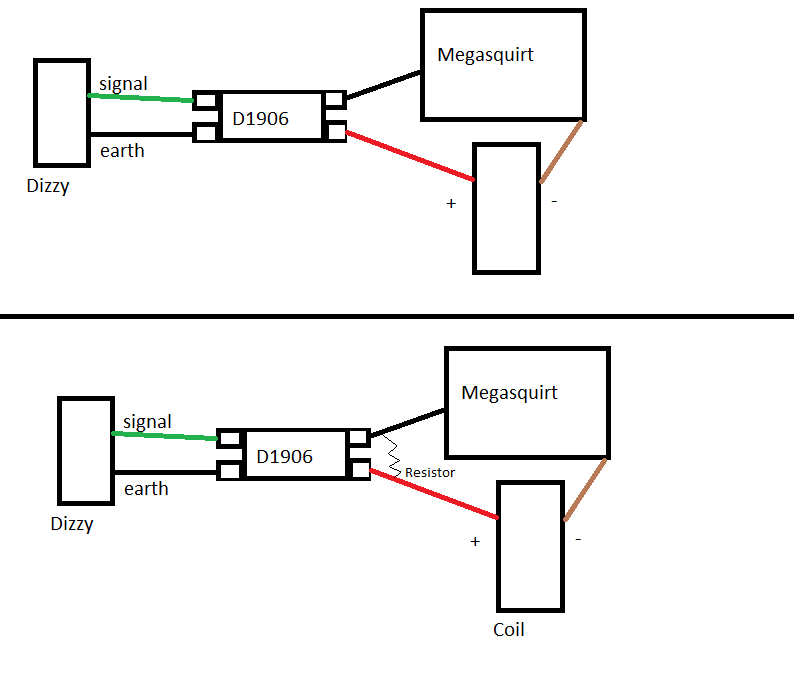
OK, now the resistor needs to go IN PLACE of the coil, between the 2 right hand pins on your drawing. t is essentially a "pull-up" to give 12V with the TIU switched off (eg points open). When the transistor unit switches on, like points close, the voltage will drop to nearly zero, probably around 0.5 - 0.7V. The B+ (upper right) pin goes to switched 12V, best to your MS main relay. The unit NEEDS to be grounded. The MS take off is from the bottom RH pin. No time for paint drawings myself tonight, but happy to look at yours to give OK.
Do or confirm that first. Then try cranking (no plugs, or fuel) and watch the trigger logger. If you use the coil the result will be different than just the resistor. Also try to be patient, lets get the input stage reading correctly first. Then plan out the IGBT mod for the coil while waiting for parts. Often when people rush into things in a hurry, shit happens. BTDT!
Using a 1K (1000 ohm) @ nominal 14V = 0.014A or 14 mA (milliamp) current in the circuit. 14mA x 14V = 200mW (milliwatt), just under the max rating for a 1/4W. Allowing for a 50% duty cycle that is OK for a carbon resistor. Once you establish the optimum value though, I would suggest investing ).05c or so on a 0.4W metal film for best reliability.
It is likely the MS input circuit I referenced yesterday needs some mods, but I need your confirmation like I asked first. That is designed for use with an ignition coil that will induce a flyback voltage. You wont have that issue with a resistor. Please appreciate I DO NOT want to give you any advice that may lead to any damage and I need to know WTF you have first to be sure.
_________________
World`s quickest 924 2L slushbox
| Allan @ DTA wrote: | | I have no issue with superchargers, they are for guys who want to drive a car rather than talk about horsepower with their baseball cap on backwards |
|
|
| Back to top |
|
|
CorsePerVita
Joined: 25 Jul 2008
Posts: 1992
Location: Redmond, Oregon
|
| Posted: Mon Sep 03, 2012 4:03 pm Post subject: |
|
|
Sorry Roger, I should have worded it differently. The resistor I was using was a 1/8. I changed it to a 330ohm 1/4 and the signal is much much better to the megasquirt.
I found my intermittent issues I've been having. A local friend of mine has the same unit but a 3.0 (megasquirt 1 v3.0) and was looking at my harness and realized 2 of my grounds were wrong. He plugged it into my harness and his would not even turn on. So we hooked mine back up as it was before and it turned on. I realized it was grounding itself to the chassis somehow.
Intermittently as well I was unable to connect to my computer. We found that only if you bolted it down where you needed the case to be, would it actually work. When we removed it to test it, it stopped working. All along it ended up being that the grounds for pins 10 and 11 were moved over to 17 and 18 but 19 was correct.
This is the wiring as I got it from DIYAutotune. I'm not sure if I got a really early cable or something, but this is exactly how it was wired from them, along with some extras not shown in the diagram.
So it looked like this...

We swapped the pins and grounds and his megasquirt would fire up but mine would not. I looked around and found out that some of the solder points on the board looked kinda not all the way done. I added solder to some and then reheated the solder on the ones with solder on them. I plugged it in, fired it up and instantly got signal. I turned the unit off then back on MANY times, wiggled connectors, disconnected and reconnected and it still fired up every time.
I wired up a bosch coil driver and am now getting constant flashes on led 17 as I should for ignition but once again my battery is dead from all the cranking. It's back on the charger and I will give it another try soon. We did not, however, see the coil "firing" or any firing from any plugs but will try again once the battery is charged. I think the trickle charger I used prior was not giving it a full charge. I hooked a different charger up which showed it at 25% charge, so I'm going to let it set a while.
So that is some good progress for the day for me.
_________________
- 1977 Porsche 924 2.0 N/A (Trackday Project)
- 1979 Porsche 924 2.0 N/A (The other daily)
- 1980 Porsche 931 (Daily)
- 1987 Lamborghini Jalpa
- 1999 Ducati 900SS |
|
| Back to top |
|
|
RC
Joined: 25 Mar 2007
Posts: 2637
Location: Australia
|
| Posted: Mon Sep 03, 2012 8:00 pm Post subject: |
|
|
Sounds like the problem was a dry / poor solder joint all along. A common enough issue even with commercially assembled PCB `s but more so from DIY`s using a too cold iron or poor quality (lead free) solder. Also exaggerated with vibration/ movement/ corrosion & age.
AFAIK, on the V3 boards anyway, all those bottom pins are earthed, so probably the harness was OK all along and earthing correctly anyway. Would additionally expect a DIY supplied one was fine and compatible with MS1 V2. In fact on mine (V3) connected all or most to common earth to spread load & generally improve EMI shielding & reliability. Not positive about V2 boards but likely the same. Worth looking out of curiosity & better understanding.
May have been unnecessary to reduce the 1K coil load resistor in retrospect, now the dry joint is fixed. A 330R dropping 14V will draw 42mA, and dissipate 0.6W. (Refer to the wiki link and read up on Ohm`s Law if you really want to go there for the knowledge.) Far in excess of the 1/4W rating even with a nominal 50% duty cycle. Would suggest trying the 1K again first (in experimental configuration at least) and see if the result is still OK (trigger logger) with lower current/ less heat. Should be OK IMO, however if it is not and you really need to use 330R then get a 1W at least, preferably a metal film, dirt cheap for better reliability. A 330R 1/4W is on borrowed time.
Hope the coil driver output is OK, but there is a lot of software settings to get right, as well as the SPECIFIC INSTRUCTIONS on the EXTRA site, particularly regarding the modifications & fitment. You are getting there mate, slowly but surely. A dry joint issue is a bastard of an intermittent problem for a pro too, trust me, so great work diagnosing that. Good luck with a charged battery anyway.
_________________
World`s quickest 924 2L slushbox
| Allan @ DTA wrote: | | I have no issue with superchargers, they are for guys who want to drive a car rather than talk about horsepower with their baseball cap on backwards |
|
|
| Back to top |
|
|
CorsePerVita
Joined: 25 Jul 2008
Posts: 1992
Location: Redmond, Oregon
|
| Posted: Tue Sep 04, 2012 10:57 am Post subject: |
|
|
Valid point Roger, I'll swap it back to the 1k.
As to the solder portion, I did not solder the board, I bought it the way it was. So I spent a few minutes reheating the solder since some of them were questionable. I'm glad that's all it was.
On my next day off I'm hoping to have it fired up. I've been saying that every day now, only to find a different story. I guess we'll see. I guess I'll just say... "On my next day off I'll try again."
_________________
- 1977 Porsche 924 2.0 N/A (Trackday Project)
- 1979 Porsche 924 2.0 N/A (The other daily)
- 1980 Porsche 931 (Daily)
- 1987 Lamborghini Jalpa
- 1999 Ducati 900SS |
|
| Back to top |
|
|
CorsePerVita
Joined: 25 Jul 2008
Posts: 1992
Location: Redmond, Oregon
|
| Posted: Wed Sep 05, 2012 1:41 am Post subject: |
|
|
Alright, I feel like I am RIGHT fricken' there.
This morning I worked on it a bit more and swapped out the resistor back to a 1k. I went off a full charge and the signal looks amazing. Very consistent as you expected.
At this point, I am even getting LED17 flashing for the spark output which looks AWESOME.
BUT... in using a test wire and test plug on the coil I am NOT seeing a spark. It is not firing. So I am not sure what's up with that. On my megasquirt it says to wire up everything to the right side of R25, and it is. That goes to pin 1 of the BIP373, and it is. Then pin 3 to the chassis and pin 2 is the signal. I am running a wire directly to chassis ground on pin 3 of the BIP373 and pin 2 has a wire going straight to the (-) on the coil.
Coil gets 12v. But it isn't firing.
I did remove the stock resistor setup and am just plugging a straight 12v to the coil, is there anything specific I need to do with the coil to get this working properly? It's a bosch uf95 coil, and it worked on the car back when things were stock. So I feel like I buggered up something in removing the odd resistor setup it had. I can easily put it back on but don't recall the order, anyone have a picture? Alternatively I can go buy a different coil too if need be.
_________________
- 1977 Porsche 924 2.0 N/A (Trackday Project)
- 1979 Porsche 924 2.0 N/A (The other daily)
- 1980 Porsche 931 (Daily)
- 1987 Lamborghini Jalpa
- 1999 Ducati 900SS |
|
| Back to top |
|
|
CorsePerVita
Joined: 25 Jul 2008
Posts: 1992
Location: Redmond, Oregon
|
| Posted: Wed Sep 05, 2012 2:01 am Post subject: |
|
|
Ok did another search through the 924board.org forums thanks to google search and found this:
http://www.924board.org/viewtopic.php?t=24289&sid=cd73c55f9b52a4c76f662ae454b7fa34
So if I understand this right... these are hooked up to power. Blue is coming off my 12v with ignition on. The other yellow wire looks like it would normally activate a relay (which I don't need to do) and then the other yellow wire feeds to the other resistor which then goes to the blue wire which connects to terminal 15 (+) on the coil?
_________________
- 1977 Porsche 924 2.0 N/A (Trackday Project)
- 1979 Porsche 924 2.0 N/A (The other daily)
- 1980 Porsche 931 (Daily)
- 1987 Lamborghini Jalpa
- 1999 Ducati 900SS |
|
| Back to top |
|
|
CorsePerVita
Joined: 25 Jul 2008
Posts: 1992
Location: Redmond, Oregon
|
| Posted: Sat Sep 08, 2012 12:11 pm Post subject: |
|
|
Had it started for a brief second last night and then it died, but only because it ran off the last bit of fuel in the lines as pressure went down. Here were my obstacles:
- My timing was off for one. I thought the timing marks on my cam pulley were all the same but didn't realize there was one on the opposite side as well that is in a different place. usually when I do timing I use the mark on the back of the pulley, however, I used the mark on the front, so the entire time my timing was off. I lined it back up and that was good. Things just don't work right at 180 degrees out, imagine that.
- After lining up my timing, I no longer got spark. I realized that in lining my timing back up, that at TDC that my rotor was no longer pointing where it needed to at cylinder 1. I moved it around and changed thatand lined it back up so that it was pointing at cylinder 1 at TDC and got spark again.
- The other issue was my coil driver was grounding to a metal surface just barely and I had a loose wire. When I soldered it, I used a test wire off my arduino, the tip had started to split and I hadn't noticed, so the wire essentially was barely attached. Ultimately it was so loose that I only got a spark sometimes, not all the time. I snipped the end off, resoldered, good to go.
- The map is way too rich. If I run fuel and spark at the same time it doesn't run at all. After I turn fuel off but leave spark on, it actually fires for a second or two, probably because the pressure in the rail is so low that it substitutes "the right amount" for a second or two and then dies out.
- I had to play with the trigger angle a bit. The angle seems to work happily somewhere around 8-10. Anything past that and it just doesn't fire right. So I think I need to play with the map, the trigger angle and make my starting mixture a lot more lean than it is because it's flooding out.
Sure felt good to finally hear something last night.
_________________
- 1977 Porsche 924 2.0 N/A (Trackday Project)
- 1979 Porsche 924 2.0 N/A (The other daily)
- 1980 Porsche 931 (Daily)
- 1987 Lamborghini Jalpa
- 1999 Ducati 900SS |
|
| Back to top |
|
|
RC
Joined: 25 Mar 2007
Posts: 2637
Location: Australia
|
| Posted: Sat Sep 08, 2012 5:43 pm Post subject: |
|
|
Congratulations on your first firing and initial success.
Dodgy solder joints and intermittent/ poor wiring are often difficult to diagnose (impossible via the internet) and quite time consuming too. Its usually always much easier and faster in the long run to simply "do it properly and do it once".
That particular ignition ground wire wants to be a reasonable gauge (=<1.5MM2) to minimise voltage drop and maximise coil saturation. Would be better (less EMI) having a separate GOOD earth rather than the main MS earth, bit difficult to achieve though being inside the case. Perhaps solder direct to some of the earth pins, used in the pre-wired loom mentioned previously.
Coils are nothing critical, but would be best off using a HEI NO resistor type for "hottest" spark. One that has some specs supplied or available on the WWW, particularly dwell saturation time or graph, and or inductance to calculate. MS parameters can then be configured to maximum advantage. Would definitely chuck any (OE) series resistance during cranking, as voltage is already much lower anyway.
It is critical to establish correct timing reference first otherwise ALL ignition advance settings in tables will be out and lead to possible engine damage at worst (not so detrimental to NA but will kill a turbo motor easily). At a minimum it will cost you much more in wasted time and frustration, and tune (VE) will never be right.
The rotor/ signal angle issue is another difficult concept to initially grasp. Ideally you want the rotor to (point to) contact the relevant contact on the dizzy cap when each plug fires. Since the timing varies over a wide range this is not always possible, more so in a stock system with actually a greater range, due mostly to emission requirements. Stock may vary from a little as 0* BTDC up to around 42* or whatever the M/Y max TOTAL advance is. With the MS you would find a smoother and better idle at 15 - 25* with dramatic improvement in throttle response, trust me on this. High comp may need as low as 10* @ cranking, but 15* is a good overall minimum for idle. With say 15* idle and 45* @ max vacuum (which is low MAP) the mid point is around 30*. This is a good starting point, and can be changed slightly after the table is established. So to summarize, set the rotor pointer to #1 with the flywheel timing mark @ 30*. Easy to count teeth or measure circumference to establish. IIRC its 3.75* per tooth, cant recall number of teeth now but divide into 360*. Think its around 24mm offhand on flywheel circumference per 10*, but again measure it yourself to be sure.
When I locked my dizzy it was for a programmable ignition, before going full EFI, so calculated the optimum position to lock it at in respect to the trigger signal, when the reluctor prongs are in alignment to the stator. This is critical as any electronics can only retard or delay the time between dizzy signal and coil firing. We don`t have fully psychic electronics that can tell the future, YET, although advanced algorithms get very close. Since many people overlook this important point, the rotor is well past the cap contact when the spark actually fires. This causes a weaker spark, and often misfires with occasional cross firing (wrong plug). MSD in particular is notorious for generating ozone, fast wearing caps and literally blowing them up, due to this issue.
But don`t worry, fortunately the MS allows you to correctly compensate for ANY offset with the trigger offset setting, even over 180* (crank) which is 90* at the dizzy. This is a distinct advantage that needs to be utilised for optimum performance, and correct (to table) timing.
Simply establish the central rotor to dizzy position @ 30* FIRST. Then with a timing light and perhaps different colour marking pens, draw lines on the flywheel and keep adjusting the offset angle till its correct. Can be done at cranking speeds easily too. If the engine is able to run and idle reasonably, set the timing to a FIXED figure, 10* is a good figure, as you can then just play around with offset until the 10* mark on the flywheel lines up perfectly. Really is a piece of cake after you have done it once. Then you KNOW the ignition tables actually correspond to the true spark timing. You only need the basic fuel tables at this stage, to set ignition. Any time spent further adjusting fuel is in vain since the tables will change again and again when the timing is moved.
Another point while I`m on the subject, is to test for timing consistency at various RPMs. Will need basically correct fuel settings though to allow higher PRM. Try set fixed timing at 20*throughout the whole rev range, idle speed is irrelevant since its just a test. Make a corresponding line on the flywheel at 20*, which is central when viewed with a timing light. Then rev the motor while observing any timing drift. Ideally you want no or extremely little variation. Dwell variations, distributor play, shaft concentricity, gear backlash, but particularly MS settings are verified or exposed during this procedure. It also confirms the correct polarization of the reluctor coil and associated wiring.
Good luck and have fun.
_________________
World`s quickest 924 2L slushbox
| Allan @ DTA wrote: | | I have no issue with superchargers, they are for guys who want to drive a car rather than talk about horsepower with their baseball cap on backwards |
|
|
| Back to top |
|
|
CorsePerVita
Joined: 25 Jul 2008
Posts: 1992
Location: Redmond, Oregon
|
| Posted: Sun Sep 09, 2012 1:43 am Post subject: |
|
|
The gauge I'm using on the coil driver is about 18 for the wire on the ground and also to the coil. The gauge however for the wire powering it off of R25 is much much thinner, should I bump that up too?
My issue is that it isn't idling reasonably at all. In fact, what's odd is that it intermittently will want to try and start. It's almost like sometimes it wants to try, other times it doesn't. I'm not sure if that's because the plugs get saturated or what. If I prime the pump and go to start it, the first time it fires up for a few seconds and stops almost immediately and chokes, smells very rich. If I wait a minute and try again it'll sound like it wants to start again and die. Or, if I turn OFF the pump it'll kick over a few times, try and run a little and die again. But if I keep cranking on it, it'll kick over, smell really rich and inevitably die.
I messed around with the fuel map and if I get things on the leaner side it definitely will try, or it'll get up to idle for 2-3 seconds and then immediately die. But it's about 20x better than when the ve table was set to a higher value.
I set the current angle to 10 on the trigger angle. I tried things below that and above that, and it doesn't really want to work right when I do that. I also tried (just to start it) to set a fixed advance, like 4 and it seemed "ok" or semi better to try and start. If I set it back to the ignition map then it will try and advance it off of the map itself in which case it jumps over on rpm to something like 10-15 and then it of course dies again. So 10 seems to be the sweet spot on the angle, and it sounds like it's firing smoothly.
The way I set it is I got it to TDC, verified that the cap is pointing the rotor dead smack at the middle on TDC and then made sure that the arms were not dead center lined up, but just a hair before or after as recommended by the mega manual (for the trigger). Trigger angle is set to 10 and cranking angle is 10. I'm not sure if my cranking angle has anything to do with the issue that I'm having but I think it's fuel more than anything.
If I set the fuel parameters to something very low, 30s or 40s at 70-90kps for the first 1500rpm it'll crank really hard, act like it wants to start and then just die. But if I set it way lower, 15 or 20 it almost wants to stay running. 15-20 seems unrealistic and odd to me.
My current fuel pressure at prime is 42psi, when I crank it stays the same as well. I'm also wondering if that's too high, I feel like it is. It seems to act a lot nicer if I set it to 2 squirts per cycle instead of 4 as well. It seems odd to me because my ve table says "hey you should be at around 45-59" but the car won't even try and start unless I set the ve table to something ridiculously low like 20 or even 15 and that seems wayyyyy off to me after looking at other ve tables. So I am wondering if maybe it's just got too much pressure when the injectors are opening and giving me more fuel than I'm calculating properly. My regulator is adjustable, so I can take that down if necessary.
I figure it must be somewhere in the ballpark of more like 30-35psi since most 2.0L engines run about that on their fuel systems. I did not adjust mine yet, and since I can't do anything unless I set the VE tables way below the normal values, I feel like I must be running too much pressure.
_________________
- 1977 Porsche 924 2.0 N/A (Trackday Project)
- 1979 Porsche 924 2.0 N/A (The other daily)
- 1980 Porsche 931 (Daily)
- 1987 Lamborghini Jalpa
- 1999 Ducati 900SS |
|
| Back to top |
|
|
CorsePerVita
Joined: 25 Jul 2008
Posts: 1992
Location: Redmond, Oregon
|
| Posted: Sun Sep 09, 2012 10:20 am Post subject: |
|
|
Ok so the pressure is fine. Stefan mentioned I may have set my engine fuel constant too hgh. It is at 10 and I'm using 235/min injectors. Will crunch numbers and get it set right. From reading numbers on those injectors most people are using more around 5 or 6.
_________________
- 1977 Porsche 924 2.0 N/A (Trackday Project)
- 1979 Porsche 924 2.0 N/A (The other daily)
- 1980 Porsche 931 (Daily)
- 1987 Lamborghini Jalpa
- 1999 Ducati 900SS |
|
| Back to top |
|
|
|
|
You cannot post new topics in this forum
You cannot reply to topics in this forum
You cannot edit your posts in this forum
You cannot delete your posts in this forum
You cannot vote in polls in this forum
|
Powered by phpBB © 2001, 2005 phpBB Group
|

