 |
924Board.org
Discussion Forum of 924.org
|
| View previous topic :: View next topic |
| Author |
Message |
Wagdog
Joined: 26 Jul 2020
Posts: 13
Location: Victoria,Australia
|
 Posted: Sun Sep 11, 2022 9:50 pm Post subject: broken manifold stud Posted: Sun Sep 11, 2022 9:50 pm Post subject: broken manifold stud |
 |
|
| I have been reading your posts and it appears that you did not lift the engine or remove the head to access the manifold. I am about to address a broken manifold stud on my 1980 931 and I would like to take your route to the problem. I would be very grateful if you could briefly summarise in order, your approach. I have a pit in my garage. Best wishes Andrew |
|
| Back to top |
|
 |
Beartooth
Joined: 05 Apr 2022
Posts: 212
Location: Roberts, MT
|
| Posted: Mon Sep 12, 2022 3:43 pm Post subject: |
|
|
Yup, I didn't lift the motor or remove the head. I sort of followed the order given in the Haynes manual; if you've got that, it'll probably work as well as I what I can give you from memory, but I'll try.
My undershield was already off, but that has to come off, obviously. I have the front up on jackstands and the right wheel off. I don't think working from a pit would make any difference, just my starting point.
I think the first thing off was the oil cooler lines. I loosened the windsheild washer reservoir to give me room to work there. I removed the turbo oil feed line later, but I think it could come off once the oil cooler lines are out of the way.
Disconnect the O2 sensor wire. I just left the sensor in; wideband will replace it pretty soon.
Next was the J-pipe, followed by the wastegate outlet pipe. The starter came off, I think before that.
Then the wastegate pressure line, then the wastegate. The mount that couples the wastegate to the torque tube was broken, in my case...
I just pulled the wastegate vent line out of the soft line that couples it to the upper half, still attached to the wastegate. and that was out. Not sure if I'll be able to get it back together like that...
Next was the exhuast. My cat had been replaced with a straight pipe (major bummer... that's not), but now there's no break point in the exhaust, so I disconnected the hangers and slid the whole thing off.
I disconnected the sway bar mounts, but left the control arm links. Unbolted the steering rack, but left the tie rods connected. If you've got right-hand-drive, I think the steering shaft has to come out or something. Not sure; I just remember reading somewhere that it'll be in the way...
Un-do the oil drainback line. Need some big wrenches; maybe it's a 30 and 36mm? I have combination wrenches up to 30mm, and use a super-size crow's foot from a set I've got with a breaker bar for the bigger one.
You can undo the manifold to turbine bolts just about anywhere; I did it a little later on. The upper two are accessible with enough variations on socket length and extensions; the last one you have to get from below, and I used an impact-rated swivel socket adapter. And that's the bolt that broke.
I removed the air filter and such, then unbolted the air flow box and fuel distributor assembly, only disconnecting the fuel supply and return lines. With that loose, I disconnected the flex hose that connects it to the compressor. Then you can move it far away enough without having to disturb the injector, WUR, and those lines. Obviously be careful not to move them too far, and try to set it all back where it normally sits so you don't damage them.
Somebody used studs for the turbo to engine mount; one came out with the nut, but I had to unbolt the mount from the block because I wasn't able to drop the turbo down far enough.
Anyway, with all that undone and the steering rack and sway bar pulled down, I had enough room to move the turbo forward and drop it out the bottom.
I welcome anyone who's done this more than me to chime in if I did anything that wouldn't be a good idea, and this has been almost a week ago, so I'm probably not remembering the order exactly. One thing I forgot to mention is that I not only sprayed penetrating oil, I also dabbed some motor oil on all the fasteners, and I think redid that at least once. If you can at least hit it and let it soak overnight, that'd be good. There are, I think, two big gotchas on this, and one you may not be able to do anything about. That's the fasteners that stick or just snap off even though you're not forcing them. The next is, don't force anything or get in a hurry. Heat might help on some things, but use sound judgment; no use setting something on fire. I definitely went back and forth, top and bottom several times. I'm pretty sure you could just disconnect and remove everything you can get your hands on from the top, then do the same from below, then go back up top until it's off. I think in terms of an official order to do things in, it's mostly a matter of saving time; it'll be obvious if you're trying to do something that's a bad idea.
I only took my manifold off because of the broken bolt. There is one nut that is very tricky in the back near the upper J-pipe connection. Lots of playing with a combination wrench to get that one. Didn't help that it was one where the stud came loose with it. I'd emphasize, if you have a stud wanting to back out with the nut, don't try to just muscle it straight out. I've done that in the past on a couple bolts that go into aluminum, and mangled the threads. On this, I think I had three studs that came loose, and they all came apart cleanly by working them back and forth. There might be other tricks for that too, but with the one stud I tried after I got the manifold off, it took a ton of heat to get the nut to move. I just cut another after I got the manifold off (it was trapped between the flange and the manifold).
Now, on the reassembly, what I gather is you will create problems, if not break things if you don't pay close attention to the order. I haven't actually got there yet, but there are several posts from Fasteddie, Chuck, and others detailing that.
_________________
1980 931 diamond in the rough |
|
| Back to top |
|
|
Wagdog
Joined: 26 Jul 2020
Posts: 13
Location: Victoria,Australia
|
| Posted: Mon Sep 12, 2022 10:41 pm Post subject: |
|
|
| Thank you very much for your long and detailed reply. I have a copy of Haynes. You have reassured me that Haynes is not a bad guide. I was pleased to see that steering components don't all have to be removed, just disconnected and that the same is true for the fuel distributor, with the injector and WUR lines left in place. I have just finished work on the fuel system from the tank to the injectors, including dismantling the WUR and unsticking the distributor plunger, and the engine is now running very nicely. Todays job was the fuel level sender - a bad earth inside the unit. Again, many thanks. Andrew |
|
| Back to top |
|
|
Fasteddie313

Joined: 29 Sep 2013
Posts: 2596
Location: MI
|
| Posted: Tue Sep 13, 2022 12:20 am Post subject: |
|
|
Your broken stud my just be a missing one with the gasket slipped in the way of installing another.. That's how mine was..
I pulled my head though.. Might even have been easier than to try to get the manifold off from the bottom, and a fresh HG is good to do..
I think the cracks can be welded pretty easily without a whole lot of skill, but its all about preparation..
Prepare a hole in the ground well big enough to bury the manifold, lined with clean dry sand.. Have a 5 gallon bucket or 2 of clean dry sand ready to dump on it..
Extremely close to welding location.. Bonus points if you can weld it right in your hole..
Heat the entire manifold with something similar to a blacksmiths forge.. In my case I made a forced air fire pit with a dayton rim, ducting to under it, and a squirrel cage to feed it..
Wood fire..
Nickle rod, stick welder..
Get the entire manifold glowing red hot evenly, then weld it, drop it in the hole, and dump the sand over it as fast as you can.. Fast..
Have everything ready..
One little zap nice and fast, medium-low amperage for the rod because it's already super hot and is going to weld like butter.. Just a straight drag will do..
Works..
_________________
80 Turbo - Slightly Modified |
|
| Back to top |
|
|
Carrera RSR

Joined: 08 Jan 2010
Posts: 2309
Location: Somerset, UK
|
| Posted: Tue Sep 13, 2022 1:18 am Post subject: |
|
|
| Wagdog wrote: | | Thank you very much for your long and detailed reply. I have a copy of Haynes. You have reassured me that Haynes is not a bad guide. I was pleased to see that steering components don't all have to be removed, just disconnected and that the same is true for the fuel distributor, with the injector and WUR lines left in place. I have just finished work on the fuel system from the tank to the injectors, including dismantling the WUR and unsticking the distributor plunger, and the engine is now running very nicely. Todays job was the fuel level sender - a bad earth inside the unit. Again, many thanks. Andrew |
To be clear on a RHD car to remove the turbo and hopefully the exhaust manifold without pulling the engine/head, you will have to remove the front cross member, steering rack and UJ shaft.
I've had the turbo off/on on mine but not the exhaust manifold without removing the head. Swapping out the turbo on its own was a 2 day job as is pulling the head only for HG swap or pulling the whole engine out.. So you don't save any time trying to take less off versus the whole engine out. Fitting the turbo + manifold was way easier with engine on the bench than doing it on the car.
If a stud has snapped in the head, it will have to come off anyway to drill out
_________________
1980 931 - forged pistons, Piper cam, K27/26 3257 6.10 hybrid turbo, 951 FMIC, custom intake, Mittelmotor dizzy & cam pulley, H&S exhaust, GAZ Gold, Fuch'ed, Quaife
Now www.924board.org/viewtopic.php?t=34690
Then www.924board.org/viewtopic.php?t=31252 |
|
| Back to top |
|
|
Wagdog
Joined: 26 Jul 2020
Posts: 13
Location: Victoria,Australia
|
| Posted: Tue Sep 13, 2022 5:49 pm Post subject: |
|
|
| Thanks for the advice on RHD. It looks like I should pull the engine out. Engine has been running well so I am reluctant to lift the head. I really needed this feedback on the way to go. Now to clear some space. and find a workshop engine crane. |
|
| Back to top |
|
|
Cedric

Joined: 27 Aug 2004
Posts: 2614
Location: Sweden
|
| Posted: Tue Sep 13, 2022 6:19 pm Post subject: |
|
|
| Wagdog wrote: | | Thanks for the advice on RHD. It looks like I should pull the engine out. Engine has been running well so I am reluctant to lift the head. I really needed this feedback on the way to go. Now to clear some space. and find a workshop engine crane. |
Might be faster and cheaper to just take the engine out. I prefer to have the engine out for manifold and turbo stuff, its really hard to solve it properly in that awkward space, and taking the engine out is a fairly quick job. While you are there you can change things like clutch, front and main seal, worn hoses etc etc to aid future reliability
Ive done the head lift aswell, lifted it with the exhaust and intake manifold still attached. Its not a fast, quick or particularly fun job, but doable. Though impossible to follow the hot side tightening procedure properly due to space constraints.
_________________
1980 924 Turbo
www.instagram.com/garagecedric/ |
|
| Back to top |
|
|
Wagdog
Joined: 26 Jul 2020
Posts: 13
Location: Victoria,Australia
|
| Posted: Sun Sep 18, 2022 10:56 pm Post subject: Lifting engine |
|
|
Carrera RSR. you recommend removing front cross member, steering rack and UJ shaft. Haynes says remove UJ joint, steering stabilizer bolts, nuts from control links, pivot bolts, then press out pivot bolts. Remove bolts holding front axle cross member and allow front suspension to rest on tie rods. Is this what you mean by remove front cross member or do you physically remove the whole box and dice from from the car?
Ideola, I now have an engine crane and leveller. Regards Andrew |
|
| Back to top |
|
|
Fasteddie313
Joined: 29 Sep 2013
Posts: 2596
Location: MI
|
| Posted: Mon Sep 19, 2022 12:07 am Post subject: |
|
|
I just don’t know man..
I wouldn’t rate the chances of a professional welding shop doing a successful job being very high..
They will probably just heat the area with a torch, weld it, and let it cool, and who knows what it will turn out like..
The stud extraction shouldn’t be too big of a deal though..
_________________
80 Turbo - Slightly Modified |
|
| Back to top |
|
|
Carrera RSR
Joined: 08 Jan 2010
Posts: 2309
Location: Somerset, UK
|
| Posted: Mon Sep 19, 2022 6:24 am Post subject: Re: Lifting engine |
|
|
| Wagdog wrote: | Carrera RSR. you recommend removing front cross member, steering rack and UJ shaft. Haynes says remove UJ joint, steering stabilizer bolts, nuts from control links, pivot bolts, then press out pivot bolts. Remove bolts holding front axle cross member and allow front suspension to rest on tie rods. Is this what you mean by remove front cross member or do you physically remove the whole box and dice from from the car?
Ideola, I now have an engine crane and leveller. Regards Andrew |
6 and two 3’s. I detached the wishbones and rack from the cross member to get it out of the way leaving the rack and suspension hanging. I had the luxury of a lift to give me full access underneath.
PS I prefer to drop the engine out the bottom using a lift. Far easier than lifting out the top.
_________________
1980 931 - forged pistons, Piper cam, K27/26 3257 6.10 hybrid turbo, 951 FMIC, custom intake, Mittelmotor dizzy & cam pulley, H&S exhaust, GAZ Gold, Fuch'ed, Quaife
Now www.924board.org/viewtopic.php?t=34690
Then www.924board.org/viewtopic.php?t=31252 |
|
| Back to top |
|
|
Wagdog
Joined: 26 Jul 2020
Posts: 13
Location: Victoria,Australia
|
| Posted: Mon Sep 19, 2022 10:06 pm Post subject: |
|
|
Carrera RSR, thanks for the clarification. Having just acquired the engine crane. I will be lifting the engine out following Ideola's approach described in an earlier thread.
The car (my spouse's )has the same body paint as yours, and the rest is stock. Interior is an op-art black/grey check. Is that what is described as pasha? |
|
| Back to top |
|
|
Beartooth
Joined: 05 Apr 2022
Posts: 212
Location: Roberts, MT
|
| Posted: Tue Oct 18, 2022 2:15 pm Post subject: |
|
|
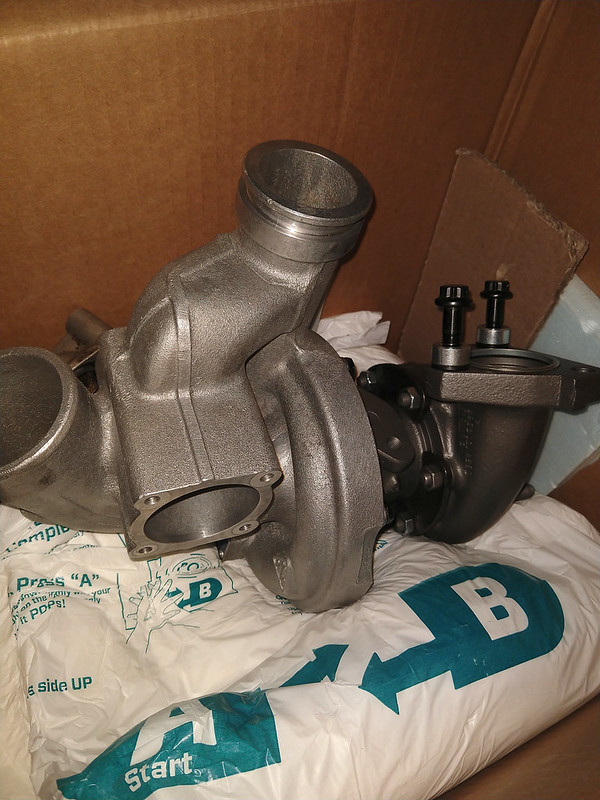
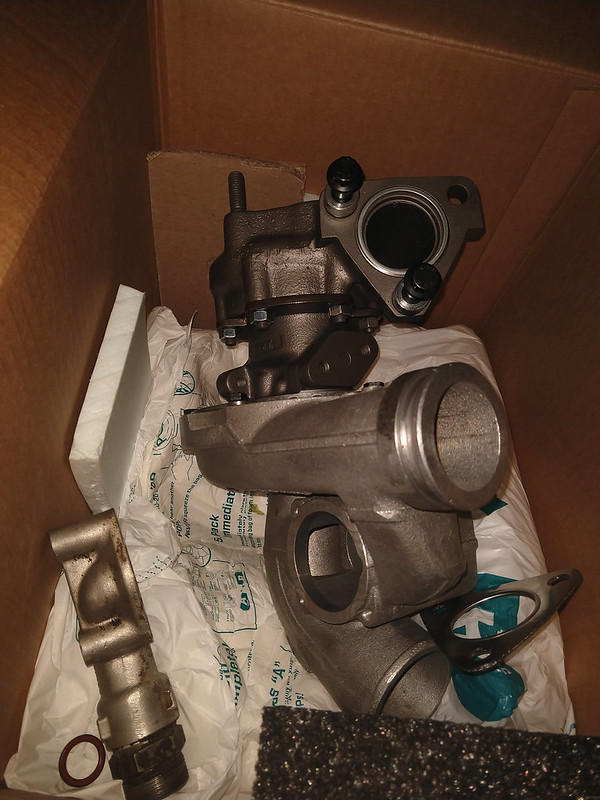
The turbo is back, actually as of a week and a half ago. Now I'm short a few parts... One, which has a big question mark on it, is the "intermediate ring" between the manifold and turbine flange, part number 931.111.599.01. It was missing from the car, and so far I've had no luck finding one. I think I read somewhere that people do without or leave them off. I'd like to have it: I'd think it'd make for better flow and direct more heat to the turbine and away from the flanges. I also don't have a new turbine outlet gasket, or the manifold to wastegate pipe gasket. I do have both a new flat gasket and the ring gasket for the manifold to turbine flange. Is there a "best" setup for that? I found one suggestion to only use one or the other (parts diagram shows both). But if it's best to just use one, one style probably works better than the other... For the manifold to wastegate pipe, I think I can use the same gasket as the head to exhaust manifold, just with the bolt holes drilled out (10mm stud vs. 8mm), but the old gasket clearly has a larger opening. I'm not sure if the smaller opening could be an issue; it's not smaller than the ID of the wastegate pipe, anyway.
I do think I've got something figured out for the manifold to turbine flange bolts. I got a set of ARP 40mm length chromoly bolts, then managed to find some 3/8ID x 5/8OD x 3/8 long spacers. They're just zinc coated, so they're probably going to rust pretty quickly, but I feel like I'm pretty close to what Porsche did. Also, although they're nominally 3/8ID, they're a good fit without having to be reamed out. I would have liked to have found OE bolts and spacers, but the spacers are NLA new, and there seems to be no point to spending $35 each on the bolts without the correct spacer. I can only guess, but I suspect the spacers are there to allow the bolts to stretch some and have a little elasticity. I'm not sure it wouldn't work to use Ti bolts with steel spacers, but it doesn't seem worth getting the bolts without the correct spacers. I'm not sure what I'm doing is going to have an benefit, but it can't hurt. Also, on the topic of bolts, I've decided to tackle the bolt loosening issue with lock wire. I bought a spool of wire and a fixture to drill the bolts, and I think I've got it figured out roughly how to do it. Might take a few tries to get it good and tight, but I think that'll do the trick. Unfortunately, I'm out of town this week, but hopefully I can get it back together pretty quickly when I get back!
_________________
1980 931 diamond in the rough |
|
| Back to top |
|
|
Wagdog
Joined: 26 Jul 2020
Posts: 13
Location: Victoria,Australia
|
| Posted: Tue Oct 18, 2022 5:16 pm Post subject: |
|
|
I have no practical experience but would mixing materials with different coefficients of expansion cause problems? Chromalloy, which I think is Nichrome, has thermal expansion factor of 9 Stainless steel is also about 9.Mild steel is about 7 and Titanium about 5.(All 10exp-6m/mdegC).
I am open to more expert advice. |
|
| Back to top |
|
|
Cedric
Joined: 27 Aug 2004
Posts: 2614
Location: Sweden
|
| Posted: Tue Oct 18, 2022 10:45 pm Post subject: |
|
|
| Wagdog wrote: | I have no practical experience but would mixing materials with different coefficients of expansion cause problems? Chromalloy, which I think is Nichrome, has thermal expansion factor of 9 Stainless steel is also about 9.Mild steel is about 7 and Titanium about 5.(All 10exp-6m/mdegC).
I am open to more expert advice. |
It absolutely affects the screw joint, when we did this in the OEM world the material in all parts were tuned to get the desired expansion characteristics, to keep clamping force stable during all the heat cycling.
I use the rings, they work well, and you have less risk that the joint sets a tiny bit, since it clamps hard machined surfaces against each other. With everything in good order ive never had any screw joint issues with the scania bolts i use, wiring shouldnt be needed. But if you really want its of course an extra safety.
_________________
1980 924 Turbo
www.instagram.com/garagecedric/ |
|
| Back to top |
|
|
Beartooth
Joined: 05 Apr 2022
Posts: 212
Location: Roberts, MT
|
| Posted: Thu Oct 20, 2022 3:20 pm Post subject: |
|
|
One thing I forgot to mention - I guess in the water under the bridge department - was the report on the turbo upon inspection. I sent to G-Pop Shop, and I think they did a good job of it. They said it looked like the turbo had very few miles on it, so it definitely appears that it's either not the original turbo, or it was rebuilt (with at least the compressor wheel replaced, judging by how new that looks). So it's a bummer that got jacked up, but that's probably part of the reason it came to me on the cheap.
I see what you're saying about the rings, Cedric. My concern in my case, with the turbine to manifold flange at least, is that there's a bit of wear and/or corrosion on the flange for the turbine. I tried cleaning the flange with a mill file, and that helped, but it's still not as flat and even as I'd like. I'm still not sure about the turbine outlet gasket: it's hard to find either the flat gasket or the ring. I do have the old sealing ring, but I can't imagine that's really up to the job.
On the bolts, I'm thinking what I might try is to wait until I get the engine going again to torque them down. Let the engine get warmed up and heat soaked, and then do the final tightening. I'm not sure how much of a big deal the different expansion rates might be, but at least that would help with that problem. The lock wire might be overkill, but given that the stock Ti bolts are prone to backing out, I'd think my hair-brained idea could be even worse. At least the ARP bolts are around $5 each, and they come in a pack of five. I guess it wouldn't be a bad experiment to see what they do straight-up. I already went through the trouble to drill the heads though...
Finally, on the intermediate ring, it seems to be NLA. The ID of the recesses in the manifold and turbine is 42mm. That's within a mm of 1-5/8." Does anyone have any actual dimension on the intermediate ring or guesses as to what it's made of? I have half a thought to get some 1-5/8 stainless pipe and whittle it down to make my own, but I'm not sure if a piece that doesn't quite fit would still do the job, or if it might be worse than nothing.
_________________
1980 931 diamond in the rough |
|
| Back to top |
|
|
|
|
You cannot post new topics in this forum
You cannot reply to topics in this forum
You cannot edit your posts in this forum
You cannot delete your posts in this forum
You cannot vote in polls in this forum
|
Powered by phpBB © 2001, 2005 phpBB Group
|

