 |
924Board.org
Discussion Forum of 924.org
|
| View previous topic :: View next topic |
| Author |
Message |
Fasteddie313

Joined: 29 Sep 2013
Posts: 2596
Location: MI
|
 Posted: Mon Jul 22, 2019 10:02 am Post subject: Posted: Mon Jul 22, 2019 10:02 am Post subject: |
 |
|
Great job and great neighbor!
_________________
80 Turbo - Slightly Modified |
|
| Back to top |
|
 |
TJC

Joined: 04 Apr 2010
Posts: 828
Location: Central-ish Arizona, USA
|
| Posted: Tue Jul 23, 2019 2:21 am Post subject: |
|
|
Thanks for the detailed report of the guide replacement. Very well done!
_________________
'95 BMW 318i/5 ..."Pearl"
'87 Porsche 944 NA... "Liebchen"
'02 Porsche Boxster..."Sunbeam"
'04 BMW X3..."Xander"
Still on the Prowl!
www.ttrs1.com |
|
| Back to top |
|
|
chuck21401

Joined: 20 Feb 2005
Posts: 526
Location: Annapolis, MD
|
| Posted: Mon Jul 29, 2019 1:11 pm Post subject: |
|
|
Spent some time under the car today. I was able to get everything back together...except the starter.
Earlier I had noticed that the clutch slave cylinder was leaking. It continued to leak as I worked on the car. At one point I pushed in the clutch and it went to the floor..followed by even more leakage. So will troubleshoot that next. I think it's the slave cylinder and I've read the suggestion to replace the master and slave at the same time. So will read up on that.
Here is the process I used to reassemble everything:
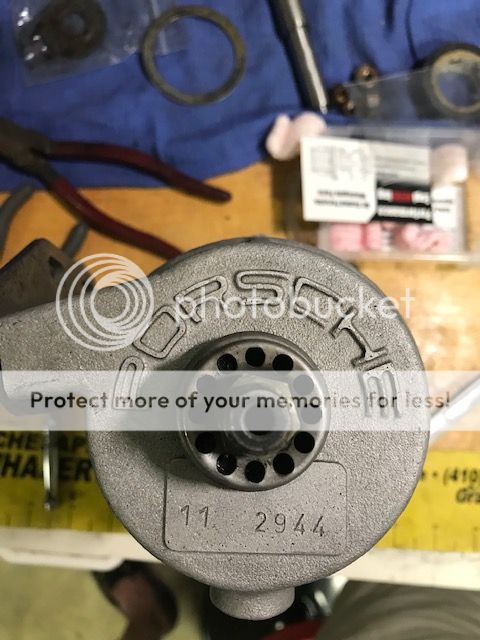
1. Reassemble wastegate - It's very important have the bracket in the right place. I also was very concerned that the diaphragm would slip out of the groove at the bottom....so I held it down tightly and started three nuts in a triangle pattern to make sure it stays in place while fighting again the spring. I tightened the nuts in a star pattern as if tightening lug nuts. I checked the valve operation (like 20 times) with my Ryobi air compressor which generates just enough pressure to open the valve about 3/4 of the way; this will be important later on. Not the most exciting video, but this is what it does https://youtu.be/qg84Pz54Lqw with this small compressor. I used the larger compressor, but with the pressure turned way down. WG seems to be working as expected.
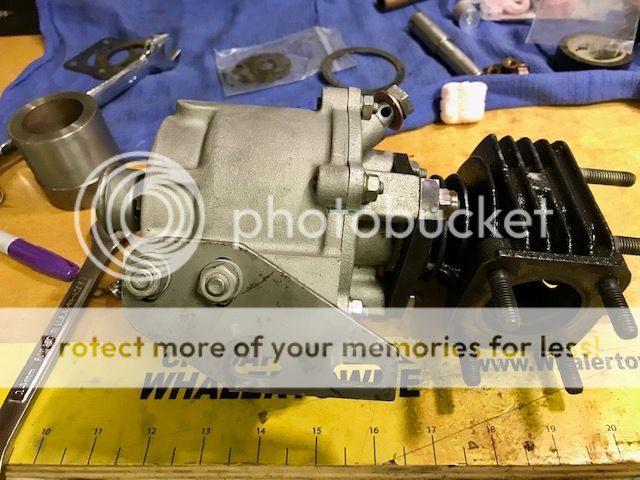
2. Install WG - This wasn't too difficult but a bit tricky given the amount of adjustment in the bracket. How high or how low should it be mounted? I connected the rigid boost control line figuring that would be a good yardstick...then tightened the bolts for the bracket. I reinstalled the heat shield. With that installed it's really difficult to get to the bracket/nuts should further adjustment be needed. So hopefully I guessed right on how the WG should be mounted.
Note: the steel nuts in the picture below are there temporarily to keep the valve seat from flopping around.
It took a while to get to this point but happy to have the WG off the workbench and back in the car.
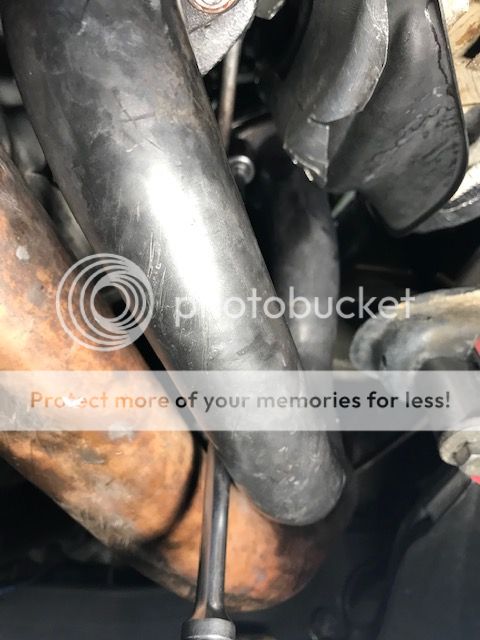
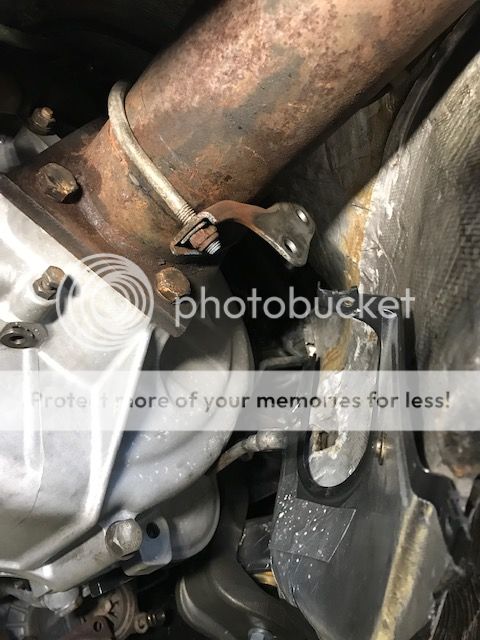
3. Install exhaust from turbo to cat converter. This took a while and I learned some things along the way. Critically important is to install the bypass pipe with the rest of the exhaust at the same time. I didn't the first time around. Had to loosen the connection at the turbo to move everything back an inch in order to install the bypass pipe and line it up with the WG connection.
Again, gravity is important. The exhaust section is heavy. I used a series of bungee cords to suspend it as I was connecting everything.
4. Connecting the exhaust to the turbo. This is really part of the step above, but I found it to be more involved. I couldn't one of the nuts started with the exhaust up against the turbo. ...had to loosen everything (again), pull it back 1/4in, start the nut...then push everything back into place. That wasn't mention in the Haynes manual. "installation is the reserve of the removal procedure." lol. I kept saying that to myself today.
And maybe this stud was just a bit too long. Circled in yellow below.
5. At this point I decided not to install the muffler. I figured if I had to back track I wouldn't want to remove that again...so decided to install the muffler last (well, before the starter at least).
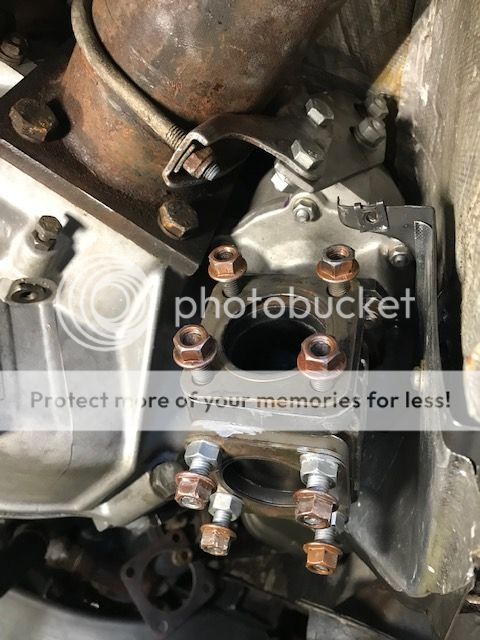
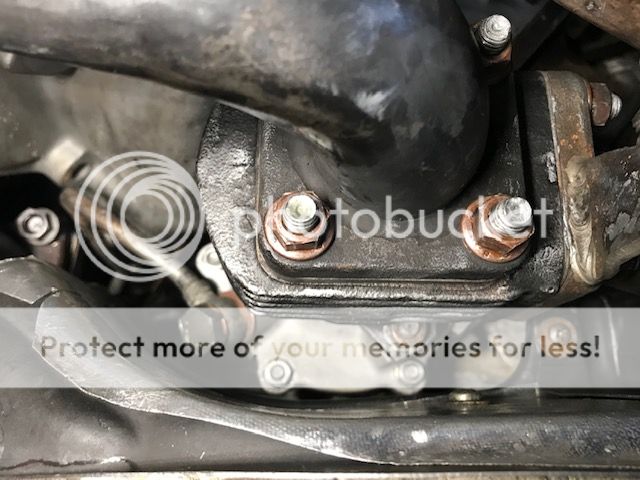
6. Install the J pipe. This is tricky. The valve seat is being pushed down by the valve (and the spring behind it). When I held the J pipe up to install it, it was like 1/2 inch from the bottom of the exhaust manifold. I read elsewhere that tightening the nuts would push the valve seat in...and push the valve up. That's a lot to ask from 12 mm copper nuts. So....and I thought this was clever....I reattached my Ryobi air compressor to the boost control line where it attaches to the intake. I had my wife/assistant operate the Ryobi with me under the car. As the pressure built the valve opened up as shown in the YouTube video....and I was easily able to install the four 12mm nuts at the bottom of the WG.....and the J pipe was a lot closer to the exhaust manifold.
Here is the bottom of the WG again. With help from the Ryobi, the valve seat could move up about a 1/4'...and the nuts could be tightened at that point. (I did remove the steel nuts).
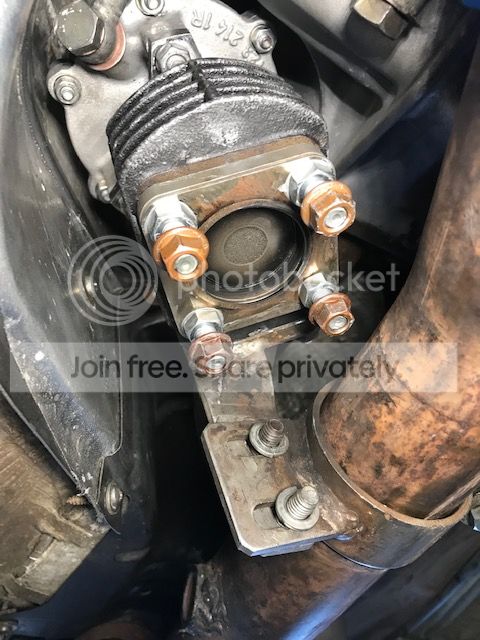
Here is the after photo:
Connecting the J pipe to the exhaust manifold required a long extension between the exhaust and J pipe and some stretching my part.
7. Install final muffler - This took a bit longer than expected. The muffler and pipe is heavy and awkward. Again I rigged up bungees to suspend the muffler. I think next time I might use milk crates. Anyway at the rear the muffler is connected by a huge oval clamp. At the front the muffler is connected to the exhaust with four bolts and is attached to the car with a rubber hanger. I attached the hanger first, then worked on the four bolts.
Next step will be to diagnose the problem with the clutch slave cylinder...I think it needs to be replaced but will read up on that.
One other note...I don't think a TiAL 46 mm would be a direct replacement. It appears that the WG is also supporting at least some of the weight of the exhaust. I'll post pictures to illustrate the point, but to me it seems like an additional bracket of some sort would need to connect from the bypass pipe to the underside of the car to provide support.
If this WG doesn't work out, that's where I am headed next. But hopefully not.
_________________
1981 Porsche 931 w/S1 engine & g31 transmission. Water-cooled intercooler
Last edited by chuck21401 on Mon Jul 29, 2019 2:11 pm; edited 12 times in total |
|
| Back to top |
|
|
chuck21401
Joined: 20 Feb 2005
Posts: 526
Location: Annapolis, MD
|
| Posted: Mon Jul 29, 2019 1:32 pm Post subject: |
|
|
As I've read about the 930/931 WG, many times the vent at the top is mentioned but I never found any pictures without it being attached.
It's nothing fancy but here's what it looks like for future reference.
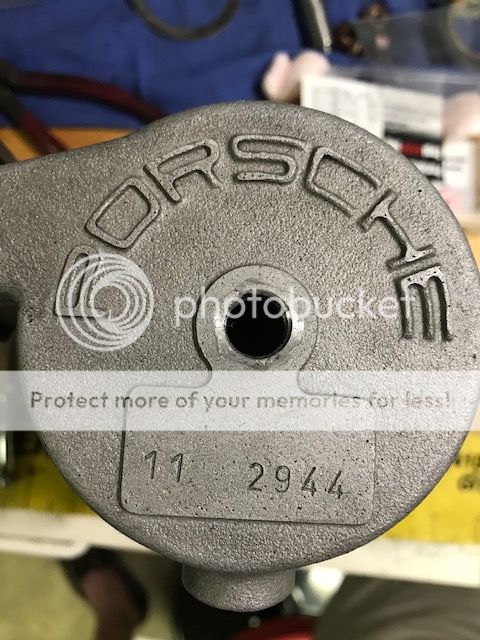
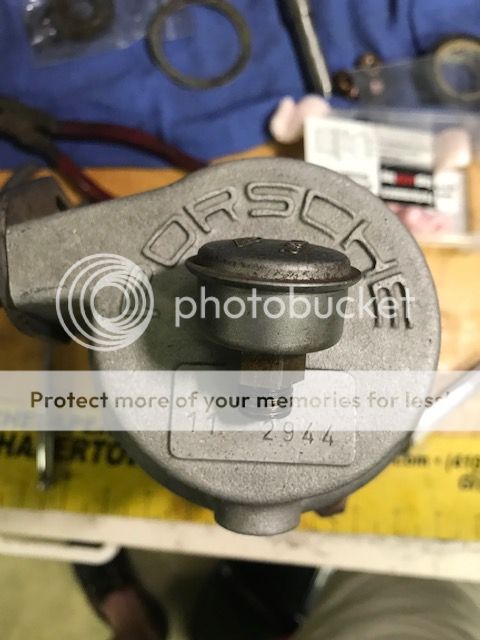
and now upside down...seems a bit over engineered....
_________________
1981 Porsche 931 w/S1 engine & g31 transmission. Water-cooled intercooler |
|
| Back to top |
|
|
Fasteddie313
Joined: 29 Sep 2013
Posts: 2596
Location: MI
|
| Posted: Mon Jul 29, 2019 2:32 pm Post subject: |
|
|
It's a tricky witch, because so much of the stuff needs to connect together and it's all ridged with no flex in any component, so they all have to be right in the correct spot..
the most crucial of it all is the cast iron IMO..
The head, to the EX manifold, to the turbine housing, to the bearing housing, to the block mount, is all SOLID and really needs to be done right..
I like to put it all together a bit loose and then sneak up all the nuts, take the turbo back off to torque all the nuts, and reinstall..
Bolt the manifold to the head good and torque it.. Done..
Loose turbine housing on bearing housing loose to block mount loose to block...
Snug them all up a bit until it pulls itself into the right shape little by little until you get right to the bottom with your nuts/bolts, then snug what you can up better, take the turbo back off and tighten everything real good, then it's all perfectly indexed and you can install it for real..
The exhaust.. I think I put the whole pipe onto the rear hanger just before the muffler, all in one piece, and then bolt that good to the turbine housing.
Probably hang the WG loosely from its torque tube mounts first..
Then put the WG loose on it's dump pipe (connected to the exhaust, then the J-pipe loose on both sides, then snug all that up a little at a time so it all pulls itself back together into position where everything actually fits nicely in its natural state.
They are all stiff pipes with ridged connections so I think it is important not to put it together by force (tightening bolts to close a flange) and stress any of the components..
These 931s have very common cracked J-pipes, cracked manifolds, and cracked turbine housings..
I can't say it's all installation error but maybe due to all these ridged connections.. Even the WG bottom port signal line is ridged on my car..
Anyway yeah I think the last thing I would tighten is the WG to torque tube mount, after I would get all of the rest of the ridged exhaust pieces "squared away"...
That mount (WG to TT) has slotted holes in it iirc doesn't it? Like it's made to be mounted wherever it lands on that soft mount.. I can't imagine being able to tighten that first and match everything else..
Yeah this post is overly long winded and I'm bad at that especially after a couple of beers but what I mean to say is that if you put all of your exhaust system together and it put a lot of stress on any particular piece to get it to fit, then it might be a good idea to loosen it all and then gradually pull it all back together so it all lands nice against eachother and isn't sprung..
In your case maybe just that WG to TT mount if you think it is really holding some force up on the exhaust, it just might be out of line with the rest of the jig.. Loosen it and tighten it again where it lands naturally..
Me and my dad built a gocart together out of a box from a mail order catalog when I was in elementary school.. It was all just pieces..
We were following the instructions but didn't tighten any of the bolts and I wanted to tighten them and asked him about it.. He showed me that if you put it all together tight then the bolt holes won't line up with the next piece..
_________________
80 Turbo - Slightly Modified |
|
| Back to top |
|
|
chuck21401
Joined: 20 Feb 2005
Posts: 526
Location: Annapolis, MD
|
| Posted: Tue Jul 30, 2019 2:18 am Post subject: |
|
|
| Fasteddie313 wrote: | | It's a tricky witch, because so much of the stuff needs to connect together and it's all ridged with no flex in any component, so they all have to be right in the correct spot. |
Correct.
| Quote: | | The exhaust.. I think I put the whole pipe onto the rear hanger just before the muffler, all in one piece, and then bolt that good to the turbine housing. |
On hindsight I would have done it that way. Now I know. 
| Quote: | Probably hang the WG loosely from its torque tube mounts first..
Then put the WG loose on it's dump pipe (connected to the exhaust, then the J-pipe loose on both sides, then snug all that up a little at a time so it all pulls itself back together into position where everything actually fits nicely in its natural state. |
That makes sense...but not sure how one would reach the WG bracket with the heat shield reinstalled along with everything else. You need to get two wrenches up in there to tighten two sets of nuts.
| Quote: | | They are all stiff pipes with ridged connections so I think it is important not to put it together by force (tightening bolts to close a flange) and stress any of the components. |
Connecting the J-pipe the exhaust manifold took some effort. Thinking back on it, I might have tightened the nuts on the turbo a bit much...I may want to back those off a 1/4 turn.
Other connections were snug but not too tight. Ideally should have a small torque wrench to be sure.
| Quote: | Anyway yeah I think the last thing I would tighten is the WG to torque tube mount, after I would get all of the rest of the ridged exhaust pieces "squared away"...
That mount (WG to TT) has slotted holes in it iirc doesn't it? Like it's made to be mounted wherever it lands on that soft mount.. I can't imagine being able to tighten that first and match everything else.. |
The bracket on the WG allows adjustment up and down. The bracket mounted to the TT doesnt alllow much adjustment...though you could wiggle the U clamp a bit if needed. That's great, but not sure how one gets wrenches up in there once everything else is mounted.
In my case I think everything went back together where it should. I relied on the pictures I took during disassembly and in some case I could see a mark where the nuts had been tightened down before to position things. But we'll see what happens after running it for awhile....and heating up everything up.
| Quote: | | and it put a lot of stress on any particular piece to get it to fit, then it might be a good idea to loosen it all and then gradually pull it all back together so it all lands nice against each other and isn't sprung.. |
If anything I would say the J pipe. Like I said above, when I went to mount the j pipe there was a big distance between the top of the J pipe and the bottom of the exhaust manifold. The valve seat has to be pushed up and tightened down first. I was a bit worried that the WG wasn't mounted up high enough on the bracket, but seems OK.
_________________
1981 Porsche 931 w/S1 engine & g31 transmission. Water-cooled intercooler |
|
| Back to top |
|
|
chuck21401
Joined: 20 Feb 2005
Posts: 526
Location: Annapolis, MD
|
| Posted: Mon Aug 05, 2019 1:27 am Post subject: |
|
|
The car is back on the road. The rebuilt WG is performing as expected...boost is between 6-7psi

Here is a 26 video - going through the gears. The glare is tough but boost gauge shows 6-7psi. My 12 year old assistant shot the video.
https://youtu.be/LaaH18OZrP8
_________________
1981 Porsche 931 w/S1 engine & g31 transmission. Water-cooled intercooler |
|
| Back to top |
|
|
chuck21401
Joined: 20 Feb 2005
Posts: 526
Location: Annapolis, MD
|
| Posted: Mon Aug 05, 2019 1:37 am Post subject: |
|
|
| chuck21401 wrote: | Next step will be to diagnose the problem with the clutch slave cylinder...I think it needs to be replaced but will read up on that.
|
I had to replace the slave cylinder and bleed the system before I could get going again. I used a Motive pressure bleeder to bleed the system. That worked great and the clutch pedal is working again.
So now I'm ready for the next project and I could see where a lift in the garage could be helpful.
_________________
1981 Porsche 931 w/S1 engine & g31 transmission. Water-cooled intercooler |
|
| Back to top |
|
|
chuck21401
Joined: 20 Feb 2005
Posts: 526
Location: Annapolis, MD
|
|
| Back to top |
|
|
|
|
You cannot post new topics in this forum
You cannot reply to topics in this forum
You cannot edit your posts in this forum
You cannot delete your posts in this forum
You cannot vote in polls in this forum
|
Powered by phpBB © 2001, 2005 phpBB Group
|


