 |
924Board.org
Discussion Forum of 924.org
|
| View previous topic :: View next topic |
| Author |
Message |
!tom

Joined: 28 Aug 2006
Posts: 1934
Location: Victoria, BC Canada
|
 Posted: Tue Jun 21, 2011 6:13 pm Post subject: Replace front wheel bearings Posted: Tue Jun 21, 2011 6:13 pm Post subject: Replace front wheel bearings |
 |
|
I apologize for the lack of step-by-step pictures, but hopefully the description will suffice. Click on any of the pictures for a bigger version.
With the 5-lug setup, the front hubs are aluminum, with steel bearings. Given that aluminum has a higher coefficient of thermal expansion than steel, this arrangement typically has a very tight interference fit, normally tighter than a cast iron hub with steel bearing.
Since aluminum is so much softer than steel, galling of the hub is a very real concern if a press is used to install or remove the bearing races.
This approach works great, and eliminates the risk of damaging your hub. No hammering is needed, nor do you need to make use of a press.
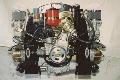
First up, race replacement. Here's an overview of the tools:

- Strip your hub. This means remove from spindle, and remove the rotor (disk).
*Tip: If you are going to replace your rotor, you can clamp your rotor in a vice directly to hold everything when stripping the hub. If you are going to re-use your rotor, you can pad the jaws of your vice with the brake pads.
- Clean thoroughly. Remove all grease, and hit the hub with a wire wheel to get rid of the caked on grime. Make it as clean as you possibly can. Use degreaser, wash, etc.
- Rummage through your socket set to try to find appropriate sized sockets for later steps. These are not critical, but they make the job easier. My 1-1/8 deep socket was a perfect fit for the outer race; when putting it through the hub from the inside, the socket would touch the inner edge of the outer race without touching the hub. You're not going to get a socket to press out the inner race due to the shape of the hub, but my 36mm socket was about right to use to install the inner race.
You'll also need a drift, and a hammer.
- Put the new bearing races in the freezer.
- Take the pans out of your oven, stick a hub in, crank the temp to 450 F, and turn on your range hood fan.
- Find yourself a street sign (or similar); you're going to want a metal surface to work on.

- After your hub has baked for 20 min. or so, it should be heated through. Take the hub out of the oven, and put it on your heat resistant work surface.
- Give the outer race a tap from the inside.

The race should fall out. Don't force it; if it takes more than just a light tap, installing the new race will be more difficult than it should be. If it doesn't come right out with a light tap, stick the hub back in the oven, wait a while, and try again.
- You'll need your drift and hammer to remove the inner race. Again, it should come out VERY easily. Just a few light taps, alternating sides.
- If more than a couple minutes have passed, pop the hub back in the oven to make sure it stays nice and toasty. If you're quick, you don't need to re-heat it, but you do need to grab the races from the freezer.
- Line up the outer race, and push it in place with your socket.

It should go in with hand pressure, and you should feel it fully seat. If you screw up and get the race in crooked, you'll need to tap it in straight. Use your old bearing race to help out; put that on top of the new race and hammer away and work it in straight. Before the race is fully seated, you're going to need to switch to another tool, as you don't want to install your old race in the bore too! You've got your socket and drift to work with as well.
- Flip the hub over and pop in the inner race. As above, it should pop in super easy with hand pressure. If you don't start it straight, you've got your tools to tap it in place.
- You're done the races!
The above works because the aluminum expands far more than the steel race. The temperature in the oven is far less than what aluminum can withstand; lots of people use aluminum cookware in ovens at higher temperatures than this.
As soon as you pop a frozen race in, the race heats up from the heat of the hub, and starts to expand. In just a couple seconds, the slip fit of the race has tightened, so it won't fall out when you turn the hub over to do the other side. It's still going to be far looser than with the hub at room temperature, but it won't fall out or shift.
Remove the outer race first; doing so gives more room when removing the inner race.
Next, it's time to pack and install the bearings.
Assemble the disk/rotor to the hub, and ensure the races and inner portion of the hub are clean.

Put a bunch of grease on the inner race. The idea is to build up a dam of grease so that the bearing is never starved for grease.

Pack your new bearing. I've normally done this by hand, but bought a packer for this project. Man is it ever slick!

Install bearing into inner race:

Similar to the inside of the bearing, you want a reserve of grease on the outside of the bearing. Cram a bit more grease around the outer edge of the bearing before you install the seal:

Install the seal. Use a hammer and tap around the edge. Be careful not to dent the seal.

Lube the seal with grease:

Flip it over and do the same for the outer bearing. Pack the bearing, but don't install it yet.

Now, time for assembly. Make sure the spindle is all clean.

Give the spindle a thin coat of grease. This is more for corrosion protection than anything. However, pay particular attention to where the seal rides; this grease helps to form the seal and prevents the seal from wearing out and burning.

Now, slip the hub on. Put it on straight, and the seal will slide over the sealing surface on the spindle.

Pop the freshly packed bearing in.

Pack more grease around the outer edge of the bearing to ensure a fresh supply during its life.

Install the retaining washer, making sure to re-use it the same way as last time. There will be a smooth and shiny side; this faces the bearing.

Install the locking nut. Again, the machined side goes towards the bearing, while the rough casting side goes out. Make sure you add sufficient preload. A good way of doing this is to use a big slotted screwdriver in the split in the nut, and tighten the nut as tight as you can. When using this technique, the screwdriver would be parallel to the axle and you would be turning the screwdriver, not using it as a pry bar.
Make sure you turn the wheel back and forth a bunch while tightening the bearing. This will help squirt the grease around inside and seat the bearings. If you don't, you may find you loose preload on your bearing in service, which will mean shortened service life.
* Note: * The FSM recommends that you test for correct bearing pre-load by trying to shift the outer washer with a screwdriver, without resorting to prying. This test should be done after tightening the clamping bolt on the axle nut. My personal recommendation is to use the technique I described above, which may result in a little more pre-load than the FSM recommendation. Regardless, ensure you turn the wheel by hand a bunch with the nut tight before settling on a final pre-load setting in order to ensure the bearings are properly seated.

Install the cap. On the left side, make sure you use plenty of goo to seal up the speedo drive. The cable will work inside the cap, and if you don't use enough, it will peel off the cap and lead to bearing contamination and failure.

You're done!

Edit: Fix links
_________________
78 924 NA
5-lug
Last edited by !tom on Wed Sep 05, 2018 12:45 pm; edited 6 times in total |
|
| Back to top |
|
 |
Grenadiers
Joined: 20 Feb 2007
Posts: 3222
Location: Nelson, WI & Prescott, AZ
|
| Posted: Tue Jun 21, 2011 11:07 pm Post subject: |
|
|
That's a great tip, I have to install new bearings on one of my projects soon.
_________________
'83 944 Track car.
'88 924S Track car.
'89 944 Turbo
2004 Winnebago Vectra monster RV
2012 Jeep Wrangler
2014 Kia Soul
2001 Ford F350 powerstroke |
|
| Back to top |
|
|
Fifty50Plus
Joined: 28 Feb 2008
Posts: 1361
Location: Washington DC area
|
| Posted: Wed Jun 22, 2011 1:07 am Post subject: |
|
|
Good write up  This system works very well and I've got an additional tip. This system works very well and I've got an additional tip.
After you have removed the old races, grind them down on the outside so that they are smaller than the hub. You can then use them as drivers for the new races by placing them small end to small end on the new race and using your socket on the big end of the old race. This allows you to seat the new race completely with no risk of damage. Then the old race falls out. Keep them in your tool box for the next time.
Chuck
_________________
1979 924 NA race car
1982 924 NA race car - Sold
1982 924 Turbo almost a PoS
1981 924 Turbo a real PoS, new engine
1982 924 Turbo nice body, blown engine
1972 911 E race car - going to Vintage
Various 944s to become IT-S race car |
|
| Back to top |
|
|
mehall

Joined: 15 Dec 2008
Posts: 191
Location: Richmond, MO
|
| Posted: Sun Jun 26, 2011 2:41 am Post subject: |
|
|
I've used this principle on steel hubs, too. It just requires a bit more planning...
Drop the new races in a deep freeze over night; the steel shrinks smaller as it drops in temp. If I'm in a hurry use dry ice, but don't place the race directly on the dry ice; this could make it harder to remove the race and it could cool too fast and cause unwanted changes in the steel.
In one case I had to use a torch to reheat the hub as I was working. Some guys have used welding current to heat them.
Generally this science works quite well and is used in many manufacturing processes.
Don't use these methods on aluminum parts unless you understane the ramifications of working with a softer metal at low temps.
_________________
Mark
'87 White 924s manual
'94 Lexus LS400
www.kcws.org |
|
| Back to top |
|
|
!tom
Joined: 28 Aug 2006
Posts: 1934
Location: Victoria, BC Canada
|
| Posted: Mon Jun 27, 2011 2:32 am Post subject: |
|
|
Uniform heating of an iron (steel) hub and steel race may help to break corrosion free, but it won't loosen the fit of the bearing in the iron hub.
Hitting the race with a welder works because as the weld bead cools, it shrinks, constricting the race that you welded.
Steel bearings in iron hubs tend to be a looser fit at room temperature than steel bearings in aluminum hubs, due to the different coefficients of thermal expansion. So, it's easier to remove a bearing from an iron hub at room temperature than aluminum, hence the above tips for the aluminum hub.
Pictures have been updated.
_________________
78 924 NA
5-lug |
|
| Back to top |
|
|
mehall
Joined: 15 Dec 2008
Posts: 191
Location: Richmond, MO
|
| Posted: Wed Aug 17, 2011 3:24 am Post subject: |
|
|
Thanks for refreshing the images.
_________________
Mark
'87 White 924s manual
'94 Lexus LS400
www.kcws.org |
|
| Back to top |
|
|
Rasta Monsta

Joined: 12 Jul 2006
Posts: 11724
Location: PacNW
|
| Posted: Wed Aug 17, 2011 3:50 am Post subject: |
|
|
Not to go around & around about this again, but putting preload on a tapered wheel bearing is not correct (especially "as tight as you can"  ). If you don't find my opinion on this persuasive, this approach is also contrary to instructions in FSM, Clark's Garage, or any other place you care to look. ). If you don't find my opinion on this persuasive, this approach is also contrary to instructions in FSM, Clark's Garage, or any other place you care to look.
_________________
Toofah King Bad
- WeiBe (1987 924S 2.5t) - 931 S3
|
|
| Back to top |
|
|
!tom
Joined: 28 Aug 2006
Posts: 1934
Location: Victoria, BC Canada
|
| Posted: Wed Aug 24, 2011 3:48 pm Post subject: |
|
|
Yes, we have disagreed on this in the past.
The technique I describe should result in a torque of a couple foot lbs. on the axle nut. This has, in my and others experience, performed well.
The technique that you mention has, in my experience, resulted in pad knock-back, as it is difficult to adjust the bearings to run with no pre-load throughout the operating temperature range. A small amount of pre-load, such that the bearing is operating with pre-load throughout its full operating range, ensures there are no failures due to insufficient pre-load, problems with pad knock-back, and also no failures due to excessive load (which results in overheating).
It is easy to find references of bearing pre-load for tapered roller bearings. A quick Google search of mine resulted in many application notes, which indicate how tapered roller bearings should be operated with pre-load. What is difficult to determine in my opinion is just how much pre-load either of our techniques achieves, in particular throughout the entire operating temperature range.
Being that the hubs are aluminum and therefore subject to a relatively high coefficient of thermal expansion, I would be concerned that bearing clearance (and hence pad knock-back) may develop with track use when the hub comes up to race temperature with the minimal pre-load applied as you describe.
Correct me if I'm wrong, but I believe the FSM recommends tightening the axle nut such that the outer washer is held in place by friction between the outer bearing and the nut, but that it can be shifted to take up its play with moderate force (that is, no levering with a screwdriver required).
There are also different opinions on just how much grease to use when packing the hub. I tend to err on the side of extra grease rather than insufficient grease, like I do with more rather than insufficient pre-load.
_________________
78 924 NA
5-lug |
|
| Back to top |
|
|
Captain_Kirk

Joined: 17 Dec 2009
Posts: 243
Location: Colbert, WA
|
| Posted: Thu Aug 25, 2011 1:47 am Post subject: |
|
|
Anything different on this how-to if you have the four lug set up?
_________________
1977 924na BlackSeaRD.com Torque Tube SuperBearings, Xenon air dam, 200# Weltmeister springs, Bursch header, 944 exhaust, Audi throttle body |
|
| Back to top |
|
|
!tom
Joined: 28 Aug 2006
Posts: 1934
Location: Victoria, BC Canada
|
| Posted: Thu Aug 25, 2011 2:27 am Post subject: |
|
|
| Captain_Kirk wrote: | | Anything different on this how-to if you have the four lug set up? |
Yes.
Race replacement is different; everything else is the same.
There is no need for putting the hub in the oven with the four lug setup, as those hubs are steel and therefore heat will not be very effective in loosening the races. Instead, they can be driven out with a drift, as the fit isn't as tight as the aluminum arrangement.
There's a notch in the hub to assist in driving out the outer race (wipe up the grease inside the hub to find them); you're probably not going to find a socket that will work for outer race removal. Race installation also requires driving the races in. Use a socket or the old race, and make sure you don't drive on the bearing surface of the race (obviously).
Putting the new races in the freezer and heating the hubs will help with race installation, but you may not find it necessary to heat the hubs.
_________________
78 924 NA
5-lug |
|
| Back to top |
|
|
Slam
Joined: 07 Jan 2005
Posts: 1689
Location: Wainwright, Alberta, Canada
|
| Posted: Tue Oct 25, 2011 9:10 am Post subject: |
|
|
This method works very well, but beware - you must work quickly and surely. I did this with my hubs a little while ago, and popped the races in the freezer the night before to shrink them. Two fell right into the hot hubs with a little sizzle and two needed persuasion - have your drifts and drivers handy. Heat transfer between the chilled race and hot hub happens fast.
I also managed to fill the kitchen with lovely greasy fumes. Fun stuff.
"What's for dinner, Dad?"
"Hot hubs, kiddo!"
"I thought Mom was cooking..."
_________________
'84 944 - kid blew motor
'83 944 - resting comfortably. For 12 years
'87 944 - sideswiped by trucker
'80 924 - gone
'78 924 - gone
'77 924 - rusting comfortably |
|
| Back to top |
|
|
Rasta Monsta
Joined: 12 Jul 2006
Posts: 11724
Location: PacNW
|
| Posted: Tue Oct 25, 2011 1:53 pm Post subject: Re: Replace front wheel bearings |
|
|
| !tom wrote: |  |
Thexthy. Dead thexthy.
_________________
Toofah King Bad
- WeiBe (1987 924S 2.5t) - 931 S3
|
|
| Back to top |
|
|
musicalannette
Joined: 21 Feb 2012
Posts: 413
Location: UK
|
| Posted: Thu Mar 15, 2012 8:06 pm Post subject: |
|
|
The best useage of kitchen appliances i have seen on the web, nice lateral thinking, you forgot to mention to do it when the wifes out the way!
Very good write up, you will have stopped a large number of people mangling their hubs. Thanks.
ps; A dishwasher is excellent for cleaning engine internals, it's a good job she can't use a computer as she still doesn't know and won't be able to read this!
_________________
I KNEW white wall tyres were invented by Americans .....just not at Boeing.... to be fitted on the 737..... |
|
| Back to top |
|
|
ideola

Joined: 01 Oct 2004
Posts: 15548
Location: Spring Lake MI
|
| Posted: Thu Mar 15, 2012 10:30 pm Post subject: |
|
|
| musicalannette wrote: | | A dishwasher is excellent for cleaning engine internals |
Agreed. I bought SWMBO a new one, and took the old one downstairs by the utility sink. Run the water in the adjacent sink until it's rocket-hot, then run the dish washer on hot water with a heavy duty degreasing detergent. Works wonders.
_________________
erstwhile owner of just about every 924 variant ever made |
|
| Back to top |
|
|
ideola
Joined: 01 Oct 2004
Posts: 15548
Location: Spring Lake MI
|
| Posted: Sat Nov 23, 2013 11:11 pm Post subject: |
|
|
What happened to pix??? 
_________________
erstwhile owner of just about every 924 variant ever made |
|
| Back to top |
|
|
|
|
You cannot post new topics in this forum
You cannot reply to topics in this forum
You cannot edit your posts in this forum
You cannot delete your posts in this forum
You cannot vote in polls in this forum
|
Powered by phpBB © 2001, 2005 phpBB Group
|


