 |
924Board.org
Discussion Forum of 924.org
|
| View previous topic :: View next topic |
| Author |
Message |
Jakkq

Joined: 29 Sep 2008
Posts: 810
Location: Omaha, Nebraska
|
 Posted: Wed Dec 08, 2010 11:07 am Post subject: Snailshell Rebuild (Pictures Included) Posted: Wed Dec 08, 2010 11:07 am Post subject: Snailshell Rebuild (Pictures Included) |
 |
|
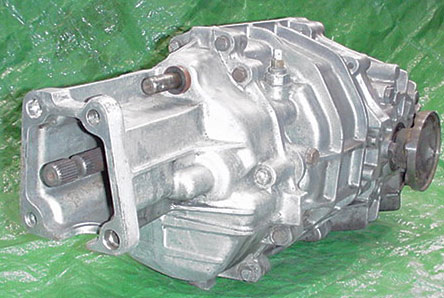
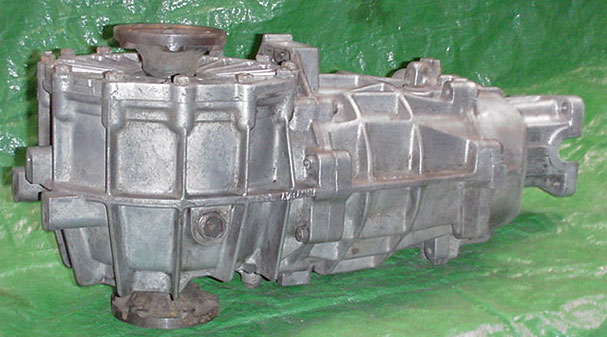
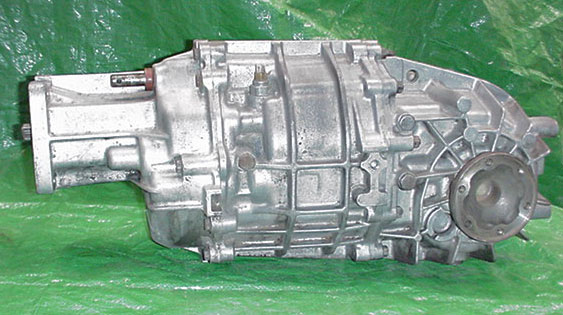
Picked up a Snailshell today. I am going to begin taking it apart to see what the true condition of the insides are like, and if need be rebuild, using Ideola's Rebuild Kit.
Has anyone had experience with rebuilding a snailshell? Anything I should take note of before beginning?

_________________
1979 Porsche 924- Snailshell
http://porsche924workblog.blogspot.com/ |
|
| Back to top |
|
 |
Tas931
Joined: 08 Apr 2010
Posts: 142
Location: Tasmania, Australia
|
| Posted: Wed Dec 08, 2010 10:00 pm Post subject: |
|
|
Oh Wicked take plenty of pics etc,
I'm going to be doing mine next year so this will be handy  |
|
| Back to top |
|
|
D Hook

Joined: 02 Nov 2002
Posts: 3158
Location: Omaha, NE
|
| Posted: Wed Dec 08, 2010 10:02 pm Post subject: |
|
|
Ambitious project Autsin. Best of luck. Keep us posted.
_________________
'80 924 n/a SOLD |
|
| Back to top |
|
|
Rasta Monsta

Joined: 12 Jul 2006
Posts: 11733
Location: PacNW
|
| Posted: Thu Dec 09, 2010 1:27 am Post subject: |
|
|
Recommend taking a close look at the PET. It appears to me that CGT synchros are a straight swap in. . .and they cost less.
Also, California Motorsports has manufactured the formerly unobtainable (and frequently FUBAR'd) dogteeth.
_________________
Toofah King Bad
- WeiBe (1987 924S 2.5t) - 931 S3
|
|
| Back to top |
|
|
Mike9311

Joined: 14 Dec 2004
Posts: 1798
Location: Chicago-ish
|
| Posted: Thu Dec 09, 2010 3:50 am Post subject: |
|
|
I did one and just found all my old worn parts from wayyy back.
I suggest strongly to fire up the digital camera and keep taking pics and notes. You will also have to obtain the Curil K2 Case sealant (Gehaeuse-Dichtmasse). I believe that is the same as the original D3 VW/Audi stuff
_________________
1980 931 since 1989
1981 Ideola 931 Club Sport
1982 931 Entwicklungsfahrzeug
1979 924 NA ohne 650 mit 471
1982 931 Red Resurrection - 951 IC
1982 931 parts car / resurrection?
1980 924 NA (R&D lightweight)
1982 931 wana-be GTR race car |
|
| Back to top |
|
|
ideola

Joined: 01 Oct 2004
Posts: 15550
Location: Spring Lake MI
|
| Posted: Thu Dec 09, 2010 4:25 am Post subject: |
|
|
The CMS dog rings are available CHEAPER by ordering from my site vs. direct.
http://garage.ideola.com/prod-Trans.html
_________________
erstwhile owner of just about every 924 variant ever made |
|
| Back to top |
|
|
Joes924Racer

Joined: 03 Nov 2002
Posts: 11964
Location: Oregon, Denver Colorado native!
|
| Posted: Thu Dec 09, 2010 4:43 am Post subject: |
|
|
I call wicked word of the day. On the post nice, thats big.
How long do you think it will take you.
_________________
1979 porsche 924 Na
1980 porsche Turbo 931GT Replica
Have u ever driven a turbo. |
|
| Back to top |
|
|
v8carreragts

Joined: 05 Sep 2003
Posts: 665
Location: Tucson, AZ
|
| Posted: Thu Dec 09, 2010 4:56 am Post subject: |
|
|
I've rebuilt these. I did my current one last summer. I changed the ring and pinion to the European 4.125 and also changed to the European 5th gear.
I posted part numbers for the synchro rings along with some other parts awhile back. I believe ideola has this info as well.
One thing I did was I changed one of the 1st gear thrust washers to re-position the driven gear. This is because the two gears always seem to be offset from each other slightly.


_________________
84 944--924 Carrera GTS clone w/520HP Chevy 302 V8--RUNNING!
2015 AUDI Q7
2013 Dodge Charger R/T AWD HEMI
2013 Chevy Cruze |
|
| Back to top |
|
|
leadfoot

Joined: 11 Dec 2002
Posts: 2222
Location: gOLD cOAST Australia
|
| Posted: Thu Dec 09, 2010 7:04 am Post subject: |
|
|
did this not too long ago too
follow V8carreragts' advice... change the thrust washer to get the gear aligned
some usefull info for you...
you will need a large gear puller, 100mm three pronger to get off the lower gears, my 100mm had the two sets of holes (extention set)
G31 Transmission Synchronizer Replacement
borrowed from
http://m-elliott.us/Porsche/Repairs_Xmsn.htm
found this site very helpful, there are also gotchas in the info, read them, especially make sure you don't crush the roller cage bearing when pulling of second gear.
Stu
________________________________________
Back to Transmission repair page
How-To remove the transmission
NOTE: Although there are many in-line pictures here, you can look at all the photos I have of this project, by going to my "photo essay" of the work. I've shown thumbnails in this article to reduce download time. Click on a photo for a larger view, or open the photo essay in a separate window and follow along.
In doing my research before getting started, I discovered some confusing information in the manuals. I have the factory manuals for both the "base model" and the turbo, as well as the Haynes and Chilton's manuals. Comparing procedures, line drawings and photographs I was able to "piece together" an almost-complete picture of what needed to be done and how. But, as with most work that you do for the first time, I discovered some "gotchas". None of the manuals were very detailed in exactly what had to be done, a lot of steps were assumed. Also, the drawings and photos were a mix of transmission models, I had to be careful in interpreting the images and "relating" what was presented to what was actually seen on the car.
Special thanks goes out to the membership of www.924.org, their assistance with this project was helpful and greatly appreciated.
In doing the repairs I replaced the following parts:
Part Name Porsche Part# Source of supply Price
First gear synchronizer band 931.302.301.02 e-Bay, Partwerks of Chicago $99.00
Second/Third gear synchronizer band 931.302.301.01 EuroWebParts.com $45.00/ea
Transmission fill plug 111.301.127E Dealership $4.00
Gasket, transmission to differential housing 477.301.191.A Dealership $3.00
Input drive shaft seal 999.113.247.40 NAPA #NOS9706 $8.00
Output seals [both] 999.113.183.40 EuroWebParts.com # J7041-24000 $7.00/ea
Shift-shaft seal 001.301.227 EuroWebParts.com # J1162-52304 $2.00
Shift-rod coupling bushings 911.424.223.90 PelicanParts.com # C-424-223-90 $16.00/pr
Shift guide rod rear anchor 477.711.176A EuroWebParts.com # J1079-40253 $39.00
Click here for a list of other supply sources.
Preparations:
This is going to be some messy, slippery work. Have lots of rags and some "quick dry" or clean kitty litter handy to absorb any spills. I also recommend that you have a supply of plastic containers and/or Zip-lock bags to put pieces in so you don't lose or get anything mixed up. They will also help to keep dirt off of things. There are several needle bearing assemblies involved, and you need to ensure you don't loose any parts or get them mixed up. All the bearings need to go back with the same gears, oriented in the same way they came out. I recommend you have a clipboard, paper and pencil handy and make notes of how things looked when you took them apart. I marked the gears and bearings with a magic marker as I took things apart so I could reassemble everything exactly the same way it came apart. The gears and bearings will have markings on them to help you remember their orientation. This is a perfect project to use a digital camera on, it is a shame I didn't have a quality camera to document the work.
To perform these repairs you'll need:
8mm, 17mm hex head (Allen type) sockets
13mm,16mm, 18mm, standard sockets
22mm, 36mm deep-well sockets
some extensions
ratchet handle
13mm combination wrench
some decent flat-headed punches
wood block
hammer
gear puller
retaining ring pliers
tweezers
anaerobic gasket sealant like Loctite 573.
Transmission disassembly:
Put the transmission on a suitable engine or transmission stand of some sort. I don't have either, so I improvised by using a Black & Decker WorkMate. By spreading the tabletop the transmission was cradled in the gap pretty nicely. At other times I stood it up on its tail end and that worked a little better. I had to move it around and shift it to access various parts, so the table wasn't the ideal surface, but it is what I have. The transmission is heavy (approx 100lbs) and un-wieldy so be careful not to drop it.
Drain the unit by unscrewing the 17mm hex drain plug on the bottom of the differential housing. As you separate the cases additional oil will drain out, so it is a good idea to leave a catch basin of some sort under it even after you drain it through the main drain hole.
Remove the coupling that mated the transmission to the car's drive shaft by rotating the input shaft until the remaining 8mm hex (Allen type) bolt is accessible through the cut-out in the front housing and taking the bolt all the way out. There is a groove in the input shaft that the bolt goes in, and unless the bolt is completely removed, the coupling cannot slide off the shaft. Make a note of how far back on the shaft this coupling is, so on reassembly you can duplicate its position.
Remove the 13mm bolts holding the front casing to the central section of the assembly. After all the bolts are off, make sure you are ready to catch some oil that is going to come out when you separate the sections.
Using a small block of wood and hammer, gently tap on the edges of the backside of the front section to break the seal between the front and center sections of the assembly.
There is a thrust washer on the end of the shaft holding the double gear, and it may fall off its shaft as you separate the sections. If you hear something fall inside the case, that is what it is, and as you pull the sections apart, don't lose the washer.
Pull the front casing off of the shafts. If the thrust washer did not fall off the double gear shaft, take it off now so it doesn't fall off unexpectedly. Put the washer in a bag or container.
Put a rag in the four oil passageways so parts or junk can't fall down inside the transmission (This is Gotcha #1).There are three shift shafts that are controlled by the main shift shaft that protrudes out of the transmission case (and attaches to the shift rod running to the gear selector): Reverse and 1st go to the fork in this outer section. The notch where the selector "tang" goes has a spring-loaded "lockout". First is engaged by pushing the selector tang into the lockout then pushing the shift shaft into the case. There is a center "neutral" position, and reverse is engaged by pulling the shift shaft out.
o (Gotcha #2) The shift shaft, shift fork and shift sleeve can come off (beyond reverse) if pulled too hard ... don't pull it off yet.
The center shift shaft engages 2nd and 3rd gears and the outermost engages 4th and 5th. The lower number gear is engaged by pulling the shaft out, the higher gear by pushing it in. All the shafts will "stop" in-gear or in the neutral position because of a spring-loaded detent.
Engage 1st and 5th gears: Push the outer shift shaft all the way in (5th). Grasp the shift fork for the 1st/reverse gear and push it in to engage the sleeve on the large first gear. This should lock up the transmission so neither the input shaft or pinion will rotate.
With one of your punches or a very small chisel, gently "un-punch" the lock tab of the collar nut on the pinion shaft.
Remove the pinion shaft collar nut with a 36mm deep-well socket.
Remove the 17mm bolt on the side of the transmission housing that retains a detent and spring that engages with the 1st gear shift fork shaft. (It is below the backup light switch as shown in the second photo up above). Remove the spring and detent, and put them in a container or bag. There will be another of these, so remember which spring & detent goes where.
o (Gotcha #3) If you don't remove the detent and spring, you risk having them fall back into the depths of the transmission on re-assembly.
Put the cap bolt back in the hole to keep dirt out and so it isn't misplaced.
Unscrew the backup light switch (22mm) and with tweezers extract the pin at the bottom of the hole.
o (Gotcha #4) This pin will block the shift shaft hole on reassembly if it isn't removed.
Gently but firmly pull forward on the 1st gear selector fork/shaft and shift sleeve until it comes completely out. What you will be doing is moving the selector sleeve out, off of 1st gear at the same time as you pull out the fork and shaft. There is no need to drive out the roll pins connecting the fork to the shaft.
Pull off the sleeve if the fork disengaged before it slid completely off the guide.
Pull off the sleeve guide.
Remove the shift selector (that shaft with a foot on it that engages either of the three shift shafts).
Gently pull the entire first gear assembly off the pinion. The synchronizer parts are kept in place by a retaining ring/clip, so don't worry about losing them
Be careful to keep everything together. There is a thrust washer, and the gear itself along with the internal synchronizer parts. Between the gear and the shaft there is a sleeve and a set of caged needle bearings. Make a note of how these parts fit in relation to one another and put them in a container or bag.
Remove the double gear idler gear. Be careful to keep the parts in order as they slide off the shaft. You removed the outer thrust washer earlier, now take off the gear, a washer-type needle bearing and another washer. Between the gear and the shaft are a caged needle bearing, a spacer and another caged needle bearing set. Don't lose any of the needle bearings and keep everything straight so they can be replaced in the same order with the same orientation.
Pull out the 2nd-3rd shift shaft until 2nd gear is engaged
Drive out the roll pins that hold the 2nd-3rd selector yolk to the shaft and remove the yolk.
This completes the strip-down of the front section of the transmission
Unbolt the 13mm nuts and one bolt holding the center section to the differential housing.
Position a drip pan to catch the oil that will drip out when you separate the two sections.
Using a small block of wood and hammer, gently tap on the edges of the backside of the center section to break the seal between the center section and the differential housing. There is a paper gasket between the sections, and depending on what kind of sealant was used on the gasket, it may be difficult to separate.
Pull off the center section case.
(Gotcha #5) Put a rag in the oil passageways so stuff can't fall down inside the differential.
I was never able to remove the fill plug in this center section, so at this point I drilled out the plug and replaced it.
Drive out the roll pins holding the 2nd & 3rd gear selector fork on its shaft. Pull out the shaft then remove the fork. To replace the 2nd & 3rd gear synchronizers, you have to remove the pressed-on outermost bearing. The bearing is the only part pressed on that has to be removed in order to replace the 2nd/3rd gear synchronizers. The factory manual says to remove the entire pinion assembly at this point and press everything off. I don't have a hydraulic press, and I didn't want to remove the entire pinion and/or main shaft from the housing because of alignment issues during reassembly. So, I used a gear puller.
Push the 2nd & 3rd gear selector sleeve rearward onto 3rd gear.
Measure the space between the second gear and the thrust washer between it and the outer bearing. Get a "go/no-go" measurement: mine was 0.012" / 0.013"
Measure the distance between the outside of the outer bearing, and some identifiable part of the pinion shaft. On reassembly you need to try and match these values.
Assemble an appropriately size gear puller, and have it grab under 2nd gear, between the gear and the shift sleeve. Grip the gear itself, not the row of "dog teeth". I placed some thin brass shims on the gear-puller jaws to ensure that the puller didn't damage the gear. The 2nd gear is free spinning, but what you want to do is to pull on it to remove the outer bearing. The washer between the two will evenly distribute the force and remove it.
o Gotcha #6 Only pull the gear up far enough so you can grab under the washer. Pulling the gear too far will cause the gear to damage the Mainshaft End-bearing.
Reposition the gear puller under the washer and finish pulling off the bearing.
Push the selector sleeve onto 3rd gear.
Remove the 2nd gear, taking care to not lose any of the synchronizer parts. They are not held in place by anything.There is a synchronizer band, a thrust block, a stop and a locking band. I found it easiest to first extract the needle bearing and sleeve, then remove the gear because the gear will hit the mainshaft bearing if you try and remove it with the bearing and sleeve in place. On re-assembly, positioning the gear first and then inserting the bearing & sleeve is the way to go.
Make a note of how the caged needle bearing and second gear fit, and put all the parts you are removing into a container or bag so you don't lose those needle bearings, and you keep the right bearings with the right gears, oriented in the right direction.
Move the selector sleeve off of 3rd gear and remove it.
Remove 3rd gear and the parts that come with it. Again, the synchronizer parts can fall off, and watch out for those needle bearings, don't lose them and keep them along with the gear in a separate container or bag so you don't mix them up with the others.
This completes the strip-down I did of the pinion.
If the 4th or 5th gears, or the last bearing on the pinion need replacing, they may need to be pressed off instead of using a gear puller because of the long reach. Also, removing the clamp plate to separate the pinion from the differential housing will cause the current alignment of the pinion and ring gear to change when you reassemble things. To properly align everything, several measurements using a backlash and run-out dial will be needed. If you don't have them or the expertise to use them, I would not recommend doing this work yourself.
Synchronizer band replacement:
Assembling 2nd and 3rd gears' synchronizer assemblies is a piece of cake, and are the same. The "stop" goes into the notch cut into the locking band. The thrust block goes into the open space in the locking band. The synchronizer band fits inside the row of "dog teeth", with its open section surrounding the thrust block. The synchronizer and locking bands are like concentric "C's" with the thrust block in the opening. Coat everything with oil and put it together in the proper order
The 1st gear assembly is held in place by a wide retaining ring. This ring is very strong and is difficult to remove, and harder to replace. I recommend covering your sturdy worktable with heavy cloth or several layers of newspaper, and (Gotcha #7) wearing gloves to help prevent hurting your hands if something slips. Remove the retaining ring with a pair of retaining ring pliers by opening the ring far enough to get it out of the groove it locks in.
Once the ring is off, assembling it is similar to the 2nd/3rd gear assemblies. The only difference is (this is important!!) that, if the stop block is at 6:00, the opening on the lock ring is at, like, 1:00 or 2:00 in relation to the stop, whereas on the 2nd/3rd gear assemblies, the opening is directly opposite the stop.
To get the retaining ring back on is difficult. To spread the ring far enough and to get it to "catch" under the locking lip on the gear takes some hand strength and persistence. I ended up clamping the assembled gear to the table with a wooden Jorgenson clamp to keep the ring from "buckling" when it was opened far enough to go over the lip. Once I got it started (while still clamped down) I drove it the rest of the way around with a small brass drift. The synchronizing ring will want to come un-seated as you man-handle the thing, and if unseated, the retaining ring can't engage the lip. Once you see it, this description will make more sense.
Once the retaining band/clip is back on, make double sure it has engaged the inset ring above the synchro ring, and then rotate the retaining ring so it's split is not over the stop or thrust block. Mine was assembled so the retaining ring opening was like at 4:00 or 5:00.
Transmission re-assembly notes:
Reassembly is pretty much in just the opposite sequence of disassembly, but a couple of pointers are:
I strongly recommend replacing the shift shaft coupling bushings, the shift guide rod anchor and output seals on the differential casing while the transmission is out, and to also replace the drive shaft input seal and main shift shaft seal. All together the seals only cost about $25 and it's good insurance. The bushings and rod anchor run about $45-$50. You sure don't want to pull the transmission again just to replace any one of these items.
I reversed the 2nd/3rd gear selector sleeve when putting things back together. The 2nd gear side (top two photos at right) had more rounded splines than the 3rd gear side (bottom two photos at right). Since I was having noticeable grinding in 2nd, I think that maybe reversing the sleeve will help out. This was a gamble, I don't know if it will pay off or not.
When putting the2nd gear back on the pinion shaft, put the gear in place first, engage it's teeth on the mainshaft, then drop in the needle bearing and sleeve, otherwise the gear will hit the roller bearing on the end of the mainshaft.
You will have to tap the pinion shaft end bearing back onto the pinion if you removed it using a gear puller like I did. Do this gently and equally all the way around the bearing to prevent it from galling, and be sure and drive the collar of the bearing, not the cage holding the roller bearings. I took a wooden Jorgenson clamp and stood it on end and used it like a double- footed punch to re-seat the bearing. Duplicate the spacing between the bearing and the thrust washer like it was when you pulled off the bearing.
Don't put the detents or their springs back in place until everything is assembled. I say this because the detents make it difficult to manipulate the shifting motions you will have to do when putting things back together. If the detents are in place and you accidentally pull one of the shafts out, you can lose the detent inside the transmission or differential (Gotcha #3) and you will have to open it back up to retrieve it (or at best, turn the thing up-side-down and hope the detent comes out one of the oil passages). This happened to me, and it wasn't fun.
When reassembling the 2nd/3rd gear shift fork and shaft, remember to engage the fork in the shift sleeve, and then push the shaft through the fork. You'll have trouble reassembling things if you put the fork on the shaft first, and then try and put the shaft in place. Brace the fork and shaft as you drive the roll pins back into place so you don't strain the shaft or its mounting holes as you hammer the pins back in place. An alternative method to re-seat the roll pins is to use a "C clamp" and press them back in place.
Clean the flanges and replace the gasket between the differential housing and the center section. Dress the gasket properly and seal it with an anaerobic flange sealant like Loctite 573.
Also brace the yolk on the 2nd/3rd shift selector yolk as you drive the roll pins back into place so you don't strain the shaft or its mounting holes as you hammer the pins back in place. An alternative method to re-seat the roll pins is to use a "C clamp" and press them back in place.
There is another detent that goes sideways between the shaft holes for the 1st/reverse and 2nd/3rd selector shafts. This detent can block either of the holes, and you have to make sure it is in between the holes on reassembly (Gotcha # or you can't get the shafts in all the way. or you can't get the shafts in all the way.
Make sure to remove the backup switch activation pin before reinstalling the 1st gear selector fork shaft (Gotcha #4).
Just like the 2nd/3rd gear detent, make sure you don't put the 1st/reverse detent in place until everything is reassembled. The fork & shaft are not anchored, and if pulled out too far, the detent can fall back inside the central housing (Gotcha #3).
Clean the flanges and seal the front transmission housing with an anaerobic flange sealant like Loctite 573.
_________________
1981 ROW 924 Turbo -
carbon fiber GT mish mash
LS1 conversion in progress... |
|
| Back to top |
|
|
v8carreragts
Joined: 05 Sep 2003
Posts: 665
Location: Tucson, AZ
|
| Posted: Thu Dec 09, 2010 7:45 am Post subject: |
|
|
I didn't use the 931 synchronizers. I used P/N 915.302.302.06 for 1st gear. This is the part used on the G31/03. (Carrera GT) It is supposed to be a stronger synchro and it is also available everywhere.
I used 928 synchros for 2nd and 3rd P/N 928.302.302.31. These are also revised parts and available everywhere.
The last 2 digits or Porsche part numbers are the revision number so as you can see, these synchros have been revised a few times.


_________________
84 944--924 Carrera GTS clone w/520HP Chevy 302 V8--RUNNING!
2015 AUDI Q7
2013 Dodge Charger R/T AWD HEMI
2013 Chevy Cruze |
|
| Back to top |
|
|
Jakkq
Joined: 29 Sep 2008
Posts: 810
Location: Omaha, Nebraska
|
| Posted: Fri Dec 10, 2010 5:38 pm Post subject: |
|
|
Okay, it looks like before I get started, does anyone have some suggestions for a Transmission Holder? I'm going to get nowhere with these superhuman tight bolts.
_________________
1979 Porsche 924- Snailshell
http://porsche924workblog.blogspot.com/ |
|
| Back to top |
|
|
v8carreragts
Joined: 05 Sep 2003
Posts: 665
Location: Tucson, AZ
|
| Posted: Sat Dec 11, 2010 1:59 am Post subject: |
|
|
I just bolted a piece of steel plate to the housing and clamped it into my bench vise. (I have a big bench vice)
_________________
84 944--924 Carrera GTS clone w/520HP Chevy 302 V8--RUNNING!
2015 AUDI Q7
2013 Dodge Charger R/T AWD HEMI
2013 Chevy Cruze |
|
| Back to top |
|
|
9XX Girl!

Joined: 20 Sep 2009
Posts: 1617
Location: Cornish Riviera SW England
|
| Posted: Sat Dec 11, 2010 3:11 am Post subject: |
|
|
this tread is gonna be fun Jakkq, 
lucky you got a computer and an internet connection!
anyway, i thought you were moving to the desert?
_________________
924 (84) N/A 2 ltr - 5 Speed - BLACK - Project (looking for 200BHP, any ideas!)
924 (81) N/A 2 ltr - 3 Speed Auto - SURINAM RED (Metallic) - Near Original Spec (sticking with originality)
BOTH ON THE ROAD, BOTH USED EVERY-OTHER DAY |
|
| Back to top |
|
|
Jakkq
Joined: 29 Sep 2008
Posts: 810
Location: Omaha, Nebraska
|
| Posted: Sat Dec 11, 2010 6:36 am Post subject: |
|
|
| 9XX Girl! wrote: | this tread is gonna be fun Jakkq,
lucky you got a computer and an internet connection!
anyway, i thought you were moving to the desert? |
Family issues. 
Trying to find a second job anyways, to help pay for the cars.
I am finishing up fixing the 928S, and then I'm selling it for a Venetian Blue 928 that fit's my requirements.
I guess I will just try and find or come up with something I have here to support the Transmission. I tried using a Black and Decker Workmate I had here, but that still didn't hold it in enough for the strength it takes to yank at the bolts. I just kept ripping it out of grip.
_________________
1979 Porsche 924- Snailshell
http://porsche924workblog.blogspot.com/ |
|
| Back to top |
|
|
bnoon
Joined: 12 Oct 2009
Posts: 607
Location: West Des Moines, IA USA
|
| Posted: Sun Dec 12, 2010 1:39 am Post subject: |
|
|
Sweet man, I hope things go well for you. Because then you can drive over to Iowa and rebuild mine!!!
Don't you have an impact gun for bolt removal??? If you find yourself over here in Iowa, let me know. We can pop those loose for you in a few seconds and leave them finger tight for ya!!!
_________________
'80 924 Turbo - SOLD!
1986 Porsche 944 Turbo - SOLD!
Porscheless  |
|
| Back to top |
|
|
|
|
You cannot post new topics in this forum
You cannot reply to topics in this forum
You cannot edit your posts in this forum
You cannot delete your posts in this forum
You cannot vote in polls in this forum
|
Powered by phpBB © 2001, 2005 phpBB Group
|


