| View previous topic :: View next topic |
| Author |
Message |
Fasteddie313

Joined: 29 Sep 2013
Posts: 2596
Location: MI
|
 Posted: Tue Apr 29, 2014 1:06 pm Post subject: Posted: Tue Apr 29, 2014 1:06 pm Post subject: |
 |
|
| pcelenta wrote: | | I would not recommend mixing dissimilar metals like aluminum and steel. Could cause further corrosion. Better with steel I my opinion. |
your right, I didn't even think of that...
electrolysis is it called? I forget but I know what you mean..
I guess I could go to the junk yard and find an old car hood to get my metal out of..
_________________
80 Turbo - Slightly Modified |
|
| Back to top |
|
 |
pcelenta
Joined: 16 Feb 2007
Posts: 546
Location: long island,ny
|
|
| Back to top |
|
|
Fasteddie313
Joined: 29 Sep 2013
Posts: 2596
Location: MI
|
| Posted: Wed Apr 30, 2014 5:14 am Post subject: |
|
|
ok so this is what my limited imagination has been able to come up with...
I am going to try to explain, I hope you will be able to follow..
this does not includt the chanel wall with the plugs, that will be the last piece to make and put on..
this is the floor all the way from the outside wall behind the front QP (left) witch includes the channel floor.

this is a view from the direction of the front of the car
the black lines represent the hole that im left with, cut out inside the black, good car on outside of black
the red will be the first panel to go into place and will be attatched from the underside, it will have a lip down all along the side that meets the fender well for attatchment purposes.
the yellow will be the next piece, it will have a lip all along its fender well side and a curved lip along that small roundout of the wheel well. lips will be upward this time and will be put in place from the top. it will extend past the curve slightly to allow overlap of the next panel and overlap the red past the point where the black is further to the right.
the next piece is the blue, it will slightly overlap the yellow on its left side, overlap the red and black towards its back and leave some room to overlap the next piece to its right. it wall also be lipped up and added from the top side
next and last panel is the green one it will overlap the blue to the left, the red and black to the back and the black to its right completeing coverup of the hole.
the reason these pieces overlap past the black is that the pink lines represent 1/4"x1" steel straps witch will be attatched from the bottom and bolted through all panels at overlap from the top down to completely entrap them together and provide rigid structural support to the floor of the box.
the pink line further back will just be another 1/4"x1" strap merely for strengthening purposes..
the channel wall can be figured out after the floor is finished.
not to throw away good advice but I am still pretty set on 3m windshield eurithane between all lipped and overlapped riveted connections...
the next crazy idea to top it all off may be to get some roofing tar stupid ridiculous dangerously hot in a pan on the stove/outside fire and pour it down the walls where there are seams and onto the floor.. prolly come up with a better plan than than though
_________________
80 Turbo - Slightly Modified |
|
| Back to top |
|
|
Fasteddie313
Joined: 29 Sep 2013
Posts: 2596
Location: MI
|
| Posted: Wed Apr 30, 2014 5:15 am Post subject: |
|
|
so whaddya think???
_________________
80 Turbo - Slightly Modified |
|
| Back to top |
|
|
pcelenta
Joined: 16 Feb 2007
Posts: 546
Location: long island,ny
|
| Posted: Wed Apr 30, 2014 6:00 am Post subject: |
|
|
Well I think it will definately be strong enough to support the battery and if you secure it with rivets the whole thing will be structurally sound. urethane will act as a sealant as well as adhesive. it aint gonna be pretty but it will work.
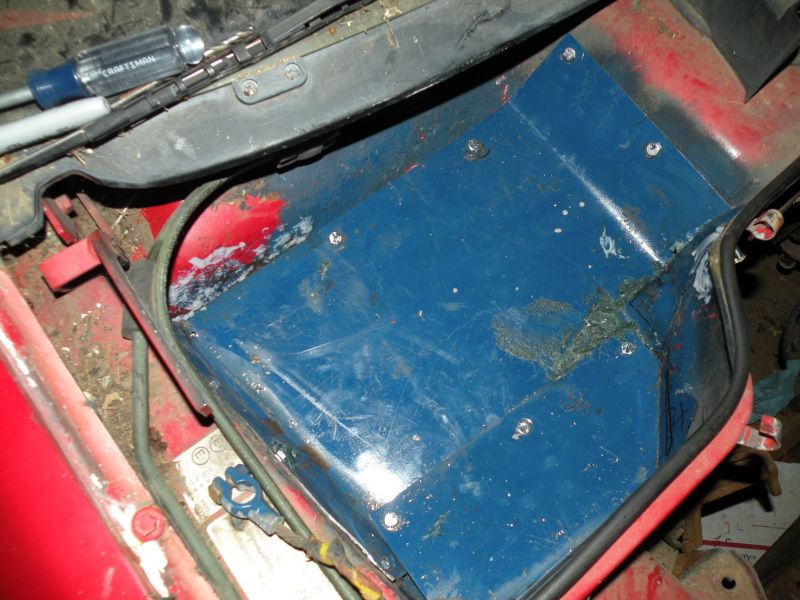
here's a shot of my battery box after some blasting.
there are actually two stress cracks one visibile and one contected to it but very fine...I spent about 45 minutes with a harbor frieght spot blaster and some aluminum oxide. |
|
| Back to top |
|
|
Fasteddie313
Joined: 29 Sep 2013
Posts: 2596
Location: MI
|
| Posted: Wed Apr 30, 2014 6:06 am Post subject: |
|
|
bodyshop wont touch it due to liability reasons....
_________________
80 Turbo - Slightly Modified |
|
| Back to top |
|
|
Fasteddie313
Joined: 29 Sep 2013
Posts: 2596
Location: MI
|
| Posted: Wed Apr 30, 2014 6:14 am Post subject: |
|
|
| pcelenta wrote: |
there are actually two stress cracks one visibile and one contected to it but very fine. |
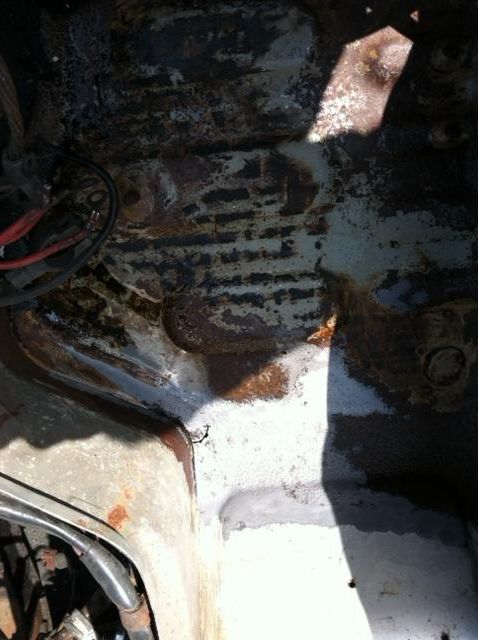
yes right where that crack is in yours I had quite a rust spot and the firewall right in that area isn't in that great of shape either.. in the pics in my first post on this thread you can see where the firewall has a hole in it right there...
the metal was weak there but im quite sure I caused the hole thinking I could chisel between the spot welds before I realized that wouldn't work and set out grinding everything
_________________
80 Turbo - Slightly Modified |
|
| Back to top |
|
|
pcelenta
Joined: 16 Feb 2007
Posts: 546
Location: long island,ny
|
| Posted: Thu May 01, 2014 4:57 am Post subject: |
|
|
that is bizzare that they didn't want to touch it for liability reasons..wtf? I suppose they shouldn't repair any cars because of liability issues. It's not like you asked them to remove an airbag from your car or something. Honestly, I don't think there would be any body shops in business if they were refusing business out of concerns of a future liability. two good friends of mine own shops and you should see the cars they straighten out there...frame straighting...welding new pieces in.
Honestly, I think they see a ton of labor and don't want your car taking up room in one of their bays especialy if it is not mobile. |
|
| Back to top |
|
|
Fasteddie313
Joined: 29 Sep 2013
Posts: 2596
Location: MI
|
| Posted: Thu May 01, 2014 6:33 am Post subject: |
|
|
honestly I don't think there that busy, they asked if patch panels were available and when I said no they said because its a structural area that they wont do the job because if it got into a wreck blah blah blah... they said it would be like $600-$800 anyway witch I would have turned down, they did say that they would make a floor plate for it for that I could install myself to eliminate there liability if I braught the car in but quoted $200 ish just to knock out that piece of metal.
but they were very nice and professional....
second body shop hasn't called me back like they said they would after I sent them pictures....
I'm just going to do it myself I suppose
_________________
80 Turbo - Slightly Modified |
|
| Back to top |
|
|
Fasteddie313
Joined: 29 Sep 2013
Posts: 2596
Location: MI
|
| Posted: Tue May 06, 2014 11:10 am Post subject: |
|
|


today I made a nice cardboard copy of the box floor, I transferred it to some nice galvanized sheet and added my lips....
I have already cut it out and folded up my lips and its awesome, turned out better than I could have hoped
_________________
80 Turbo - Slightly Modified |
|
| Back to top |
|
|
Grenadiers
Joined: 20 Feb 2007
Posts: 3222
Location: Nelson, WI & Prescott, AZ
|
| Posted: Tue May 06, 2014 11:55 am Post subject: |
|
|
Here's my debacle, what I had to deal with on my 1980 car. I had a sheet of heavy sheet metal and cut it to fit from the topside. I bolted it to whatever was left of the oem sheet metal. That in itself was pretty strong. However, in subsequent photos you'll see the underside of the 'wound' and how the side piece was damaged too. I had to pop rivet a piece of sheet metal, and then used kitty-hair bondo to reinforce the area; which is what you see in the photo. Then, I bolted another sheet of sheet metal on the underside sandwhiching some oem metal between the upper and lower pieces. And to the side part of the car as well. I then used a whole can of bondo on the underside bottom sheet metal. After a few track days, no sign of cracking anywhere. It's ugly, but it's a track car! And I have the battery in the back seat as there isn't enough room in the original tray to hold one.
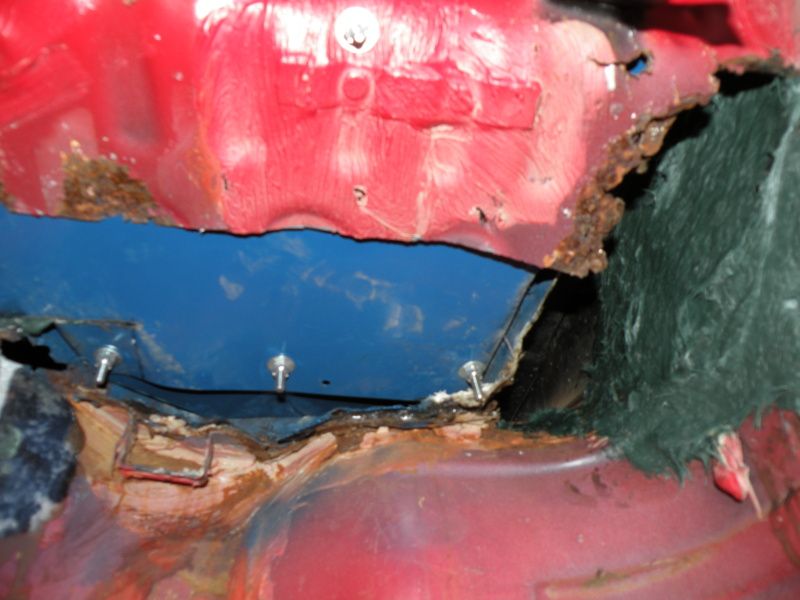
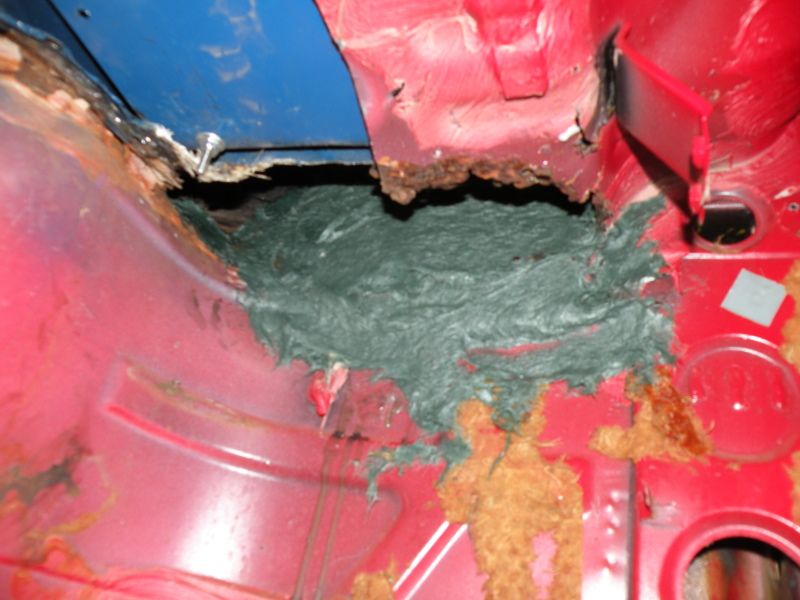
I don't have any additional pictures of the finished product, but you get the idea. Don't be afraid to booger something up unless you're a fit and finish guy. Then you'll lose some sleep over it~!
_________________
'83 944 Track car.
'88 924S Track car.
'89 944 Turbo
2004 Winnebago Vectra monster RV
2012 Jeep Wrangler
2014 Kia Soul
2001 Ford F350 powerstroke |
|
| Back to top |
|
|
Fasteddie313
Joined: 29 Sep 2013
Posts: 2596
Location: MI
|
| Posted: Tue May 06, 2014 12:30 pm Post subject: |
|
|
I didn't think I had what it takes to make the piece and have it fit, I surprised myself today though....
its still going to take a little bit of tweaking here and there to get my lips right but it looks excellent in there...
I've just never done anything like this before...
_________________
80 Turbo - Slightly Modified |
|
| Back to top |
|
|
Fasteddie313
Joined: 29 Sep 2013
Posts: 2596
Location: MI
|
| Posted: Wed May 07, 2014 9:58 am Post subject: |
|
|
not to be conceited but I am quite proud of myself 


I think I am going to seal it all up just the way it is with some superhot roofing tar from the top, maybe some with a knife from the back too and spray on undercoat
or take it all back off and try to do some seam sealing inbetween the lips/overlaps... idk, I like it how it is kinda...
still need to build that short channel wall under the 3 plugs but that should be a piece of cake compared to this (crosses fingers while knocking on wood)
what kind of undercoat would you recommend for the inside of the wheel well???
_________________
80 Turbo - Slightly Modified |
|
| Back to top |
|
|
Fasteddie313
Joined: 29 Sep 2013
Posts: 2596
Location: MI
|
| Posted: Wed May 07, 2014 10:02 am Post subject: |
|
|
oh yeah, and those are all little 5mm 8.8's
f'n $32.xx for 100 bolts, 100 nuts and 100 3/16 washers..
_________________
80 Turbo - Slightly Modified |
|
| Back to top |
|
|
Fasteddie313
Joined: 29 Sep 2013
Posts: 2596
Location: MI
|
| Posted: Wed May 07, 2014 10:25 am Post subject: |
|
|
oh, and if anyone would like a copy of my cardboard template I would be happy to reproduce it and ship it to anyone.....
It is pretty much perfect along the firewall and all the way to the back of the wheel well back almost all the way to the door
_________________
80 Turbo - Slightly Modified |
|
| Back to top |
|
|
|


