| View previous topic :: View next topic |
| Author |
Message |
joecitizennn

Joined: 12 Sep 2005
Posts: 2096
Location: no mans land
|
 Posted: Sat Mar 14, 2009 12:47 pm Post subject: change your shocks and keep alignment. Posted: Sat Mar 14, 2009 12:47 pm Post subject: change your shocks and keep alignment. |
 |
|
Kind of a no brainer, but for those who are not familiar with the proscess, here are some how-to tips.
First order of business, if you are going to change your front shocks (strut inserts) you are going to have to have some specialized tools to break down the strut assembly. Tools to have are:
-High quality spring compressor set. (rent one from your local parts store)
-A jack and two jackstands.
-Metric socket set.
-Huge chanel-lock pliers, or even better a pipe wrench.
-Hammer and broad punch.
-Possibly an air impact gun.
The latter you may be able to get by without using. Carefully.
A sure sign of suspension failure. Shock oil all over the place!!!
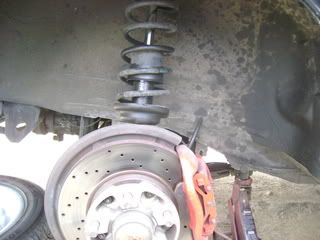
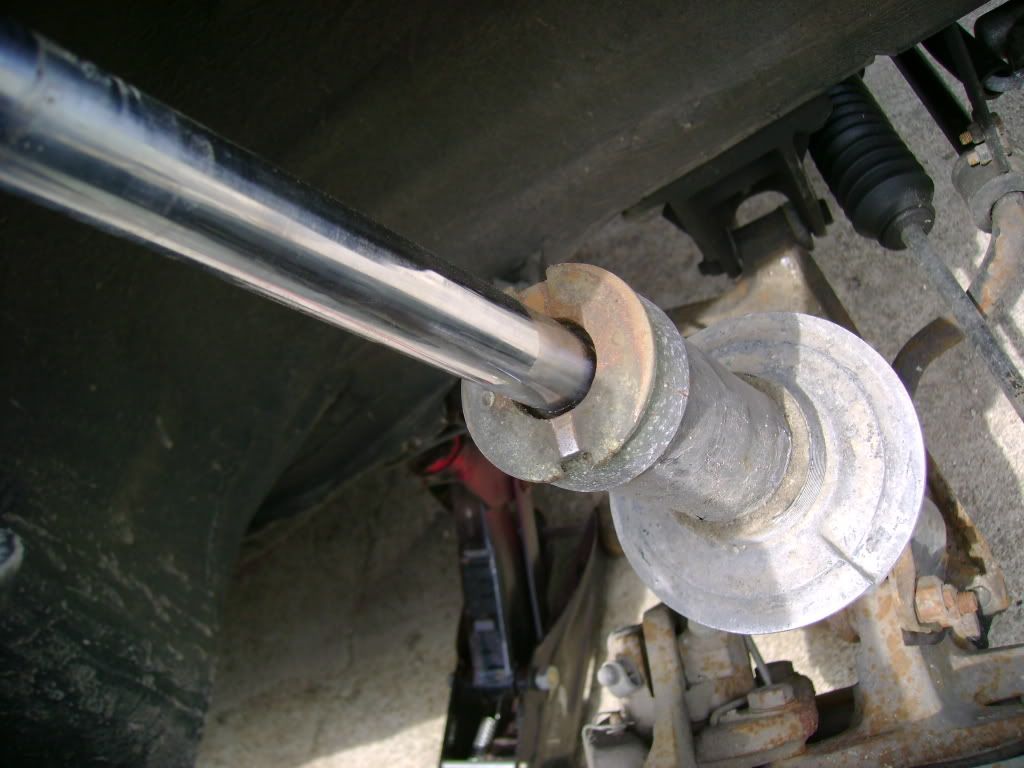
Step 1, squirt a little penetrating oil on the top center shock nut inside the engine compartment the night before. Loosen your wheel lugs, then jack up the car on BOTH sides and place on jackstands. THis is necessary because with one side of the vehicle down, the sway bar will prevent you from dropping the suspension arm enough to get the strut past the fender. Remove the front wheels. Before you do anything else, see if you can loosen the top center shock nut. THis is really important if you dont have air tools. I have been able to loosen SOME without an impact gun. If you are disposing of the shock because it is bad, you can grip the piston rod with vice grips or a pipe wrench. THis will ruin the rod, but if the shock is bad, who cares right? IF the shock is to be saved, you can grip the spring plate located at the top of the spring with a pair of vice grips while attempting to loosen the shock nut with a breaker bar. I have found this to be the best method. If you get it loose, DO NOT REMOVE IT! YOu only want it loose at this point
There is a good chance the bolt will be frozen with rust and will require an impact gun. If you dont have one, drive to a shop that does and have them break the nut loose. Again, the nut should NOT be removed. Drive the car home and jack it back up and pop the wheels off.
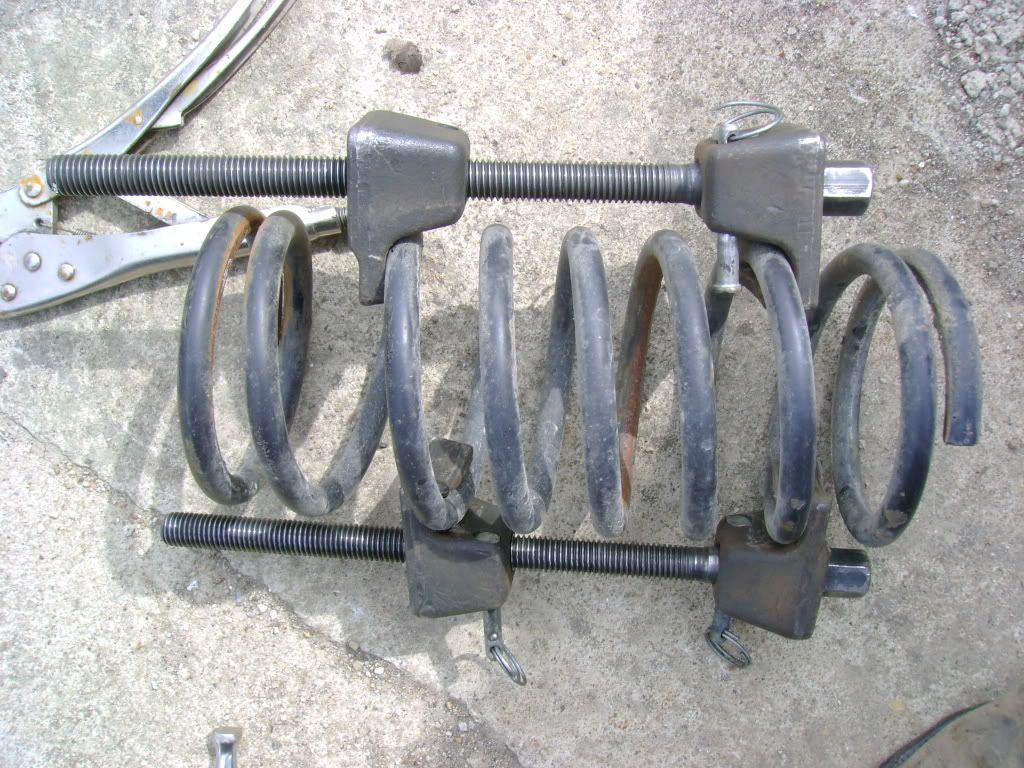
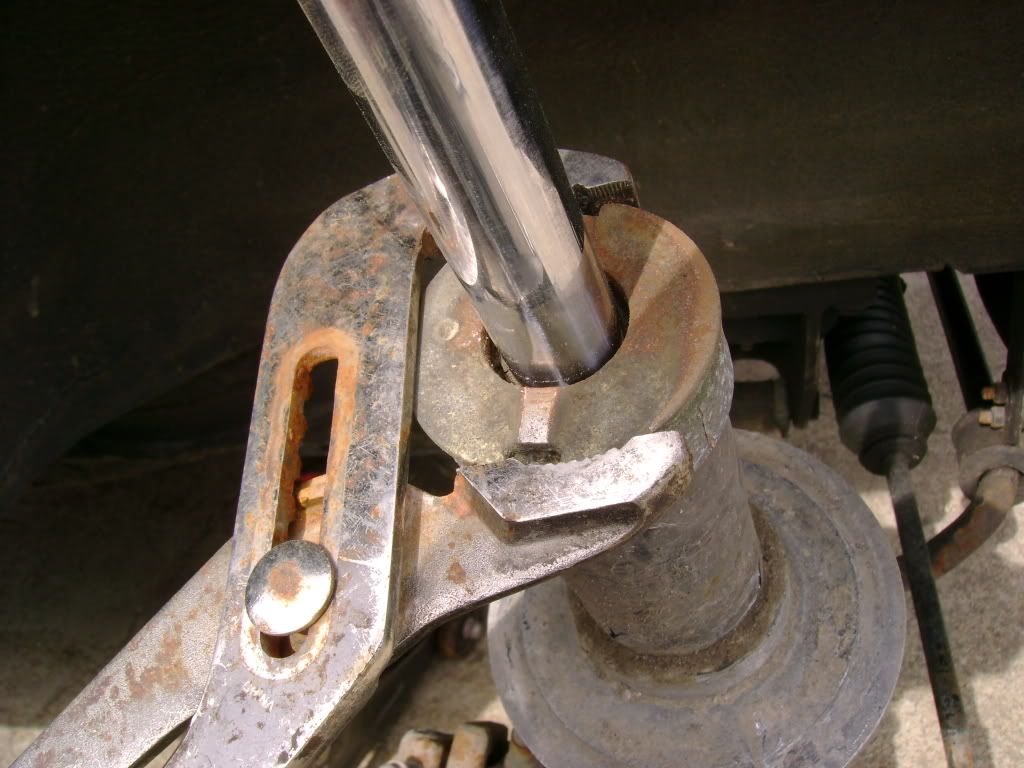
Step 2, Now you get to use the spring compressors. Put them on opposite sides of the strut as shown.
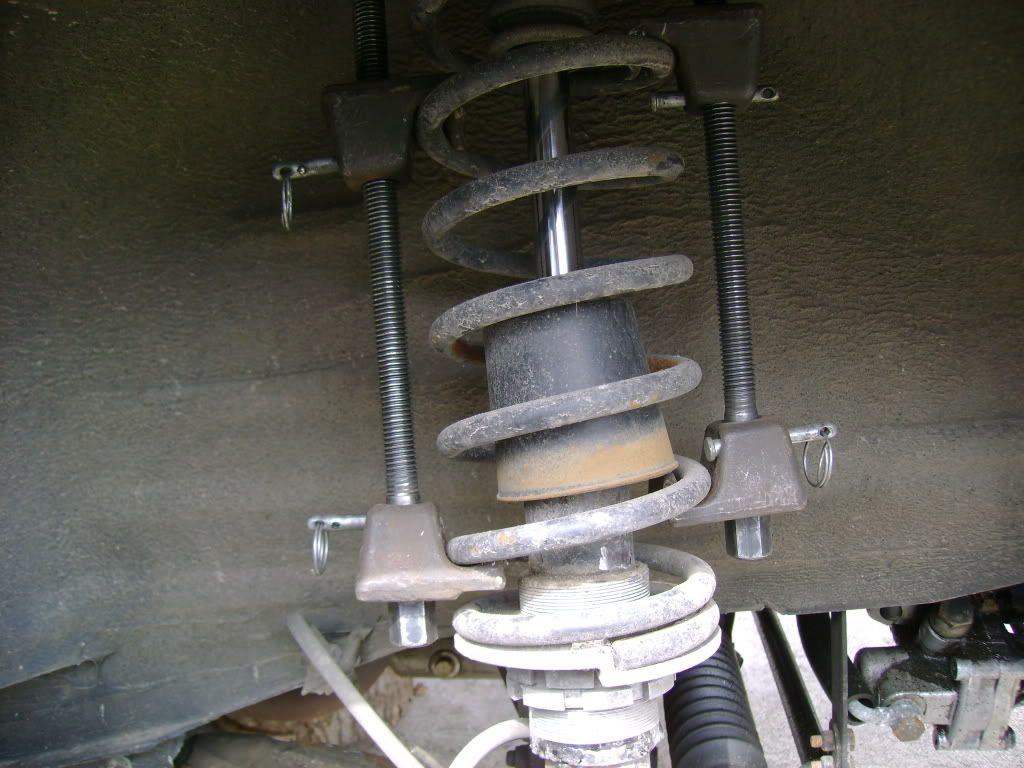
Now tighten them equally untill your spring is compressed a few inches. At this point you can remove the shock nut and let the shock drop through the bearing.
Now compress the spring more and more untill you can tilt the strut past the fender. This is harder than it sounds, you will have to press down on the whole suspension arm to clear the fender. Challenging, but do-able. You may want to tape a towel over the outside of your fender to protect it.
Once you get the strut past the fender, you can simply lift the spring off.
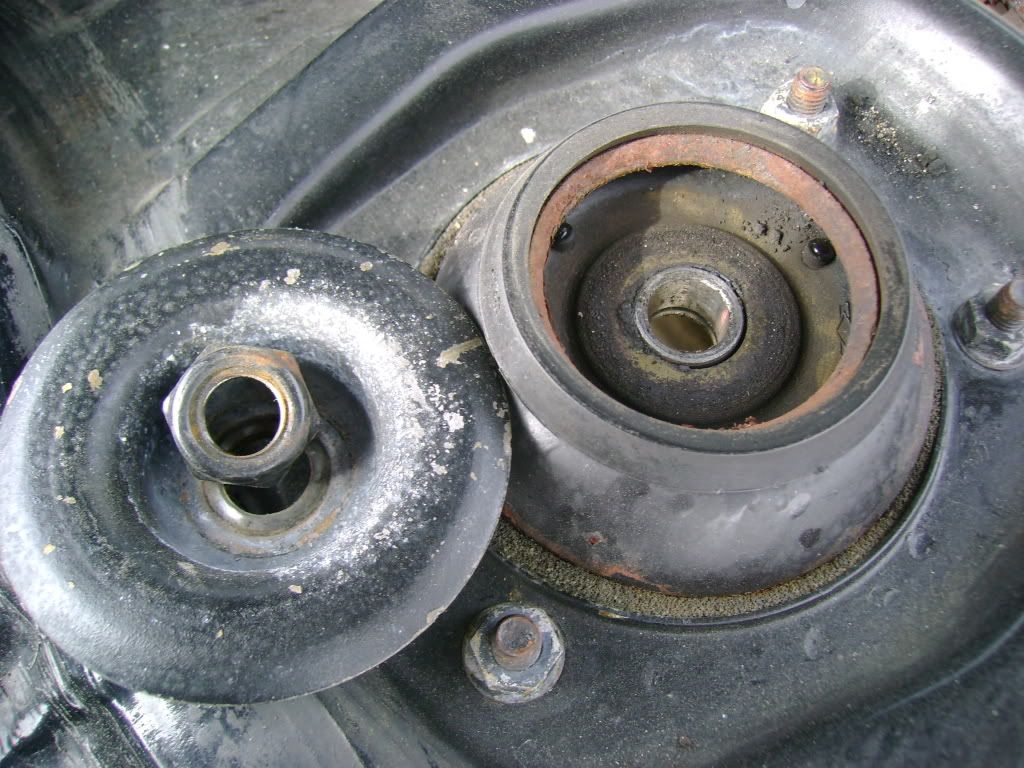
THis leaves the beastly task of removing the strut tube cap. If you thought the shock nut was a pain in the nutts, this is worse. This is where your hammer, punch, and long pipe wrench or chanel-locks come into play.
The cap must be unscrewed, and it takes some muscle. You can either do it by grabbing it with a pipe wrench, or by tapping the notch counter clockwise with a hammer and punch. It took a little bit of both to do this one.
With the cap off the shock simply slides up and out. Your new shock may have assorted spacers to make it fit the tube. You may also find that your shocks are the old oil type, not the nice clean gas unit you just bought. In this case you just pull everything out and mop the oil out of the tube with a rag. Important note here, if you are racing or driving vigerously enough to generate alot of heat in the shock tower, you can put some transmission fluid in the tube before you put the gas insert in. THis helps to cool the cartridge. The fluid should come no more than two thirds up the tube when the insert is in place. This prevents boil over and leakage.
Assembly is the reverse of what you just did. Make sure to be careful to line up the bumps in the spring shelf and spring topper plate with the spring ends.
It is easy once you do it a time or two. Have fun! I know I did.
 |
|
| Back to top |
|
 |
morghen

Joined: 21 Jan 2005
Posts: 8883
Location: Romania
|
| Posted: Sat Mar 14, 2009 4:26 pm Post subject: |
|
|
haha...whats better than a 924S..? two 924S 
good info i bet that there are people that dont know this.
_________________
https://www.the924.com |
|
| Back to top |
|
|
bruni
Joined: 26 Jul 2008
Posts: 114
Location: South Africa
|
| Posted: Sun Mar 15, 2009 2:58 am Post subject: |
|
|
Good post. It looks like you have a RH disc fitted to the left hand side 
_________________
1982 931
1975 harley sportster |
|
| Back to top |
|
|
joecitizennn
Joined: 12 Sep 2005
Posts: 2096
Location: no mans land
|
| Posted: Sun Mar 15, 2009 4:21 am Post subject: |
|
|
I actually drilled that disc. The vents in the disc are straight so the orientation of the holes does not matter.
Last edited by joecitizennn on Fri Oct 28, 2016 1:43 pm; edited 1 time in total |
|
| Back to top |
|
|
Joes924Racer

Joined: 03 Nov 2002
Posts: 11964
Location: Oregon, Denver Colorado native!
|
| Posted: Sun Mar 15, 2009 4:33 am Post subject: |
|
|
Thats how its done. 
_________________
1979 porsche 924 Na
1980 porsche Turbo 931GT Replica
Have u ever driven a turbo. |
|
| Back to top |
|
|
bruni
Joined: 26 Jul 2008
Posts: 114
Location: South Africa
|
| Posted: Sun Mar 15, 2009 7:42 am Post subject: |
|
|
| Quote: | | I actually made that disc, and intended the pattern of holes to turn forward. Does the pattern usually go the other way? I cant see how it would matter. |
Ooops sorry, I thought it was a vented disc, if it's solid it makes no differance
_________________
1982 931
1975 harley sportster |
|
| Back to top |
|
|
Rasta Monsta

Joined: 12 Jul 2006
Posts: 11724
Location: PacNW
|
| Posted: Sun Mar 15, 2009 11:34 am Post subject: |
|
|
If its an S disc, it's vented.
Good to see you back Joe C. . .you disappeared for a while.
_________________
Toofah King Bad
- WeiBe (1987 924S 2.5t) - 931 S3
|
|
| Back to top |
|
|
joecitizennn
Joined: 12 Sep 2005
Posts: 2096
Location: no mans land
|
| Posted: Sun Mar 15, 2009 11:40 am Post subject: |
|
|
It is vented and cross-drilled. The vents do not curve, they radiate straight out from the hub. . The arrangement of the holes in spirals is cosmetic and does not indicate spiraling vents.
I ended switching the sides the rotors were on so now it looks cosmetic-correct.
Last edited by joecitizennn on Thu May 03, 2012 10:18 pm; edited 1 time in total |
|
| Back to top |
|
|
joecitizennn
Joined: 12 Sep 2005
Posts: 2096
Location: no mans land
|
| Posted: Tue Mar 17, 2009 12:14 pm Post subject: |
|
|
| Rasta Monsta wrote: |
Good to see you back Joe C. . .you disappeared for a while. |
Last edited by joecitizennn on Thu May 03, 2012 10:17 pm; edited 1 time in total |
|
| Back to top |
|
|
MikeJinCO
Joined: 08 Jun 2010
Posts: 1228
Location: Maysville, Colorado
|
| Posted: Sat Oct 09, 2010 3:35 am Post subject: |
|
|
Having just finished my struts, I'll add a little info for newbies like me. Using the new mounts P/N 944 343 071 00, there is a 6mm spacer needed below the mount that does not seem to be available anywhere. I used two 1/2" washers and a 5/16" fender washer drilled and ground out to size. came out .022" too thick, but I'll live with it. The mount also needs a bushing inserted into the top. The bushing is in the original mount bearing and can be pulled out. Hope this helps someone as it had me really confused for a time.
_________________
Mike
'67 MG Midget Dp
'71 Ocelot Dsr Kawasaki 1000(under rebuild) |
|
| Back to top |
|
|
Brendan
Joined: 04 Jan 2011
Posts: 63
Location: Maine USA
|
| Posted: Sun Apr 15, 2012 3:22 am Post subject: |
|
|
Mike--
It took a couple years, but that was a huge help for me.
Thanks,
Brendan |
|
| Back to top |
|
|
Slam
Joined: 07 Jan 2005
Posts: 1689
Location: Wainwright, Alberta, Canada
|
| Posted: Wed May 02, 2012 1:21 pm Post subject: |
|
|
Good write-up, but spring compressors scare the crap out of me. I posted some pics and procedural stuff in the thread below for those who don't want to use compressors.
http://www.924board.org/viewtopic.php?t=33966&highlight=
_________________
'84 944 - kid blew motor
'83 944 - resting comfortably. For 12 years
'87 944 - sideswiped by trucker
'80 924 - gone
'78 924 - gone
'77 924 - rusting comfortably |
|
| Back to top |
|
|
joecitizennn
Joined: 12 Sep 2005
Posts: 2096
Location: no mans land
|
| Posted: Thu May 03, 2012 10:13 pm Post subject: |
|
|
You could paste that here on this thread if you wanted. The more pictures the merrier.
_________________
87 924s
88 924SE gone
447 hp cgt clone
87 924S gone
84 944 sold
83 944 sold
89 turbo S LSD, ABS etc
86 951 white rocket
85 944 sport everything.
84 944 sold.
87 944 sold |
|
| Back to top |
|
|
|

