| View previous topic :: View next topic |
| Author |
Message |
Fasteddie313

Joined: 29 Sep 2013
Posts: 2596
Location: MI
|
 Posted: Tue Jul 16, 2019 12:19 pm Post subject: Posted: Tue Jul 16, 2019 12:19 pm Post subject: |
 |
|
| chuck21401 wrote: | So I'm curious to know what is going on here...but not quite ready to disassemble the WG until I figure out how to prevent that big spring from jumping out.
I connected my extra boost control line to the WG. Then I connected my battery powered Ryobi portable air compressor to the other end. I was thinking I could build some pressure to see the valve open....no such luck. The WG wouldn't hold any pressure. I found that the air was leaking from the top vent. Shoot...so that means torn membrane?
Here is the other part. I figured that I could push down on the valve to get it to open (despite the big spring holding it shut). I tried several times...not such luck. Added some CRC freeze...more pushing...and it broke loose. Not easy to push in, but it did go.
So next step will be to open up the WG and verify that membrane is torn. But what would cause the valve to stick if it was indeed stuck?
Still curious to check out the play in the valve guide but that theory is a bit diminished with today's findings. |
This is a good diagnosis of a blown diaphragm..
Good news, you found the problem..
My top port will hold pressure for a long time..
I don't think the spring is as much of a beast as you are anticipating..
Loosten all the nuts around the top can until the nuts near the ends of the studs, and then push on it a few times to get a feel of how heavy the spring is..
I think I took mine apart and put it back together by just holding the spring down by hand, so it's not crazy like a strut..
If you loosen them till you can feel the spring to know what it takes to push it then I think you can just push it closed with one hand leaning against a bench, wing the nuts off with your other hand, and let it up slowly.. It might have like 2 inches of stroke left in it..
_________________
80 Turbo - Slightly Modified |
|
| Back to top |
|
 |
chuck21401

Joined: 20 Feb 2005
Posts: 526
Location: Annapolis, MD
|
| Posted: Thu Jul 18, 2019 2:25 am Post subject: |
|
|
| Fasteddie313 wrote: |
I don't think the spring is as much of a beast as you are anticipating.. |
Well you were right about that. I tied a strap around it just in case. Removed the nuts, then released the remaining force by loosening the strap.
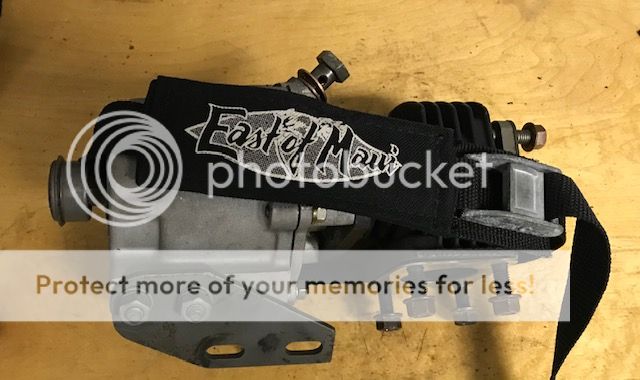
So here's the interesting part -- the diaphragm did not appear to be torn or have holes in it! So what is going on here? Maybe I should put it back together again with the spring and try to pressurize is again to see if the WG opens? When I insert the diaphragm into the "hat" by hand (without the spring)...it seems to be holding air...when I push the valve up, air comes out the vent.
There did seem to be play in the valve guide, I could wiggle it around...not sure if that is normal or not.
_________________
1981 Porsche 931 w/S1 engine & g31 transmission. Water-cooled intercooler |
|
| Back to top |
|
|
Carrera RSR

Joined: 08 Jan 2010
Posts: 2309
Location: Somerset, UK
|
| Posted: Thu Jul 18, 2019 5:22 am Post subject: |
|
|
Looks too clean not to have been rebuild recently.
_________________
1980 931 - forged pistons, Piper cam, K27/26 3257 6.10 hybrid turbo, 951 FMIC, custom intake, Mittelmotor dizzy & cam pulley, H&S exhaust, GAZ Gold, Fuch'ed, Quaife
Now www.924board.org/viewtopic.php?t=34690
Then www.924board.org/viewtopic.php?t=31252 |
|
| Back to top |
|
|
chuck21401
Joined: 20 Feb 2005
Posts: 526
Location: Annapolis, MD
|
| Posted: Fri Jul 19, 2019 4:35 am Post subject: |
|
|
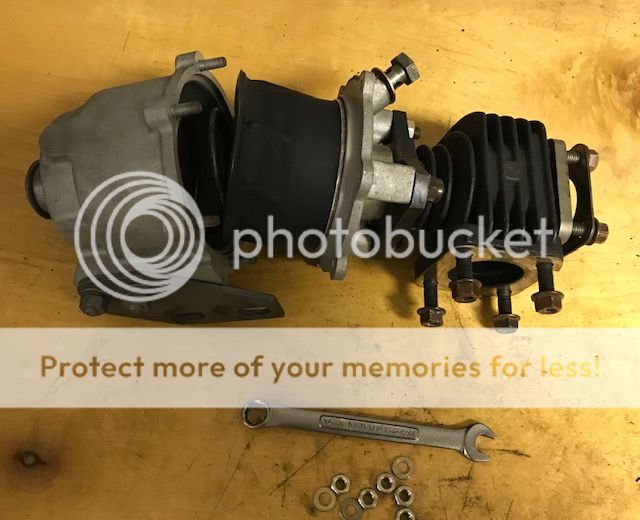
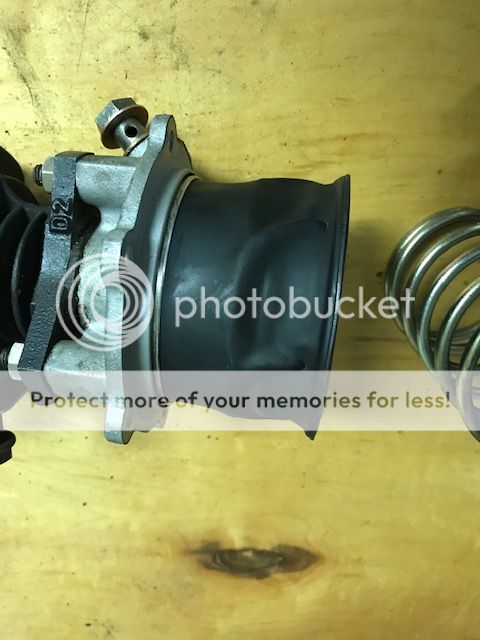
Notice how the the WG came apart. The diaphragm was not folded over.
It should look more like this:
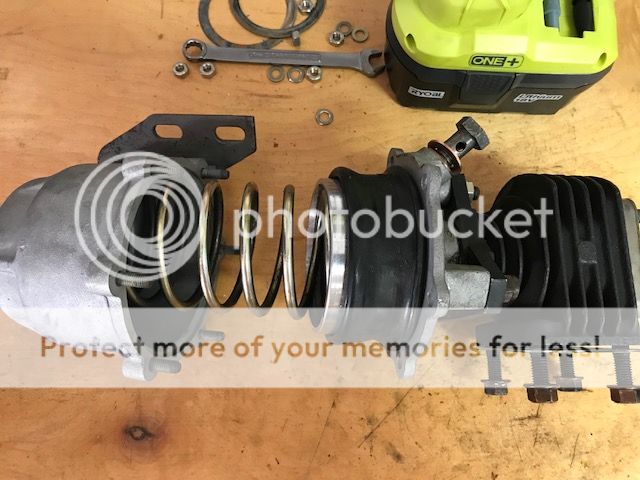
No wonder it wasn't holding air pressure.
I put is back together (minus the spring) and connected air...it moved the valve as it should.
I could put it all back together again, but what would cause that...don't want the problem again after driving it for awhile.
_________________
1981 Porsche 931 w/S1 engine & g31 transmission. Water-cooled intercooler |
|
| Back to top |
|
|
Fasteddie313
Joined: 29 Sep 2013
Posts: 2596
Location: MI
|
| Posted: Sat Jul 20, 2019 1:33 am Post subject: |
|
|
Doesn't the diaphragm have a thick belt around its rim that sits in a nice notch in the WG housing?
All I can really think of is to put it back together carefully and test the crap out of it with your air before you put it back on the car..
_________________
80 Turbo - Slightly Modified |
|
| Back to top |
|
|
chuck21401
Joined: 20 Feb 2005
Posts: 526
Location: Annapolis, MD
|
| Posted: Sat Jul 20, 2019 2:12 am Post subject: |
|
|
| Fasteddie313 wrote: | Doesn't the diaphragm have a thick belt around its rim that sits in a nice notch in the WG housing?
All I can really think of is to put it back together carefully and test the crap out of it with your air before you put it back on the car.. |
Yes, it does....but somehow that came unseated...
But I think you are right...put it back together again...test it out on the bench...then bolt everything back on the car.
Also going to replace the valve guide since I have the kit...have been in touch with someone that should be able to help with that part.
_________________
1981 Porsche 931 w/S1 engine & g31 transmission. Water-cooled intercooler |
|
| Back to top |
|
|
Fasteddie313
Joined: 29 Sep 2013
Posts: 2596
Location: MI
|
| Posted: Sat Jul 20, 2019 2:55 am Post subject: |
|
|
When you do that can you compare the old VS new for us?
Do you happen to have a bore gauge you can use to measure them to compare? Maybe some good radial play measurement comparisons? Leakdown comparisons also maybe?
It would be pretty sweet to do a sort of leakdown test before and after..
Maybe just see how well it works with both guides, how it feels, and how much you think it leaks, because, we don't really know "how much is too much", and your old one might not even be "too much"..
Did you ever get your CIS test kit?
It would be a great time to play with that while you are waiting on your WG..
_________________
80 Turbo - Slightly Modified |
|
| Back to top |
|
|
chuck21401
Joined: 20 Feb 2005
Posts: 526
Location: Annapolis, MD
|
| Posted: Mon Jul 22, 2019 5:53 am Post subject: |
|
|
| Fasteddie313 wrote: | When you do that can you compare the old VS new for us?
Do you happen to have a bore gauge you can use to measure them to compare? Maybe some good radial play measurement comparisons? Leakdown comparisons also maybe?
It would be pretty sweet to do a sort of leakdown test before and after..
Maybe just see how well it works with both guides, how it feels, and how much you think it leaks, because, we don't really know "how much is too much", and your old one might not even be "too much".. |
Unfortunately we didn't have access to bore gauge and digital caliper would not be precise enough. The new guide was definitely tighter, tough to say by how much without precise instruments. I don't think that the guide was the problem, but since I bought the part decided to install it. It was a bit more involved than expected. Pics and details to follow.
| Quote: |
Did you ever get your CIS test kit?
It would be a great time to play with that while you are waiting on your WG.. |
Yes, I have the CIS test kit. Now that the valve guide has been replaced, getting the WG back together again is up first. But yes, checking the CIS is on the list.
_________________
1981 Porsche 931 w/S1 engine & g31 transmission. Water-cooled intercooler |
|
| Back to top |
|
|
chuck21401
Joined: 20 Feb 2005
Posts: 526
Location: Annapolis, MD
|
| Posted: Mon Jul 22, 2019 5:59 am Post subject: Removal of WG valve guide and installation process |
|
|
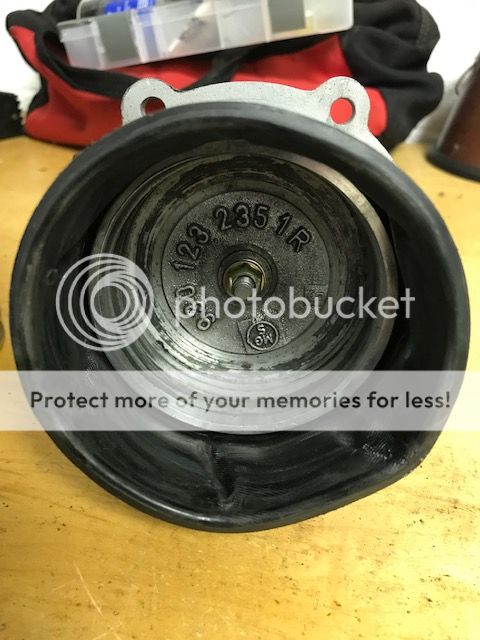
Here are pictures of the hot side of the WG with the original valve guide:

Let's call this the TOP
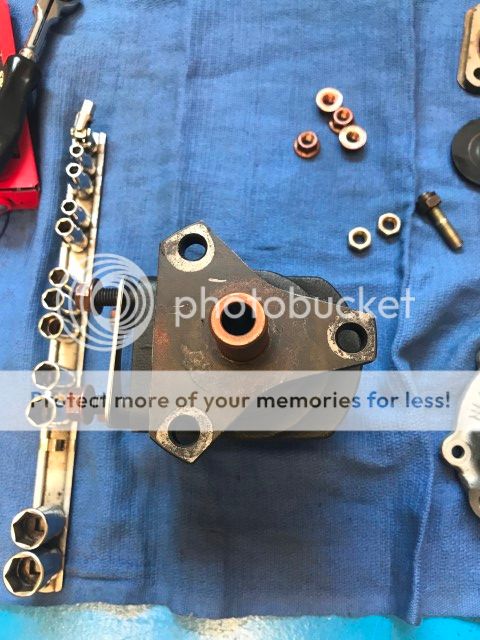
And call this the BOTTOM
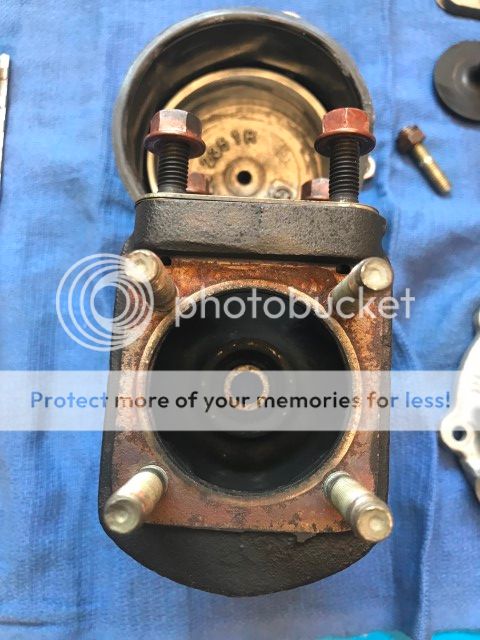
Basically the old valve guide needs to be pushed out of the housing...up through the BOTTOM
_________________
1981 Porsche 931 w/S1 engine & g31 transmission. Water-cooled intercooler
Last edited by chuck21401 on Mon Jul 22, 2019 6:03 am; edited 1 time in total |
|
| Back to top |
|
|
chuck21401
Joined: 20 Feb 2005
Posts: 526
Location: Annapolis, MD
|
| Posted: Mon Jul 22, 2019 6:01 am Post subject: |
|
|
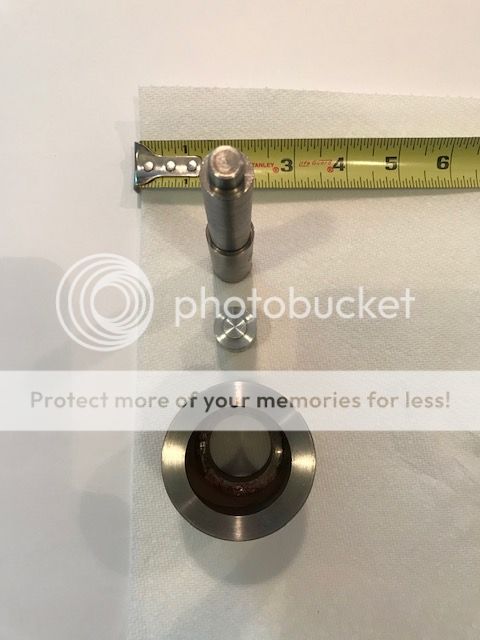
To do this we had to make three arbors on a lathe.
This arbor will be used to push out the old valve guide.

Here is a pic of the arbor that will be used to push out the valve guide. I believe that is it stainless steel but not certain. Harder material than the original guide no doubt.
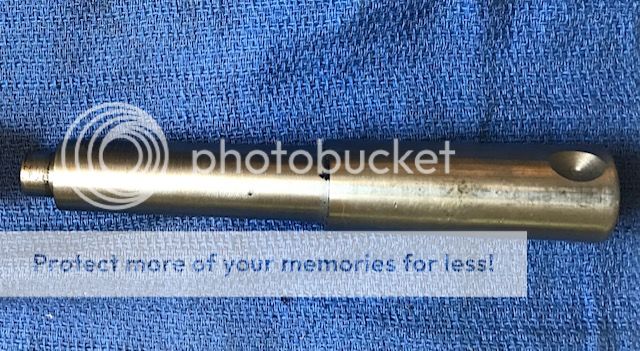
Here is the arbor in action. The "TOP" is now up side down as the press pushes the arbor which in turn pushes the old valve guide out.

_________________
1981 Porsche 931 w/S1 engine & g31 transmission. Water-cooled intercooler
Last edited by chuck21401 on Mon Jul 22, 2019 6:54 am; edited 3 times in total |
|
| Back to top |
|
|
chuck21401
Joined: 20 Feb 2005
Posts: 526
Location: Annapolis, MD
|
| Posted: Mon Jul 22, 2019 6:14 am Post subject: |
|
|
A second arbor was created to help push in the new valve guide.
This one is made from aluminum (softer than the new valve guide). While we used a thermal fit to install the new guide, some extra force was required to push it in.

_________________
1981 Porsche 931 w/S1 engine & g31 transmission. Water-cooled intercooler
Last edited by chuck21401 on Mon Jul 22, 2019 6:44 am; edited 1 time in total |
|
| Back to top |
|
|
chuck21401
Joined: 20 Feb 2005
Posts: 526
Location: Annapolis, MD
|
| Posted: Mon Jul 22, 2019 6:18 am Post subject: |
|
|
A third arbor was used to hold the WG as the new guide is pushed in without removing the studs on the bottom of the WG.
_________________
1981 Porsche 931 w/S1 engine & g31 transmission. Water-cooled intercooler
Last edited by chuck21401 on Mon Jul 22, 2019 6:50 am; edited 1 time in total |
|
| Back to top |
|
|
chuck21401
Joined: 20 Feb 2005
Posts: 526
Location: Annapolis, MD
|
| Posted: Mon Jul 22, 2019 6:19 am Post subject: |
|
|
But first, we need to cook the wastegate to 350 degrees

We put the new valve guide in the freezer at the same time.
_________________
1981 Porsche 931 w/S1 engine & g31 transmission. Water-cooled intercooler |
|
| Back to top |
|
|
chuck21401
Joined: 20 Feb 2005
Posts: 526
Location: Annapolis, MD
|
| Posted: Mon Jul 22, 2019 6:23 am Post subject: |
|
|
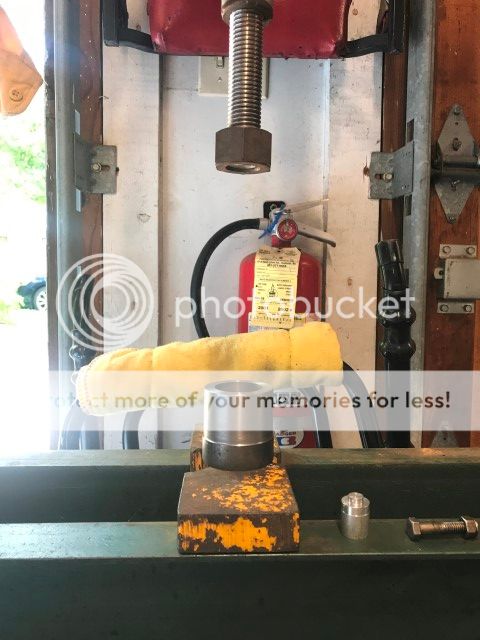
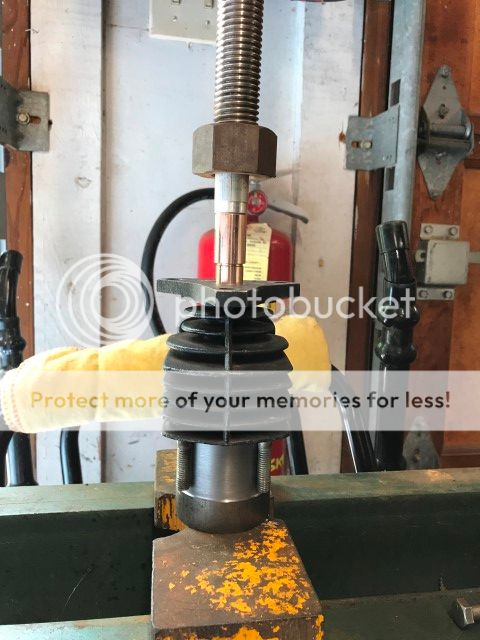
And here we go. The WG is removed from the toaster oven (don't forget your oven mitts!) and positioned on arbor #3.
The frozen valve guide and arbor #2 is positioned into place...and pressed in slowly with help from the hydraulic press.

_________________
1981 Porsche 931 w/S1 engine & g31 transmission. Water-cooled intercooler
Last edited by chuck21401 on Mon Jul 22, 2019 6:40 am; edited 3 times in total |
|
| Back to top |
|
|
chuck21401
Joined: 20 Feb 2005
Posts: 526
Location: Annapolis, MD
|
| Posted: Mon Jul 22, 2019 6:25 am Post subject: |
|
|
And here is the final result. Special thanks my neighbor Steven Stomski at Stomski Racing (https://www.stomskiracing.com/) for helping me with this project.

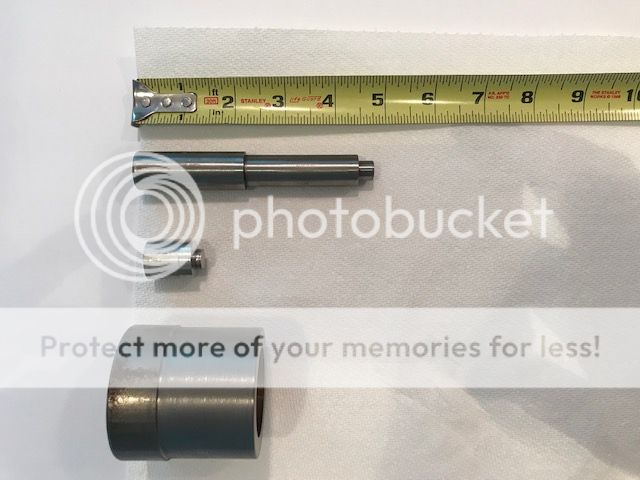
Here are the arbors that were used:
#1 to push out the old valve guide
#2 push in the new valve guide and
#3 hold the WG steady as the new valve guide was pushed in...again without removing the studs.
_________________
1981 Porsche 931 w/S1 engine & g31 transmission. Water-cooled intercooler |
|
| Back to top |
|
|
|

