| View previous topic :: View next topic |
| Author |
Message |
Chrenan

Joined: 15 Jan 2003
Posts: 3903
Location: Canada
|
 Posted: Mon Jun 13, 2005 2:56 pm Post subject: Writeup on swapping fuel pumps, accumulator and hoses... Posted: Mon Jun 13, 2005 2:56 pm Post subject: Writeup on swapping fuel pumps, accumulator and hoses... |
 |
|
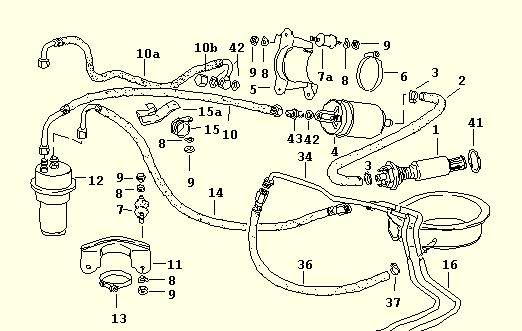
REPLACEMENT OF BOTH FUEL PUMPS, THE FUEL ACCUMULATOR, AND ASSOCIATED HOSES
Car: 1980 Porsche 924
Length of Time Required: A leisurely afternoon
STEP 1 - PARTS REQUIRED
Part Number - Description - (Position in Picture)
928 608 013 00 - In-Tank Fuel Pump - (1)
928 201 187 02 - Seal for In-Tank Fuel Pump - (41)
911 608 102 00 - External Fuel Pump - (4)
N 013 812 3 - Crush Washer between Check Valve and External Fuel Pump - (42)
N 020 704 2 - Check Valve - (43)
477 209 199 D - Fuel Hose from In-Tank Fuel Pump to External Fuel Pump - (2)
477 209 093 A - Fuel Hose from External Fuel Pump to Fuel Accumulator - (10)
477 209 071 C - Fuel Return Hose - (36)
931 110 140 00 - Fuel Accumulator - (12)
STEP 2 - DRAINING THE TANK
1. Make sure the fuel gauge reads below 1/4 of a tank. This ensures all fuel in the tank will fit in a 25 litre jerry can.
2. Disconnect both leads from the battery.
3. Jack up the rear of the car.
4. Support the rear of the car so the tires are about 1 foot off the ground. This will allow space for the 25 litre jerry can under the car as well as ample working room.
5. Clamp off the Fuel Hose from the In-Tank Fuel Pump to the External Fuel Pump (2).
6. Loosen the hose clamp from the tail end of the External Fuel Pump and pull the hose off the tail end of the External Fuel Pump. A small amount of fuel will flow backwards out of the External Fuel Pump as well as from the hose.
7. Stick the Fuel Hose from the In-Tank Fuel Pump to the External Fuel Pump (2) into the jerry can.
8. Release the clamp from the Fuel Hose from the In-Tank Fuel Pump to the External Fuel Pump (2). The fuel tank will now drain into the jerry can.
STEP 3 - REMOVAL OF THE IN-TANK FUEL PUMP
1. Loosen the hose clamp from the In-Tank Fuel Pump (1) and pull the hose off.
2. Mark the negative wire connected to the In-Tank Fuel Pump (1) for ease of connection later, the +/- markings are on the body of the pump. Pull both wires off the In-Tank Fuel Pump (1).
3. With a 36 mm socket remove the In-Tank Fuel Pump (1), the rear axle nut tool works great for this. A small amount of fuel will drain out of the tank when you pull out the In-Tank Fuel Pump (1), rust or jelly in the fuel is a bad sign!
STEP 4 - REMOVAL OF THE EXTERNAL FUEL PUMP
1. Remove the 2 wires connected to the External Fuel Pump (4). No need to mark the wires are they fit on different sized bolts protruding from the pump and cannot be connected incorrectly.
2. Remove the Fuel Hose that connects the External Fuel Pump to the Fuel Accumulator (10) at the Check Valve (43).
3. Loosen the large hose clamp which holds the External Fuel Pump (4) to its mounting plate (5).
4. Slide the External Fuel Pump (4) up and out of the mounting plate (5).
STEP 5 - REMOVAL OF FUEL ACCUMULATOR
1. Loosen and remove the hose clamp which holds the Fuel Accumulator (12) to its mounting bracket (11).
2. The hose (14) connected to the driver's side of the Fuel Accumulator (12) will give slightly which allows you to pull the Fuel Accumulator (12) down to access the hose connections on top.
3. Loosen and remove both hoses from the top of the Fuel Accumulator (12). This is a tricky bit of wrenching that may be aided with shorter than standard wrenches, but I did it with normal length wrenches and survived, so it is possible.
STEP 6 - REMOVAL OF FUEL RETURN HOSE (36)
1. OK, this is the only part of the job I found very challenging, but it is possible.
2. The Fuel Return Hose (36) is rubber, as are all the hoses listed for replacement in this job. However, it is connected to a hose which is steel and CANNOT be bent to allow easier access.
3. Place a 17 mm wrench on the top fitting of the Fuel Return Hose (36) to hold it in place while turning the fitting at the end of the hose it is connected to with a 14 mm wrench.
4. This is a VERY tricky bit of wrenching because there is little working space to turn the wrenches, and the fittings are almost out of reach. Again, it would be easier with shorter than standard wrenches, but I did it with normal length wrenches.
5. Remove the hose clamp where the Fuel Return Hose (36) connects to the fuel tank. Gently pull the Fuel Return Hose (36) away from the thin neck sticking out of the tank.
STEP 7 - PUTTING IT ALL BACK TOGETHER WITH NEW PARTS
1. OK, you've taken everything apart so you should have a pretty good sense of how it all goes back, but I'll list the order of assembly and a few tips as well.
2. Connect the new Fuel Return Hose (36) to its upper attachment point. Again, this is hard to do, but it seemed easier than removing it!
3. Connect the new Fuel Return Hose (36) to the fuel tank using the hose clamp.
4. On your work bench, connect the new Fuel Hose that runs between the External Fuel Pump and the Fuel Accumulator (10) to the new Fuel Accumulator (12).
5. Under the car, connect the new Fuel Accumulator (12) to hose (14). This is your last tricky bit of wrenching for the day!
6. Using the hose clamp, connect the new Fuel Accumulator (12) to its mounting bracket (11).
8. On your work bench, connect the new Check Valve (43) to the new External Fuel Pump (4) with the Crush Washer (42) in between.
9. Slide the new External Fuel Pump (4) into the hose clamp on its mounting plate (5) and tighten the hose clamp.
10. Attach the new Fuel Hose that connects the External Fuel Pump to the Fuel Accumulator (10) to the Check Valve (43) in the end of the new External Fuel Pump (4).
10. On your work bench, fit the new Seal for the In-Tank Fuel Pump (41) onto the new In-Tank Fuel Pump (1).
11. Screw the new In-Tank Fuel Pump (41) into the fuel tank. Tighten with 36 mm socket. Do not over-tighten. Tighten to the point that you see the new Seal for the In-Tank Fuel Pump (41) deform.
12. Using hose clamps, connect the new Fuel Hose from the In-Tank Fuel Pump to the External Fuel Pump (2).
13. Reconnect the electrical connectors on both fuel pumps.
14. Reconnect both leads to the battery.
15. Under the dash, to the left of the steering wheel, remove the fuel pump relay.
16. Jumper holes 30 and 87 on the relay board where you removed the fuel pump relay. Both fuel pumps will now run so you can check for leaks while they are running.
17. Once you are sure there are no fuel leaks, remove the jumper from the relay board and replace the fuel pump relay.
18. You're done and ready to drive.
_________________
1987 951 - M193 Version for Japan |
|
| Back to top |
|
 |
John Adams
Joined: 09 Mar 2007
Posts: 1
|
| Posted: Sun Mar 11, 2007 3:40 am Post subject: Just replace hose |
|
|
Thanks for the useful post
My brother just gave me a 1980 924 and it seems well sorted but for a petrol smell which I have traced to the hose ends on the fuel pump and accumulator
Do I need to obtain these:
477 209 199 D - Fuel Hose from In-Tank Fuel Pump to External Fuel Pump - (2)
477 209 093 A - Fuel Hose from External Fuel Pump to Fuel Accumulator - (10)
Could I use hose from other vendors, if so what do I need to ask for? |
|
| Back to top |
|
|
Smoothie

Joined: 01 Jan 2003
Posts: 8032
Location: DE (the one near MD, PA, NJ)
|
| Posted: Sun Mar 11, 2007 4:29 am Post subject: |
|
|
That's a good find - it should be copied to the How-To section. 
John -
#2 can be replaced with any regular low pressure fuel hose. I used 1/2" EEC/fuel line - and since it's not quite flexible enough to go directly from the in-tank to main pump, I used a longer piece and routed it from the in-tank pump back up around the rear of the fuel tank then forward to the main pump. If you have a working in-tank pump this will work. I wouldn't recommend it if there is no in-tank pump though.
#10 you'll have to be more fussy with - it's in the high-pressure part of the system, so has to withstand pressures in the 90-100+ psi range. -So you'll need either a replacement OE part -or- you might find a hose shop that can rig a replacement with high pressure fuel resistant line and possibly crimped to your old end fittings if they're still good.
Don't be too suprised if after replacing them, you still get a fuel smell. Apparently that more often comes from deteriorated (and not easily accessible) lines on top of the fuel tank and the large filler hose and it's venting.
_________________
"..it's made in Germany. You know the Germans always make good stuff."
'82 924T, US version, dark green metallic, 5 speed Audi 016G gearbox |
|
| Back to top |
|
|
Joes924Racer

Joined: 03 Nov 2002
Posts: 11964
Location: Oregon, Denver Colorado native!
|
| Posted: Sun Mar 11, 2007 6:14 am Post subject: |
|
|
How to alert.
_________________
1979 porsche 924 Na
1980 porsche Turbo 931GT Replica
Have u ever driven a turbo. |
|
| Back to top |
|
|
Peter_in_AU

Joined: 29 Jul 2001
Posts: 2743
Location: Sydney, Australia
|
| Posted: Sun Mar 11, 2007 9:43 am Post subject: |
|
|
Nice use of the search John.
It's straight to the how-to section for this one.
_________________
1979 924 (Gone to a better place)
1974 Lotus 7 S4 "Big Valve" Twin-cam (waiting)
1982 924 (As featured on Wikipedia)
Learn to love your multimeter and may the search be with you |
|
| Back to top |
|
|
Rasta Monsta

Joined: 12 Jul 2006
Posts: 11723
Location: PacNW
|
| Posted: Mon Mar 19, 2007 4:10 am Post subject: |
|
|
Question:
Did you rehab this as a resulty of diagnostic info (low pressure, etc) or for peace of mind? I am considering the same job, for the second reason (although I do have some indications of fuel delivery problems - hard hot start, and fuel starvation at the track in fourth gear over 6k).
Thanks,
rasta
_________________
Toofah King Bad
- WeiBe (1987 924S 2.5t) - 931 S3
|
|
| Back to top |
|
|
morghen

Joined: 21 Jan 2005
Posts: 8879
Location: Romania
|
| Posted: Mon Mar 19, 2007 6:03 am Post subject: |
|
|
| Rasta Monsta wrote: | Question:
Did you rehab this as a resulty of diagnostic info (low pressure, etc) or for peace of mind? I am considering the same job, for the second reason (although I do have some indications of fuel delivery problems - hard hot start, and fuel starvation at the track in fourth gear over 6k).
Thanks,
rasta |
what the hell are you doing above 6K ? peak power is 5.8K
_________________
https://www.the924.com |
|
| Back to top |
|
|
Chrenan
Joined: 15 Jan 2003
Posts: 3903
Location: Canada
|
| Posted: Mon Mar 19, 2007 11:17 am Post subject: |
|
|
| Rasta Monsta wrote: | Question:
Did you rehab this as a resulty of diagnostic info (low pressure, etc) or for peace of mind? I am considering the same job, for the second reason (although I do have some indications of fuel delivery problems - hard hot start, and fuel starvation at the track in fourth gear over 6k).
Thanks,
rasta |
I would say it was a peace-of-mind job, but I think it was very close to being required. My external fuel pump was getting louder and louder, which is not good, and the line to the accumulator and the fuel return line were both swollen and seeping. I figured I might as well do as much as reasonable while I was in there, so that's what I did.
_________________
1987 951 - M193 Version for Japan |
|
| Back to top |
|
|
Rasta Monsta
Joined: 12 Jul 2006
Posts: 11723
Location: PacNW
|
| Posted: Tue Mar 20, 2007 1:48 am Post subject: |
|
|
On more Q: Bosch or Pierburg?
_________________
Toofah King Bad
- WeiBe (1987 924S 2.5t) - 931 S3
|
|
| Back to top |
|
|
Chrenan
Joined: 15 Jan 2003
Posts: 3903
Location: Canada
|
| Posted: Tue Mar 20, 2007 2:37 am Post subject: |
|
|
Bosch for the external pump, and internal pump was made by Airtex.
I've heard the Pierburg external pump is excellent as well, I just couldn't find one when I did the work.
_________________
1987 951 - M193 Version for Japan |
|
| Back to top |
|
|
Rasta Monsta
Joined: 12 Jul 2006
Posts: 11723
Location: PacNW
|
| Posted: Thu Mar 22, 2007 3:29 am Post subject: |
|
|
One more Q:
How did the inside of your tank look? Did you do anything to rinse it out?
TIA
rasta
P.S. I am asking all these Q's b/c I am doing this job within the next week or so.
_________________
Toofah King Bad
- WeiBe (1987 924S 2.5t) - 931 S3
|
|
| Back to top |
|
|
Chrenan
Joined: 15 Jan 2003
Posts: 3903
Location: Canada
|
| Posted: Thu Mar 22, 2007 3:57 am Post subject: |
|
|
Inside of the tank looked clean as a whistle, no rust visible, no rusty particulate came out when I drained the tank and removed the internal pump, no yucky fuel jelly visible either, all looked good.
_________________
1987 951 - M193 Version for Japan |
|
| Back to top |
|
|
tom2turbo
Joined: 16 Jan 2007
Posts: 34
Location: Portland, Oregon
|
| Posted: Thu Mar 22, 2007 3:41 pm Post subject: |
|
|
| Chrenan wrote: | | Inside of the tank looked clean as a whistle, no rust visible, no rusty particulate came out when I drained the tank and removed the internal pump, no yucky fuel jelly visible either, all looked good. |
Lucky You, My tank had a lot of rust and fuel gel in the pump well. Pulled the tank, rust everywhere. Need new one and a filler neck as well. |
|
| Back to top |
|
|
tom2turbo
Joined: 16 Jan 2007
Posts: 34
Location: Portland, Oregon
|
| Posted: Thu Jun 28, 2007 4:00 pm Post subject: |
|
|
| I finally found a replacement tank that is clean, and includes the sending unit and pre-pump. All I need is the fuel filler pipe, time, and a helper like my son to install the tank. |
|
| Back to top |
|
|
Scorpio

Joined: 05 Jul 2007
Posts: 1957
Location: Brisbane, Australia
|
| Posted: Sun Aug 19, 2007 8:37 pm Post subject: |
|
|
anyone know where i can find the internal fuel pump rubber washer here in australia?...mine has degraded and leaks..the plumping washer i found at the hardwear store didnt do much better..
_________________
1979 NA
MS1..EFI..
GARRETT T25 TURBO
BILSTEIN SHOCKS
GT BASED CUSTOM BODYKIT
Brisbane , Australia
Think mean think fast
all youll see is
my Porsches Arse!!! |
|
| Back to top |
|
|
|

