| View previous topic :: View next topic |
| Author |
Message |
Peter
Joined: 04 Nov 2002
Posts: 379
Location: New York, NY
|
 Posted: Tue Jul 11, 2006 1:05 pm Post subject: Posted: Tue Jul 11, 2006 1:05 pm Post subject: |
 |
|
Thanks Nick,
I don't plan to do this again until I have a garage to work in. Painting a car outside is a real PITA! |
|
| Back to top |
|
 |
Peter
Joined: 04 Nov 2002
Posts: 379
Location: New York, NY
|
| Posted: Mon Jul 17, 2006 10:07 am Post subject: |
|
|
Just a quick update:
I received my foam and gathered my tools to begin roughing out a scoop for the intercooler. The foam is closed cell urethane foam used in floral arrangements.
http://members.rennlist.com/peter/Foam%20&%20tools.jpg
I used a hot glue gun to glue the blocks together than used a coping saw and rasp to shape the general dimensions of the IC. The mold will be covered with S-Glass, a type of fiberglass readily used for boat and small plane construction, and epoxy resin.

The IC scoop will sit on the IC rather than being mounted on the hood.

While I am waiting for my fiberglass and epoxy resin to arrive, I have nearly completed wet sanding the 931. A tip which speeds up sanding time immensely, but gets you very wet, is to start wet sanding from the first grade of sandpaper you are using. Use a garden hose and let it flow water over the panel you are sanding. The water lubricates the panel and cleans out the sandpaper so you dont have to stop to clean the sandpaper or wash off the panel. Also use a sanding block. I began wet sanding with 180 and progressed up to 600 in less time than the traditional method of dry sanding (which requires you to stop & start while you blow off the paper and panel) and the traditional wet sanding (which requires you to stop & start while you dunk the paper into a bucket of water and wash off the panel). Of course, you get wet, but on 90+ degree days, getting wet with cold water is a perk. The panels feel as smooth as glass and just as straight.  |
|
| Back to top |
|
|
Vince Ponz

Joined: 02 Nov 2002
Posts: 3581
Location: Florida
|
| Posted: Thu Jul 27, 2006 12:16 am Post subject: |
|
|
Peter is a nudist and did it without clothes on. 11 fingers got him to do the work faster.
_________________
"Never let them see you sweat"
77.5 924 modified track car
79 931 Euro stock
88 924S SE
87 911 Targa stock |
|
| Back to top |
|
|
Peter
Joined: 04 Nov 2002
Posts: 379
Location: New York, NY
|
| Posted: Sun Aug 13, 2006 12:04 am Post subject: |
|
|
| Vince Ponz wrote: | | Peter is a nudist and did it without clothes on. 11 fingers got him to do the work faster. |
Very funny Vince!!! 
I have been off the Board for a while and just saw your reply.
Tell you what, 11 "fingers" must have done the trick. I just finished painting my car outdoors and it came out great! It came out so well that a neighbor who I never met before came over and wanted to hire me to paint his car.
I will post some pics of the car & IC progress later.
BTW Vince, you gave away my secret to wet sanding. |
|
| Back to top |
|
|
Vince Ponz
Joined: 02 Nov 2002
Posts: 3581
Location: Florida
|
| Posted: Sun Aug 13, 2006 1:57 am Post subject: |
|
|
I have been using the same system for years. Great for getting under the fenders.
_________________
"Never let them see you sweat"
77.5 924 modified track car
79 931 Euro stock
88 924S SE
87 911 Targa stock |
|
| Back to top |
|
|
Peter
Joined: 04 Nov 2002
Posts: 379
Location: New York, NY
|
| Posted: Tue Aug 15, 2006 1:10 pm Post subject: |
|
|
Quick updates:
Car Painting:
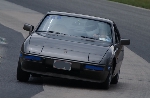
Car has been painted hi-gloss black (base & clear coat system). A pic is attached below of the car a week after painting. I need to wet sand the clear coat. Then I will probably shoot a few more coats of clear, as I have about ¾ of a gallon left and want to use it all up. After that comes wet sanding then buffing and then I am FINALLY finished. As this was my first time painting, I am very happy with the results. One thing I have learned and would like to share with everyone is NEVER paint your car adjacent to a plum tree! All the bugs form the garden landed on the clear coat as I was spraying.
Pic below:
http://members.rennlist.com/peter/931%20Black%20Painted.JPG
Intercooler:
Intercooler has been reinstalled with a partial IC/Bay partition. Pic below:
http://members.rennlist.com/peter/Intercooler%20Reinstalled.JPG
Wiring:
Hot wires have been rerouted along with installation of both primary and secondary disconnect switches (pull cable for corner workers to be installed).
Hot wires are installed in the following manner.
(1) Battery in rear seat.
(2) One-foot length of 2/0 gauge wire from battery to primary disconnect switch. Once this switch is thrown all wires in the car are cold except for the one-foot length.
(3) Bridge cable to starter solenoid.
(4) 2/0 gauge wire from start solenoid running under the car to starter. This wire is hot ONLY during cranking.
Pic of primary disconnect switch mounted under seat covering:
http://members.rennlist.com/peter/Primary%20Disconnect%20Switch.JPG
(5) Wires from Alternator and fuel-pump-lead bundle run from primary disconnect, under car, to secondary disconnect. This secondary disconnect is necessary for corner workers, and are the only hot wires while the car is running.
(6) Leads run from secondary disconnect switch to alternator and fuel-pump-lead bundle.
Pic of secondary disconnect switch mounted on driver side:
http://members.rennlist.com/peter/Secondary%20Disconnect%20Switch.JPG
Gratuitous pick of cockpit:
http://members.rennlist.com/peter/Cock%20pit.JPG
Hood Scoop:
I have also begun glassing my intercooler scoop. I ended up purchasing the vinyl NOT epoxy resin, for the main reason that vinyl resin is good for hi-temp fiberglass work 220+ Fahrenheit; whereas, the epoxy would get soft. Being that the hood scoop will be painted black and sit on top of the hood, vinyl resin is better. Also, I went with the 6 ounce E-glass fabric, which I found to be easy enough to work with around corners. I chose fiberglass fabric instead of fiberglass mat to have greater strength. I will post pics later. |
|
| Back to top |
|
|
Peter
Joined: 04 Nov 2002
Posts: 379
Location: New York, NY
|
| Posted: Mon Aug 21, 2006 4:00 am Post subject: |
|
|
Update Hood Scoop:
Below are pics of my trial run of making my own hood scoop out of fiberglass. I have provided links to the pics to save bandwidth. As a background, I used 6 oz fiberglass cloth and vinyl resin. I used only 1-2 layers of fiberglass for the model, and will use about 4 layers for the actual piece. Even though the scoop is smooth ( combination of proper amount resin and proper thickness cloth) I will apply resin wax to the final coat of resin, which will give the work a smooth waxy covering that is ideal for sanding and painting.
PIC 1:
http://members.rennlist.com/peter/Hood%20Scoop1.JPG
This is a pic of the closed-cell foam core glassed. The green core is pictured in a previous post. I covered the foam with a layer of gray duct tape to ease removal. The difficulty with working with cloth vs. mat is that cloth does not like to be stretched over 90 degree bends.
PIC 2:
http://members.rennlist.com/peter/Hood%20Scoop2.JPG
Same as above except for a different angle. I did manage to stretch the cloth over the arched ends very nicely.
PIC 3:
http://members.rennlist.com/peter/Hood%20Scoop3.JPG
The fiberglass has completely dried in this pic. I then cut with a hack saw the front air opening and the bottom that fits over the intercooler. As you can see, because it is a test piece, I just cut it by eye, resulting in uneven edges.
PIC 4:
http://members.rennlist.com/peter/Hood%20Scoop4.JPG
Here the foam core has been removed. Came out very easy!
PIC 5:
http://members.rennlist.com/peter/Hood%20Scoop5.JPG
Same as above but a look from underneath.
Will post more as I progress. Hopefully this century I will be finished.  |
|
| Back to top |
|
|
flosho

Joined: 01 Jul 2004
Posts: 3160
Location: Eau Claire, Wisconsin
|
| Posted: Mon Aug 21, 2006 10:54 am Post subject: |
|
|
Looks pretty badass!
Any pictures of it mocked up on the car? I'm assuming you're chopping the hood up a bit? Can't wait to see some more updates..
_________________
[This Space For Rent] |
|
| Back to top |
|
|
endwrench

Joined: 07 Dec 2002
Posts: 1631
Location: Victor, Montana
|
| Posted: Mon Aug 21, 2006 12:11 pm Post subject: |
|
|
Extremly cool! I can't wait to see more!
Todd |
|
| Back to top |
|
|
Peter
Joined: 04 Nov 2002
Posts: 379
Location: New York, NY
|
| Posted: Thu Aug 24, 2006 7:57 am Post subject: |
|
|
Thanks Flosho and Endwrench,
I'll post more pics as I progress. |
|
| Back to top |
|
|
Peter
Joined: 04 Nov 2002
Posts: 379
Location: New York, NY
|
| Posted: Sun Oct 22, 2006 7:26 am Post subject: |
|
|
Updates:
Finished the painting process, with car put back together. The bumpers have been pushed in somewhat, along with deletion of the side marker lights. Pics below.


Interestingly, preliminary testing of the IC w/o the hood scoop yet installed showed a 10-15 degree drop in temps. I made several aggressive ½ hour and 1 hour runs with full stock boost and took temperature readings on several points along the intake and IC route. I was surprised to record temperature drops, considering the hood has yet to be cut open and the hood scoop installed. I believe that enough air entered the engine bay to dissipate hot air from the IC.
Below is pic with numbers indicating the locations where I took temperature readings with an infrared thermometer?
After ½ aggressive street driving
1 101.2
2 122.8
3 110.6
4 92.8
5 90.1
After 1 hour aggressive highway driving
1 111.9
2 127.8
3 114.6
4 95.3
5 94.6
Note: the yellow X plate will be removed upon final installation.

I want to thank Vince for getting behind the wheel of my car and making some test runs. I appreciate his input.
I will post an update when the IC is finally installed. |
|
| Back to top |
|
|
JB 924

Joined: 03 Apr 2006
Posts: 606
Location: Hessen, Germany
|
| Posted: Sun Oct 22, 2006 8:16 am Post subject: |
|
|
| That's a beautiful finish on the car. Gives me some hope for my project. It'll also be black with at least 3 clear coats. I'm using Nason, a DuPont brand. I'm not planning on putting a basecoat on until I get my airbrushing down, but I still want to drive it. Is it true that primer will hold all the moisture? Never heard that before. |
|
| Back to top |
|
|
TheFuzz89

Joined: 16 May 2006
Posts: 50
Location: Grand Rapids, MI 49316
|
| Posted: Sun Oct 22, 2006 2:35 pm Post subject: |
|
|
Well done on the body work eliminating those reflectors. I did the same with mine over the summer and repainted the car "Torch Red." It's a GM color but it fits the car really well.
Nice work anyways...

_________________
1977 Porsche 924 |
|
| Back to top |
|
|
JB 924
Joined: 03 Apr 2006
Posts: 606
Location: Hessen, Germany
|
| Posted: Sun Oct 22, 2006 2:46 pm Post subject: |
|
|
| I did the same with my reflectors. How long did it take you guys to sand the rear ones perfectly smooth. Took me forever! kept on getting bumps in it. |
|
| Back to top |
|
|
TheFuzz89
Joined: 16 May 2006
Posts: 50
Location: Grand Rapids, MI 49316
|
| Posted: Sun Oct 22, 2006 10:36 pm Post subject: |
|
|
| JB 924 wrote: | | How long did it take you guys to sand the rear ones perfectly smooth. Took me forever! kept on getting bumps in it. |
^ Probably about a week... sanding and putting down a new layer of body filler each day. Those rear reflectors were definately a lot harder than the front ones, thats for sure.
_________________
1977 Porsche 924 |
|
| Back to top |
|
|
|

